
This post will show you how to run Tails OS as a VM with the Persistence feature enabled.
Running Tails as a VM is not recommended generally as it defeats many of the security features in Tails. For example, virtualization requires that you trust the hypervisor host, as the hypervisor has extra privileges over a VM that can reduce security and privacy of the VM.
I recommend reading Tails’s official documentation about virtualization considerations before continuing: https://tails.boum.org/doc/advanced_topics/virtualization/
However, there may be many great reasons this VM setup would be beneficial to you.
I recommend this setup for tasks that call for extra anonymity. One fun reason to run Tails as a VM with Persistence would be to store and access your crypto wallets. You could also use Tails simply to reduce your digital footprint around the web more generally.
Write Tails Live to a USB Stick
The first step to running Tails on Unraid (with Persistence) is to write the Live OS to a USB stick. You will need a USB stick that can stay attached to your Unraid server anytime you want to access the Tails VM (I leave mine in all the time).
If you simply want to run Tails with no Persistence, you can certainly skip this step.
You can find documentation about writing the OS to a USB stick from Tails’s official site: https://tails.boum.org/install/index.en.html
As an Amazon Associate, I earn from qualifying purchases. Thank you for supporting the maintenance of this blog. Pricing is the same for you whether you use my links or not.
I am using this Sony USB stick from Amazon. I am also using this USB stick for my Unraid OS because it is on the recommended USB stick list by the Unraid developers.
At the time of the writing of the post, I am using Tails 4.26.
Attach the USB Stick to Unraid
Attach the USB stick to Unraid. Open an SSH connection to Unraid or open the Terminal in the Unraid GUI. Run the command below.
ls -lha /dev/disk/by-id/
Copy the full location of your USB stick. It should look similar to the one below. Do not copy the ID that contains “-PART”, etc.
/dev/disk/by-id/usb-_USB_DISK_3.0_xxxxxxxxxxxxxxxxxx-0:0
(Note: If you have two or more USB sticks attached to Unraid, and the chances are that you do given Unraid is supposed to run off of a USB stick, you may need to use deductive reasoning or the brand name to differentiate which USB stick you have. If you have trouble identifying the correct USB stick, you could unplug the Tails USB and run the command again in order to isolate your USB.)
Create the VM
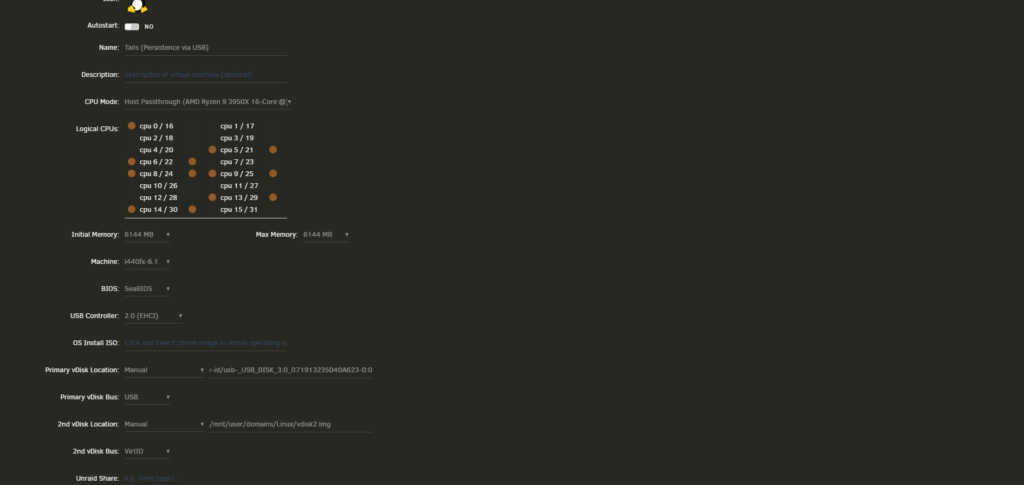
In Unraid’s VM manager, select “ADD VM.” From there, select “Linux.” Select the core distribution and RAM allotment that makes sense for your purposes. For Machine, select “i440fx-6.1.” For Bios, select “SeaBIOS.” For USB Controller, select “2.0 (EHCI).” For Primary vDisk Location, select “Manual” and paste the location of your USB from earlier (e.g., <strong>/dev/disk/by-id/usb-_USB_DISK_3.0_xxxxxxxxxxxxxxxxxx-0:0</strong>). For 2nd vDisk Location, select Auto or define your vDisk as needed (this will be the Persistence storage disk), and select the 2nd vDisk BUS to be “VirtIO”. See the image below.
Finally, select a Network Bridge to use. Bonus points if you route an Unraid Network Bridge through a VLAN tagged subnet routed through a VPN (see an older post here for ideas, especially if you use Unifi).
Save the VM, but do not start it upon saving!
Launch the VM
Back on Unraid’s VM Manager page, click your VM, click Start, and very quickly select VNC Remote as soon as it is available. Once the VM loads, quickly press “Tab” on your keyboard to modify boot options. You will be presented with the following screen.
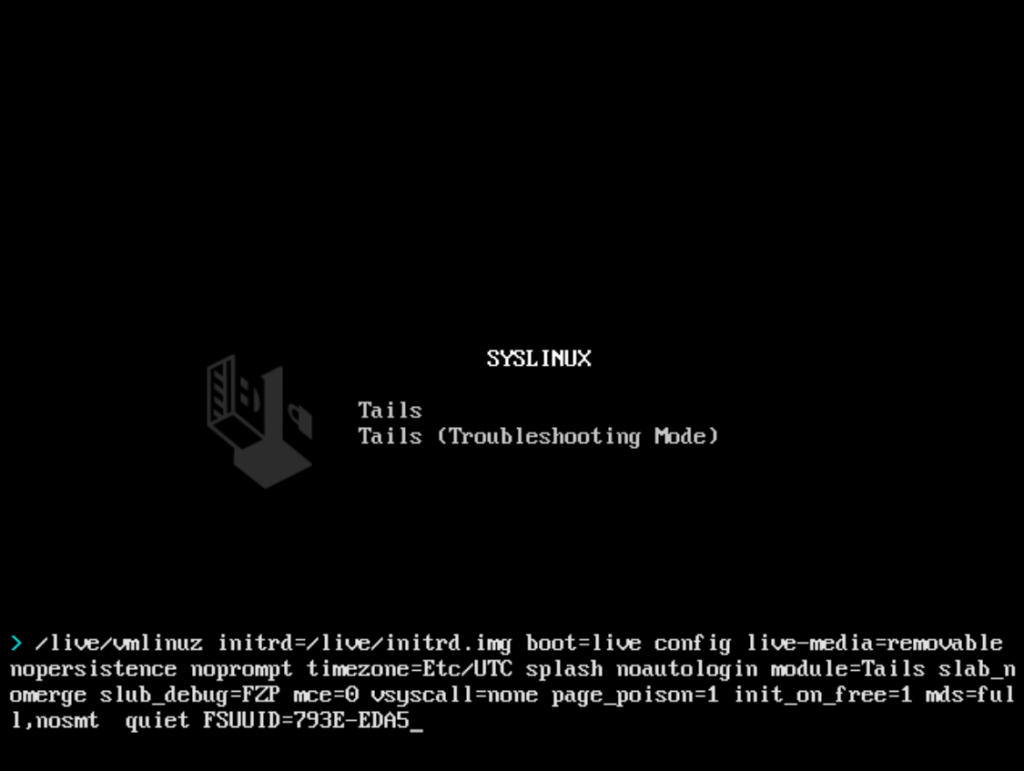
Modify the boot options by using your arrow keys, and use Backspace or Delete to remove the “live-media=removable” and “nopersistence” options. Note: You will need to do this every time you restart the VM. There is probably a way to make this permanent, but I have yet to explore that.
Once finished, click Enter twice, and Tails will begin to boot.
Setup Persistence
When presented with the “Welcome to Tails!” screen, select “Start Tails.” Then, choose “Applications” in the top left, select “Configure persistent volume” and follow the steps presented. The 2nd vDisk you created earlier will likely be pre-selected as mine was.
Follow the steps to set up the volume, make a strong encryption key, and save. Restart Tails. Follow the same procedural steps to launch the VM as above while being sure to remove the boot options specified.
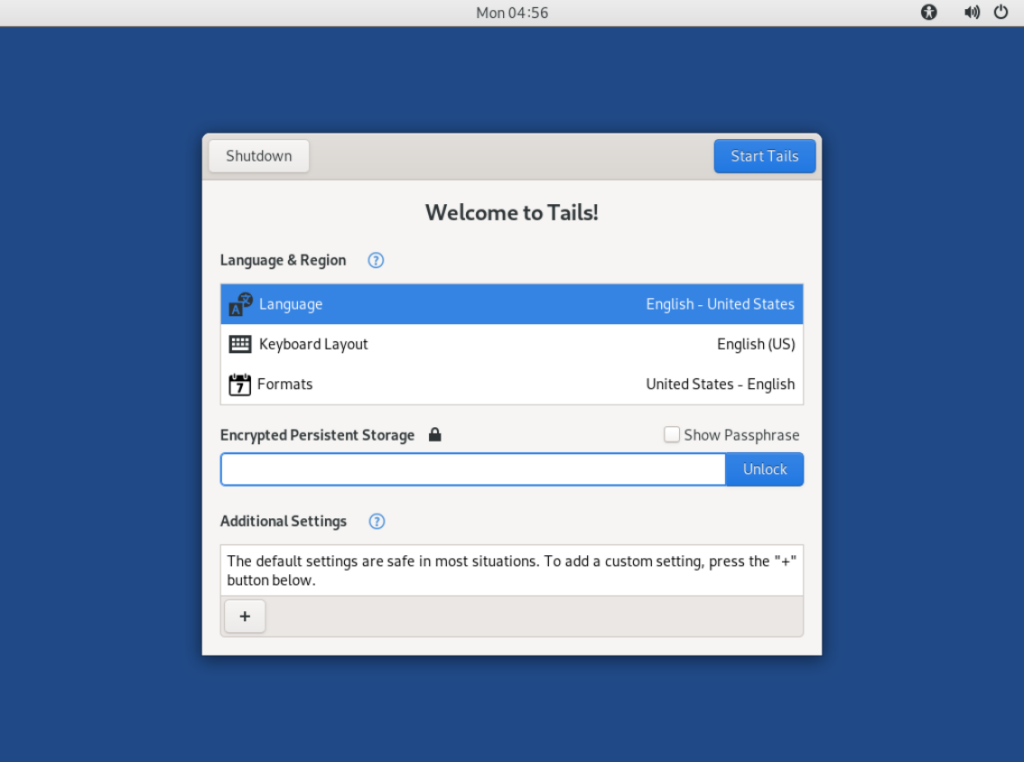
Once Tails has booted again, you will be presented with the same wlecome screen from earlier with the addition of an “Encrypted Persistent Storage” box as shown in the image below. Type in your strong encryption key, and click “Unlock.” From there, you have a fully functioning Tails VM with encrypted Persistent storage on Unraid!
Wrapping Up
Congratulations if you made it this far and everything is working! I hope this tutorial aids you in your endeavors to use Tails as a VM.
As always, if you have any questions, feel free to start a Discussion on GitHub, submit a GitHub PR to recommend changes/fixes in the article, or reach out to me directly at [email protected].
Thanks for reading!
Robert