IoT Overview
The smart world of Internet-of-Things (IoT) devices is ever growing. From everyday lightbulbs to the sprinkler out front, just about every household appliance and utility has a smart-counterpart. For example, my smart home is fully Apple HomeKit compatible and consists of a Hue bridge with lightbulbs, Lutron Caseta smart dimmers/switches, Eve Aqua outdoor water hose control, iSmartGate garage door opener, Schlage deadbolt, Eve motion sensor, Sonos speakers throughout the house, a Vocolinc oil diffuser, Vocolionc power strip, a couple iRobot Roomba vacuum cleaners, some Vocolinc pluggable outlets, an Ecobee thermostat to replace each analog thermostat in the house, and a Unifi G4 Doorbell (the doorbell is not technically compatible with HomeKit, but I added support with a third-party tool known as “Homebridge”). On top of all these smart home devices, I have a handful of other Unifi Protect cameras around my property.
As an Amazon Associate, I earn from qualifying purchases. Thank you for supporting the maintenance of this blog. The pricing will be the same for you regardless if you use my links or not! Thanks for your support!
If you’re reading this, you may not have quite that many devices, but you are probably either looking to invest in some smart home devices or you have already started the process of converting your home to the world of IoT. Either way, it is important to consider the security implications of adding these devices to your network. For example, some smart switches have such poor encryption that they are easily compromised and can be overpowered to catch on fire. While none of the devices in my home have this sort of vulnerability that has been publicized, the possibility exists nonetheless that these devices could be used by nefarious actors to cause ruckus in my home or attempt to gain access to other devices on my network.
IoT devices continue to improve their security mechanisms (mostly), and IoT is certainly not going away anytime soon. Because of this, prudent users, like you, should consider how to best protect their internal resources. One recommended method of securing your network containing IoT devices is to segment your network with VLANs. I will show you how to segment your home network from your IoT devices with VLANs, including how to create subnets, VLANs, firewall rules, and how to enable IPS/IDS for good measure. To follow along, your network will need to be comprised of Unifi networking gear. My gateway and Unifi controller is the Unifi Dream Machine Pro, though you could use any Unifi gateway + controller combination. Additionally, many other network providers besides Unifi will have similar functionality, and you will likely be able to accomplish some of these tasks with other gear.
Check out a community ports list for IoT on GitHub here: https://github.white.fm
Creating VLANs and Segmenting the Network
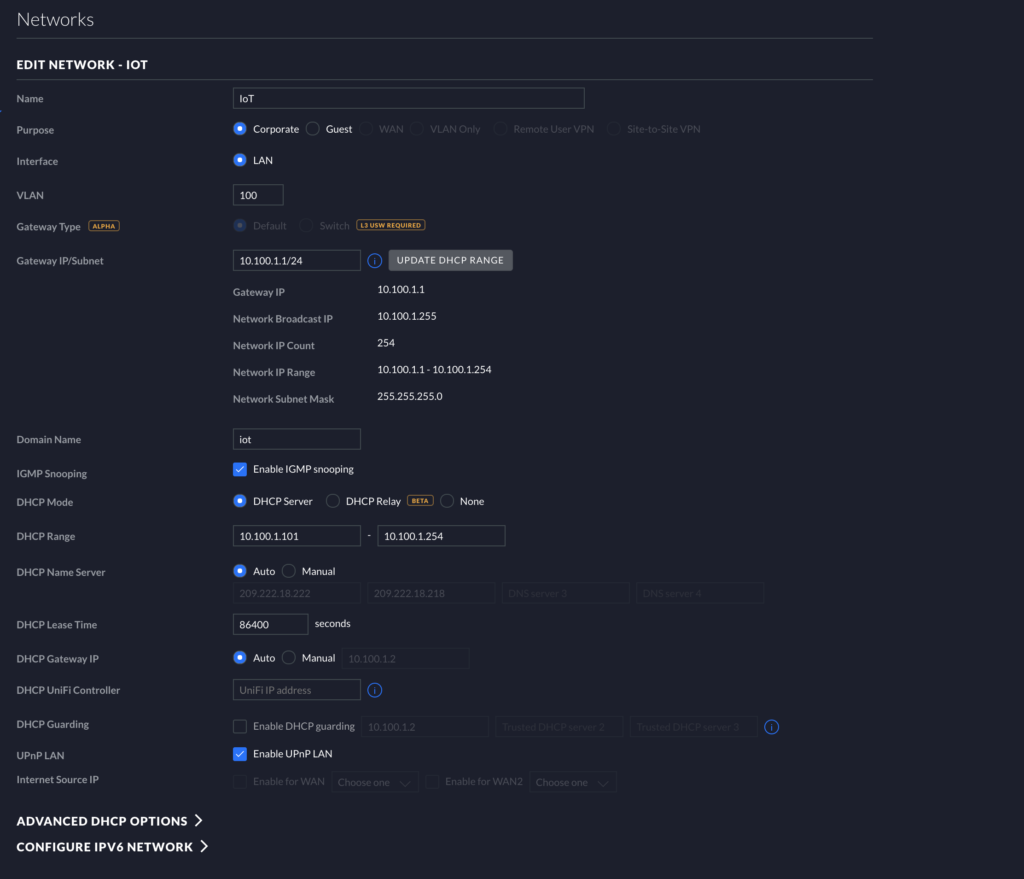
The first step is creating a VLAN for your IoT network. The easiest way to accomplish this task is to create a new subnet for your IoT network. For example, if you currently just have a single network for all of your Internet-connected devices, including your personal computers, phones, etc, you probably have a single subnet that looks something like this: 192.168.1.1/24. This is seen on your Unifi Controller by going to Settings > Networks (on the old GUI). I recommend you next click “Create New Network,” and name the network something like “IoT”. Specifically select “Corporate” for the “Purpose.” It makes it easy to remember if you set the Gateway IP/Subnet 1 number off from your default network (e.g., set it to something like 192.168.2.1/24 or 192.168.10.1/24). Below, you will see my settings. Notice my Gateway is 10.100.1.1. My default subnet is 10.100.0.1, in contrast. For simplicity, I have IGMP snooping and UPNP enabled. This might help down the road for certain smart components like Home Assistant. For VLAN, set any number from 2-4018. I set my DHCP range to only include x.101-x.254 because I wanted to reserve the first 100 IPs in this subnet for static addressing. If you want all your devices to be DHCP, you do not need to modify this option. Go ahead and save this network.
Preparing the Wireless
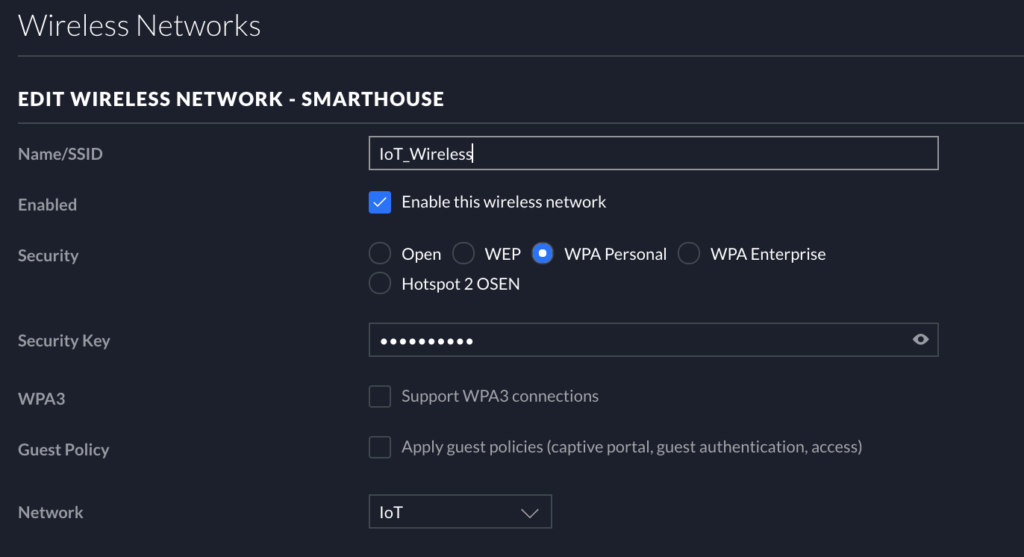
Since most IoT devices are wireless, you will need to create a wireless SSID for all of your IoT devices to connect to separately from the rest of your home network. Go to Settings -> Wireless Networks, and click “Create New Wireless Network.” Name the SSID something memorable, and set the security to “WPA Personal” (old GUI…the new GUI may allow you to specifically choose WPA2, in which case, do that). For “Network,” choose the subnet/VLAN you made in the previous step. This will associate the new SSID to that particular network segment.
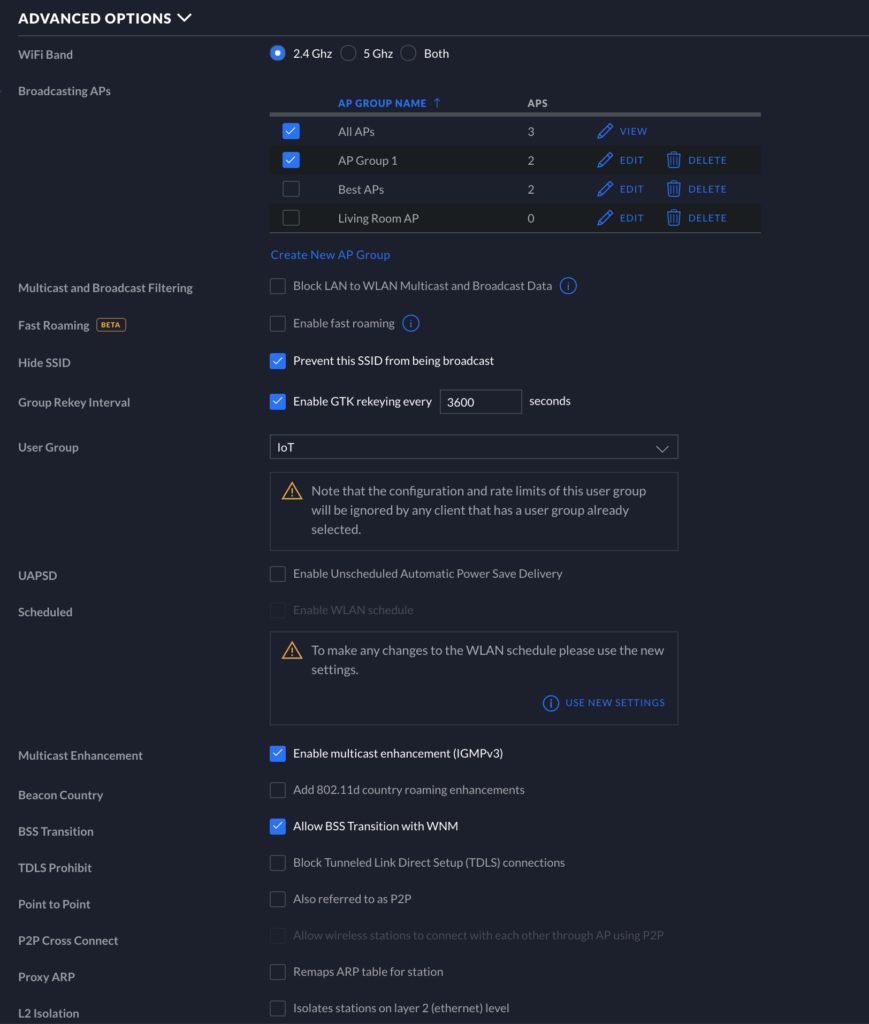
Continue through the setup screen to “Advanced Options.” Here, I specifically have ONLY 2.4GHz enabled for WiFi Bands because most IoT devices still only use 2.4GHz. If you happen to have some 5GHz IoT devices, the slightly better performance for those devices will likely be overshadowed by the constant disconnecting of your devices when both 2.4GHz and 5GHz are enabled simultaneously. IoT devices in general do a pretty bad job of handling Unifi APs with both bands enabled. Feel free to try enabling both bands in your environment, but if you have lots of issues with connectivity and the infamous “No Response” message on Apple HomeKit, I recommend again to stick with just 2.4GHz for now. Disable all of Unifi’s “BETA” tagged options like Fast Roaming, as these will also cause performance and connectivity issues. I also prevent my SSID from being broadcast to clean up the WiFi experience for users at home. It is a lot nicer to only see my LAN and my guest networks being broadcast. This will, however, force an extra step when you try to add devices to HomeKit, as you will need to connect your phone to the IoT WiFi before adding the IoT devices to that network. Manually adding the SSID can be tedious, but it is well worth it in my opinion once the overall setup is complete. I leave GTK rekeying to 3600 seconds. I also have a User Group setup for IoT devices in case I want to throttle IoT in the future. Check to Enable multicast enhancement (IGMPv3). Leave everything else as is, and you’re finished with the Wireless setup.
Blocking Traffic Between Subnets/VLANs
The next part of this process will be setting up the Firewall to block traffic between the subnets/VLANs. Go to Settings > Routing & Firewall > Firewall. I will assume you are only using IPv4, and we will therefore only look at IPv4 rules. For a detailed definition of the WAN IN, WAN OUT, WAN LOCAL, etc. options, I will recommend you search the Internet. This part can be pretty confusing, and the definition of these options is outside the scope of this post. We will focus on LAN IN and LAN LOCAL for our purposes.
LAN IN
This portion can get complicated depending on how specific you want to be with allowances of devices between these network segments. I have a lot of different home automation programs running like HomeBridge and Home Assistant. I also have Sonos speakers, which need their own rules to function properly with your iPhone on a different subnet. If you have some IoT devices (no Sonos) without any external programs like HomeBridge, the only rules you will need to concern yourself with are 2003 and 2012.
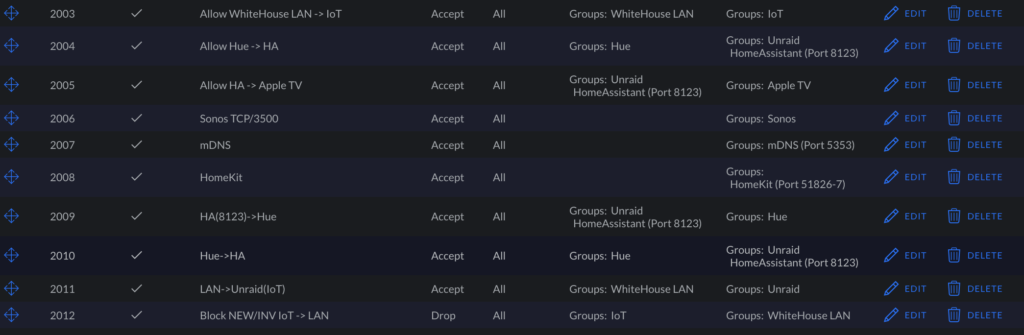
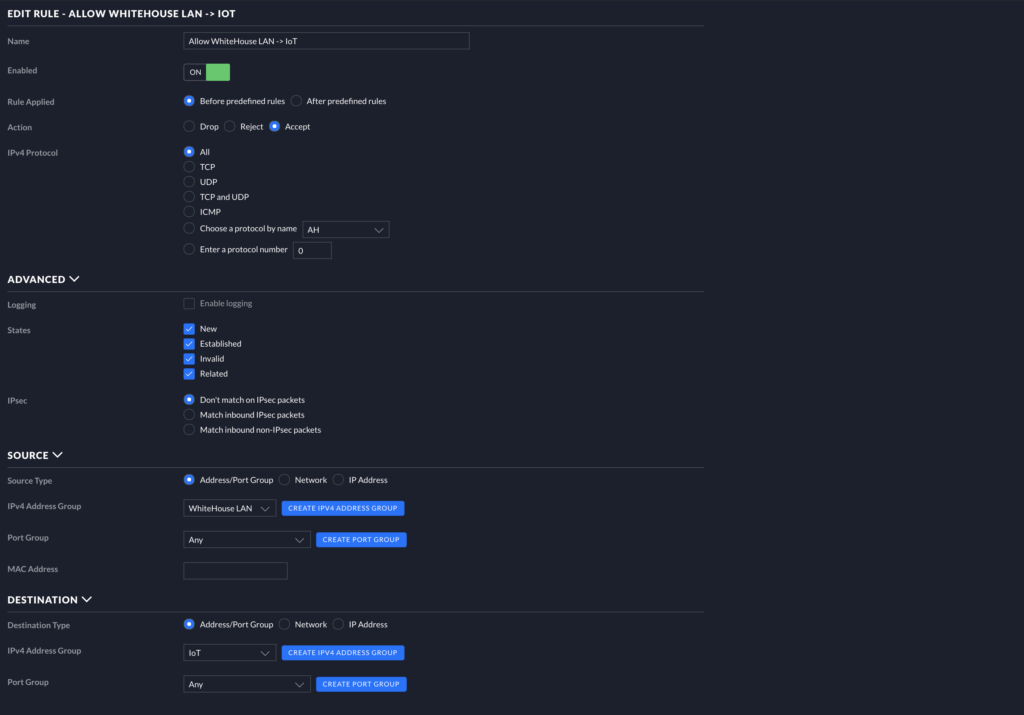
Let’s look at the mentioned Rule 2003. Go ahead and create a rule in the LAN IN section. In the image below, you can see my settings for this rule. Essentially, this rule allows your devices in your default network to communicate with your IoT devices only (traffic flow LAN -> IoT). Match your settings to the settings below. Be sure Action is set to Accept.
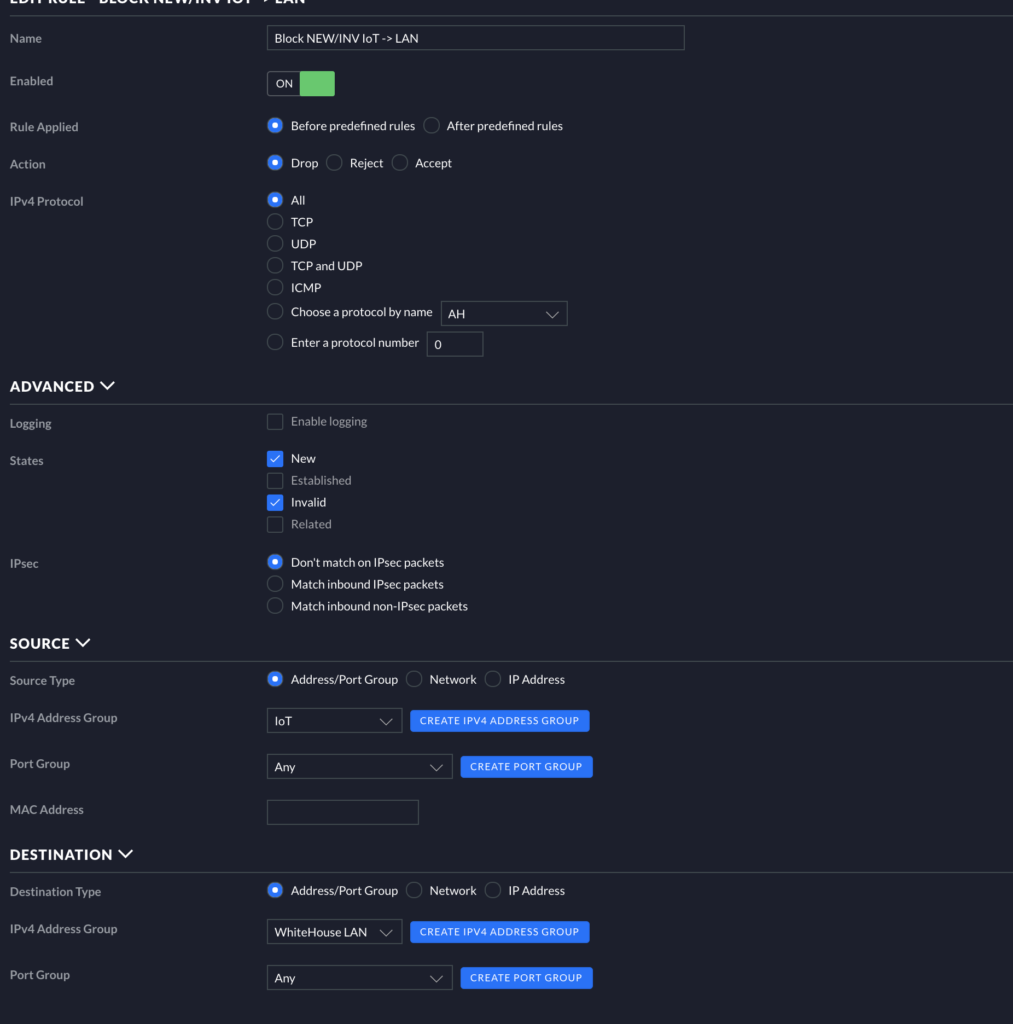
Next, let’s check out Rule 2012. Create a new rule and match to the image below. Note that Action Is set to Drop. Also, note the States that are checked are New and Invalid. This prevents traffic from flowing from the Source (IoT) to Destination (LAN) (traffic flow IoT ->X LAN) based on the status of the traffic. Only established and related traffic will be allowed, then.
LAN LOCAL
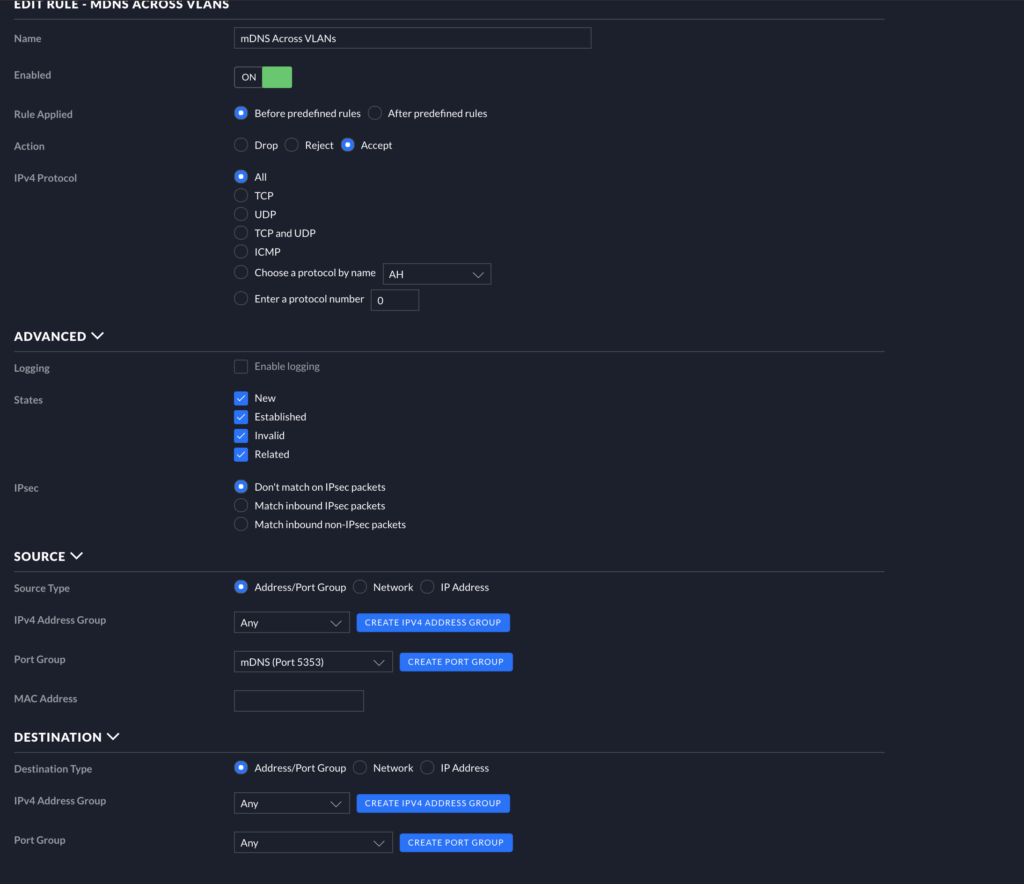
Next, let’s check LAN LOCAL rules These rule is concerned with allowing multicast DNS (mDNS) traffic and with allowing HomeKit-specific ports to receive data as needed.
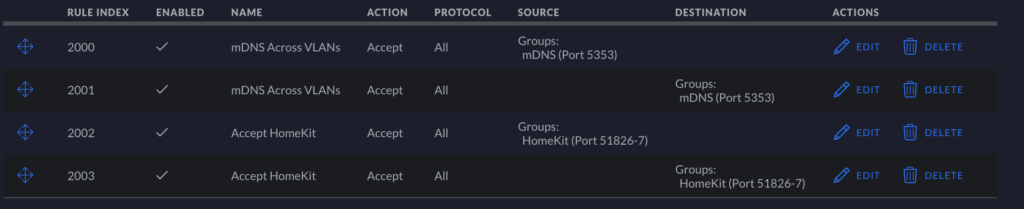
mDNS For mDSN, we are only concerned with a single port: 5353. You will need two allow rules for mDNS: 1) source=ANY:5353 -> destination=ANY:ANY, and 2) source=ANY:ANY -> destination=ANY:5353. See an example of the first rule in the image below.
HomeKit I have a Port Group with ports 51826 and 51827 for HomeKit. Make your own rules and match your settings to the image below. All you will need to do is change your source/destination like in the image below (Rules 2000-2003) to allow HomeKit communications. You can more finely tune this particular rule by granularly allowing different source/destination combos (e.g., source: IoT, destination: home), but I am currently simply allowing any source/destination combo to communicate over HomeKit ports.
In summary, one rule will allow ANY:5353 -> ANY:ANY, one will allow ANY:ANY -> ANY:5353, one will allow ANY:51826-7 -> ANY:ANY, and finally one will allow ANY:ANY -> ANY:51826-7. Make and save your rules!
Wrapping Up
There you have it! You now have a fully-functional HomeKit setup enabled with extra security practices to prevent mischief from poorly-secured IoT devices reaching your internal LAN. It is clear this does not mitigate 100% of the risk since we’re allowing traffic to flow in opposite direction. You can lock your subnets down even more by experimenting with fully blocking your traffic from your LAN to your IoT network but ONLY allowing instead your HomeKit controller (e.g., Apple TV, Homepod, etc.). These rules can and probably should be tweaked to fit your environment, but the rules described above will at least get you started.
As always, if you have any questions, feel free to start a Discussion on GitHub, submit a GitHub PR to recommend changes/fixes in the article, or reach out to me directly at [email protected].
Thanks for reading!
Robert