Overview
The purpose of this post is to provide some tips to address some network security concerns when hosting an externally-facing web server from a device within your home network. For this post, I will be using Unifi networking gear. My screenshots will be of the Unifi controller on my Unifi Dream Machine Pro (UDMP), but I will do my best to overview the concepts so you can replicate with your own networking gear. Let’s get started!
As an Amazon Associate, I earn from qualifying purchases. Thank you for supporting the maintenance of this blog. The pricing will be the same for you regardless if you use my links or not! Thanks for your support!
Strong Passwords/Encryption Keys
Here is your obligatory “strong password” spiel. Be sure, during the setup and maintenance of any services, OSs, logins, databases, etc., that you use complex and variable passwords and encryption keys where possible. Utilizing a password manager (I recommend 1password.com) can help you in this endeavor by allowing you to easily generate and securely store complex passwords/encryption keys. This step alone will help mitigate security concerns overall even if a hacker were able to compromise your network security mechanisms. If it takes a hacker one-million years to brute-force the encryption key for your WordPress database, gaining access to the network in which the database rests approaches pointless. This idea is true regarding your OS root user(s) passwords, GUI application logins/passwords, databases encryption keys, and anything that is secured with a password or encryption key. The concept here is to do your best to prevent hackers from gaining access to your network in the first place (I will show you some tools at your disposal if you use Unifi networking gear in this post), but if they somehow manage to succeed gaining access, have your resources utilizing passwords/encryption keys locked as much as possible with long, complex, non-reused strings.
Build and Configure an Isolated “DMZ”-like Network
DMZ stands for “de-militarized zone.” DMZs in practice are relatively antiquated in today’s networking world, as the concept behind a DMZ is to clump a bunch of relatively insecure servers/resources together and hope a hacker is unable to pivot to your internal network. You will still hear the terminology, especially if you explore technical certifications like CompTIA’s Security+. The concept behind what we will do is relatively similar to the DMZ. We will setup VLANs and firewall rules on our router to prevent any traffic from coming from the “DMZ” network to the internal network(s). From this point forward, I will refer to the subnet we will create containing the WebHost as the “DMZ network,” and all other subnets will be referred to as “internal networks.”
Note: If you are following along with my images, you will need to ensure you are on the old settings page. To disable the new interface, go to Settings > System Settings and locate the “New User Interface” check box. Uncheck and click “Deactivate” on the popup to go back to the old settings for now. I will try to update this post in the future with the new interface.
To get started, in Unifi, go to Settings > Networks, and add a Corporate Lan and name it whatever–I named mine DMZ. For other networking gear, you will want to create a subnet or isolated iteration of a LAN or VLAN, but it helps if you are able to make a new subnet. On my Corporate LAN on Unifi, I assigned VLAN 777 to this subnet.

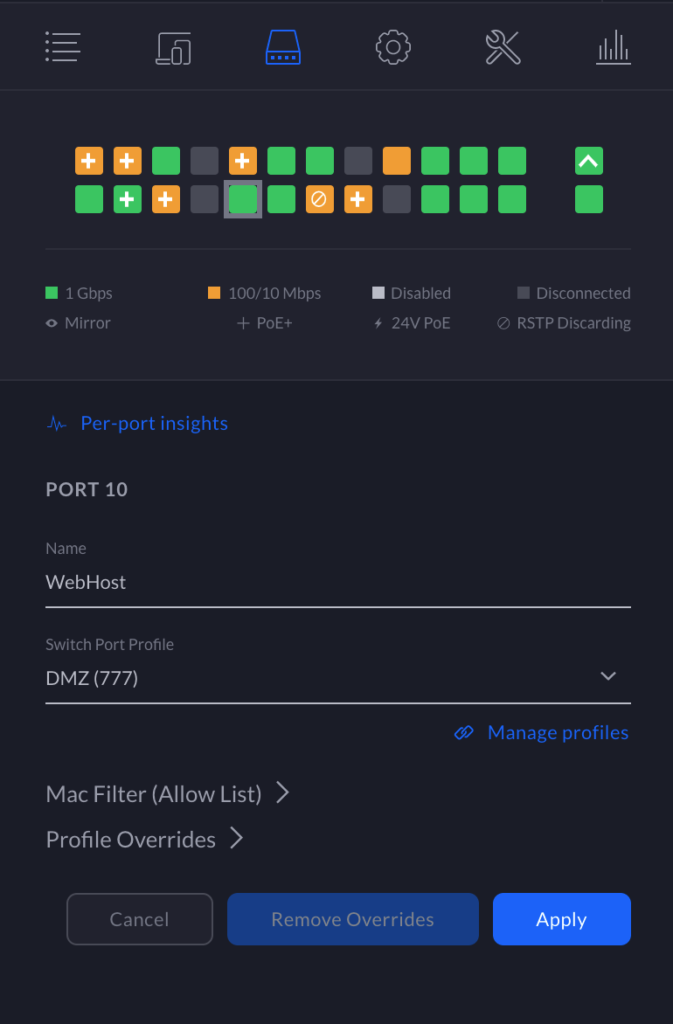
Now, we can assign any device to this network. Below is a screenshot of the port assignment for my webhost. You can assign any physical port on your Unifi switches to this particular subnet. Other networking devices will probably have similar setups or allowances. If your particular networking equipment does not, perhaps it is time to consider switching to Unifi!
Setting Firewall Rules
Next, go to Settings > Routing & Firewall > Firewall. From here, we want to select LAN IN. Click “Create New Rule.” I recommend naming your rules something descriptive and helpful (e.g., Block DMZ -> IoT). You will want to make sure the rule is Enabled and “Before predefined rules” is selected for the Rule Applied option. Check “Drop” as the Action, and choose “All” for the IPv4 Protocol selection. Now, under Advanced, select all available states (i.e., New, Established, Invalid, Related). Leave the IPsec option as is. Finally, we will change the Source and Destination to match our intended subnets. Under Source, choose “Network” for “Source Type” and select your DMZ network. Similarly, for Destination, choose “Network” for “Source Type” and select your internal network (in the image below, I chose my IoT network). This will drop all IPv4 traffic in any state from your DMZ network destined for your internal network. Be aware that this will cause trouble if you need to access your WebHost for some reason from your internal networks. This will break SSH, RDP, etc. See below if you need to setup certain protocol access to your WebHost.
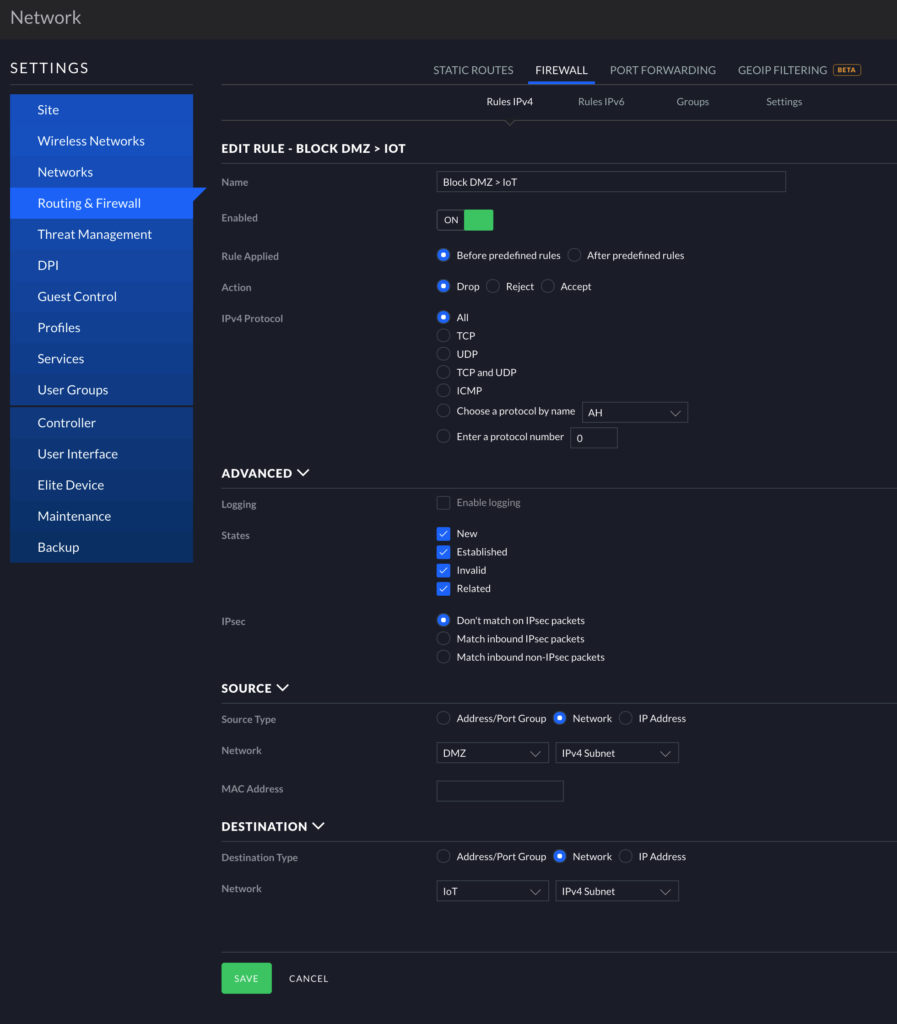
If you have multiple internal networks defined as Corporate LANs in Unifi, you will need to recreate the above rules for each network. In the image below, you can see I set up this same rule for my IoT and Protect networks.

Allowing Specific Traffic From DMZ to Internal Network
Any adjustments made at this point will lead to unnecessary security concerns. I highly recommend avoiding making these adjustments unless absolutely necessary. Before making the changes, ask yourself if there is any possible other way to achieve your goal–protect your internal resources as much as possible.
Adding Firewall Rules
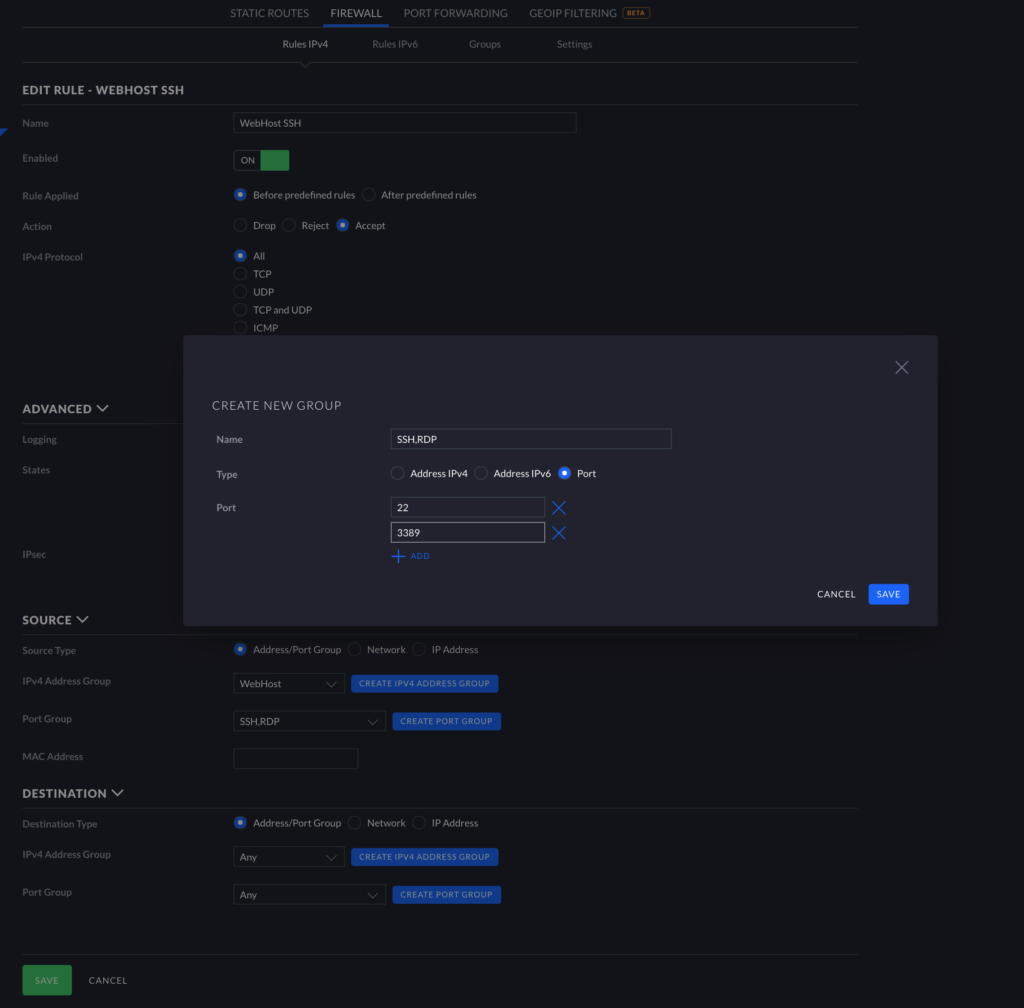
The image below shows how your configuration might look if you need certain protocols open between your WebHost and your internal network. Notice the changes from our previous rules: Action = Accept, Invalid = Unchecked, Source = Address/Port Group.
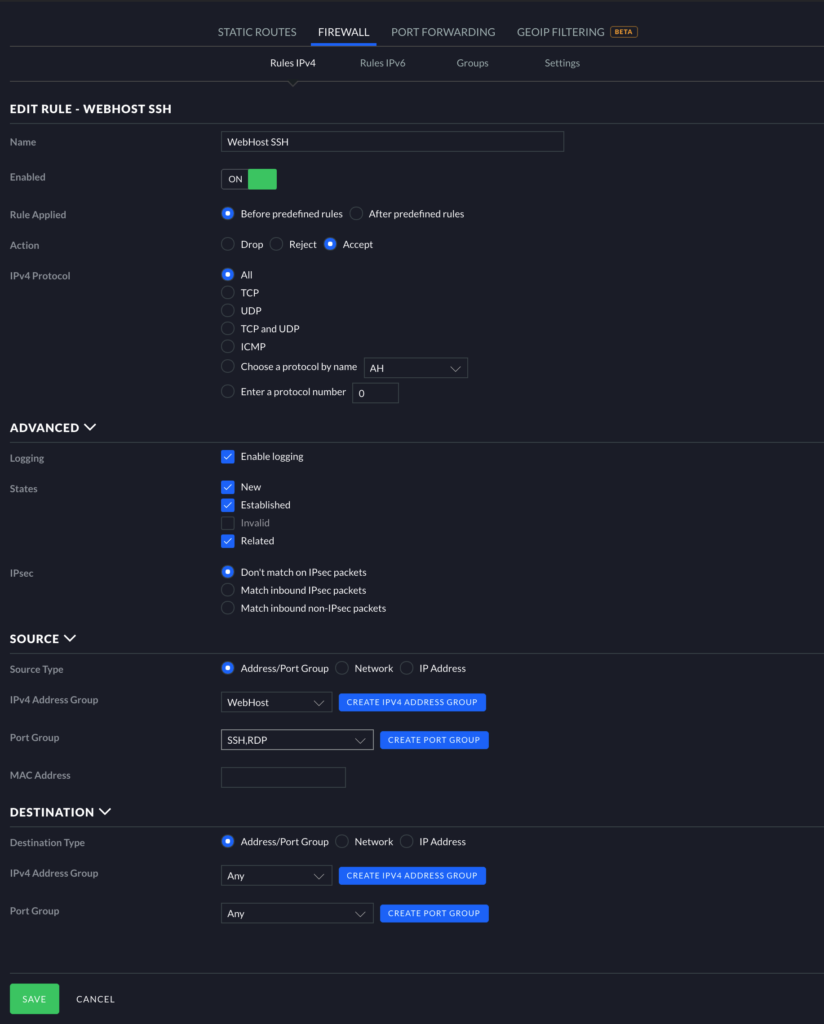
Concerning Source specifically, I highly recommend specifying which WebHost will need this access. For example, if you have multiple WebHosts, and you would like your WordPress WebHost to be accessible via SSH, choose “Create IPv4 Address Group.” Input a descriptive name (e.g., WebHost), and add the static IP of the WebHost under “Address” (e.g., 10.99.100.77).
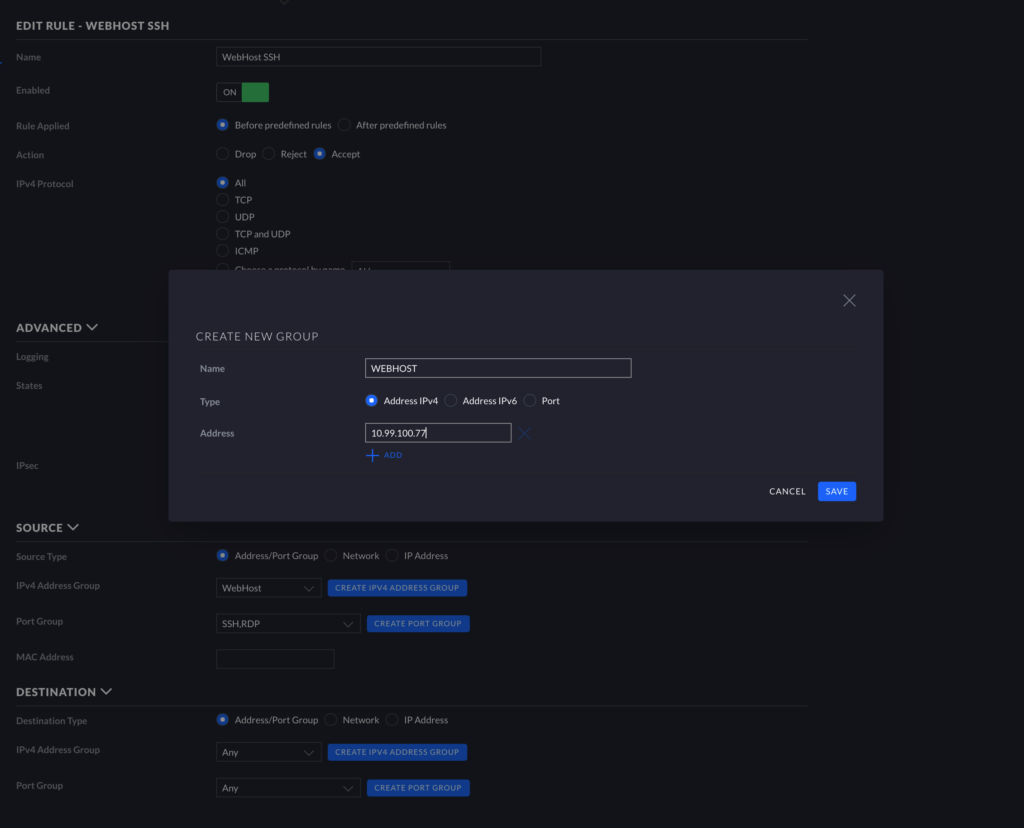
Note: Your WebHost really should have a static address in general, so if you do not currently have it configured that way, go back and give the WebHost a static address before proceeding.
Finally, continuing under Source, select “Create Port Group.” Here, add the ports which you would like to be able to access from your internal network. Below, you can see I added SSH (port 22) and RDP (port 3389). Click “Save.” Under Destination, you can either specify which networks/specific devices need this access or allow any of your internal networks to access these ports by leaving “Any” selected in both boxes.
Enable IPS/IDS
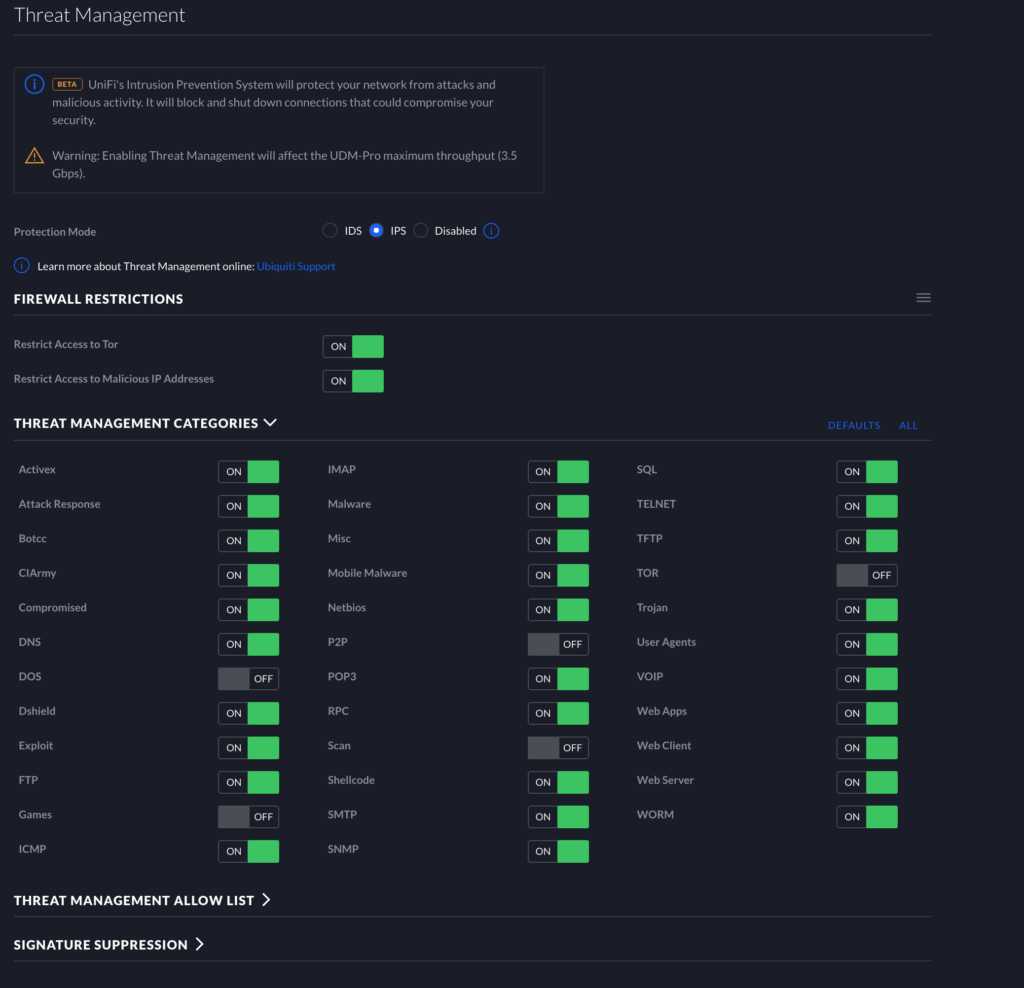
The Unifi Dream Machine Pro comes with some excellent security features. The feature we will look at next is IPS/IDS located under Settings > Threat Management (old GUI) or Settings > Security > Internet Threat Management (new GUI). IPS stands for Intrusion Prevention System while IDS stands for Intrusion Detection System. The best way to think about these concepts is to think about IPS as an “active” system while IDS is a “passive” system. IDS pays attention to all of your traffic and logs/alerts you if something nefarious/abnormal is detected. IPS on the other hand pays attention to all of your traffic and actively prevents/blocks traffic it detects as nefarious/abnormal based on the rules you give it.
IPS may be the single best security measure you have at your disposal with the UDMP to protect your network while WebHosting at home.
If you do not use Unifi, you may be able to get hardware or software that provides this service, but I am not knowledgeable about current consumer/prosumer-priced alternatives.
In your Settings > Threat Management page, I recommend choosing IPS for your Protection Mode. If you are not using a Unifi Dream Machine Pro, this may negatively impact your overall download speed. Before you enable IPS, your device will tell you what your maximum throughput will be with IPS enabled. The Unifi Dream Machine Pro is good to use IPS up to 3.5Gbps of throughput. Below you can see the way I currently have the IPS rules configured. The rules are similar in both version of the GUI (new and old). This image is from the old GUI, but you should easily be able to mix+match on the new GUI too.
Wrapping Up
Network security is an important topic to discuss in general, but the benefits of taking security seriously when WebHosting on a device at home cannot be overstated.
I implore you to consider implementing the above outlined security measures regardless of your WebHosting status, but it should really not even be an option if you do indeed have a WebHost. Go ahead and get your isolated network prepared and enable IPS on your Unifi Dream Machine Pro or other Unifi Gateway device.
As always, if you have any questions, feel free to start a Discussion on GitHub, submit a GitHub PR to recommend changes/fixes in the article, or reach out to me directly at [email protected].
Thanks for reading!
Robert