Today’s post will cover how you can route any Docker container through a VPN.
There are many reasons you might want to route a Docker container through a VPN. Some common considerations are privacy, anonymity, and security.
I always recommend a VPN provider that values privacy, and in your search, you should consider providers that do not keep access logs that can be tied back to you (I use Private Internet Access [PIA]).
There are many use-cases for this sort of functionality that do not entail breaking laws or piracy. I also DO NOT advocate for your use of these techniques for such purposes.
For example, one might be interested in anonymously accessing Twitter feeds in one container routed through a VPN, pulling those feeds into an RSS reader container, and anonymously hosting your own Twitter, anonymously.
Obtain VPN Container
The first thing you will need to do is obtain a container on Unraid that can host your VPN client. For example, I use binhex/arch-privoxyvpn and highly recommend it. However, there are viable alternatives like NordVPN. You might want to do some research and see which best meets your needs. But, for PIA, binhex/arch-privoxyvpn is the best.

Create Docker Network for VPN
Next, you will need to use the Terminal on Unraid to issue a command that specifically creates a Docker network that will use the VPN to route traffic through. Using Binhex’s PrivoxyVPN (where the container is named “privoxyvpn”), my command looks like this:
docker network create container:privoxyvpn
Route Containers Through the New Network
The next step is to route your containers through the new network you just created. To do this, go to the settings page of the container you would like to route and edit the “Network Type” on the container. Here, choose the new network you just created (e.g., privoxyvpn) (see image below).

Then, you need to take note of and delete all port mappings on the container you just routed. Port mappings will either render the container useless or render the VPN useless. Delete the mappings and keep them for reference in the next step (for example, if you use the container “Nitter,” you would take note of and delete the port mapping to 8080).
After the port mappings are deleted, all ports to your container will be routed through your VPN container.
Adding GUI Ports to VPN Container
Finally, in order to access your containers that are routed through the VPN, you must tell the VPN container what ports can be used for access.
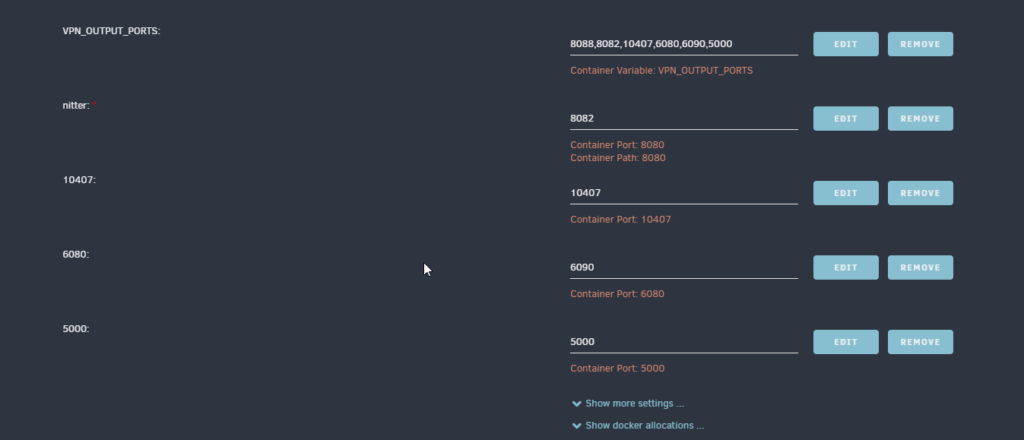
To do this, go to your VPN container’s settings. In settings, add your ports to the VPN_OUTPUT_PORTS option (this may be different if you are not using Privoxyvpn). Then, map each port directly to the container by selecting “Add another Path, Port, Variable, Label or Device” at the bottom container’s settings page. Change “Config Type” to “Port”. Next, add the original port from your container under the “Container Port:” option. Then, add the port you would like mapped to the container to access that port under “Host Port:”. For example, if you want to access Nitter’s port 8080 on 8082, “Container Port:” will be 8080 and “Host Port:” will be 8082. Otherwise, you can make these two ports match for ease of setup. See the image below for an example.

Conclusion
Once your container settings are saved, you will be able to access the GUI of your container, but the container traffic will be routed through your VPN! This will provide extra security, privacy, and anonymity for your data.
Congratulations if you made it this far and everything is working! I hope this tutorial aids you in your endeavors to anonymize certain portions of your network.
As always, if you have any questions, feel free to start a Discussion on GitHub, submit a GitHub PR to recommend changes/fixes in the article, or reach out to me directly at [email protected].
Thanks for reading!
Robert
