
Introduction
OSSIM is a powerful open source security information and event management (SIEM) operating system. AlienVault OSSIM is the open source version of AlienVault, which is sold by AT&T.
I have used OSSIM in professional deployments in the past, and I currently use OSSIM for vulnerability scanning, asset management, and security alerts. OSSIM can often be overly complicated to set up and install, and the documentation available for troubleshooting is sparse. I have learned a lot of great tricks over the years by trial and error.
One of the most interesting things about OSSIM is that it is relatively Windows-centric, even though it is built on Debian. Because of this, it can be challenging and involved to successfully deploy the host intrusion detection system (HIDS) on Linux endpoints.
This post will teach you how to install the OSSEC HIDS required for an OSSIM deployment and how to add the required config to send Linux syslog to OSSIM. If your Linux distro is not supported on the OSSEC site, I will also show you how to quickly compile the HIDS agent and how to navigate the CLI for a successful configuration.
Adding an Agent to OSSIM
This post will assume you have successfully installed OSSIM as a VM or baremetal and can access the web interface. If you have not yet made it this far, I recommend checking out AT&T’s official documentation. I also made a post a while back on how to install OSSIM as a VM on Unraid if Unraid is more your speed.
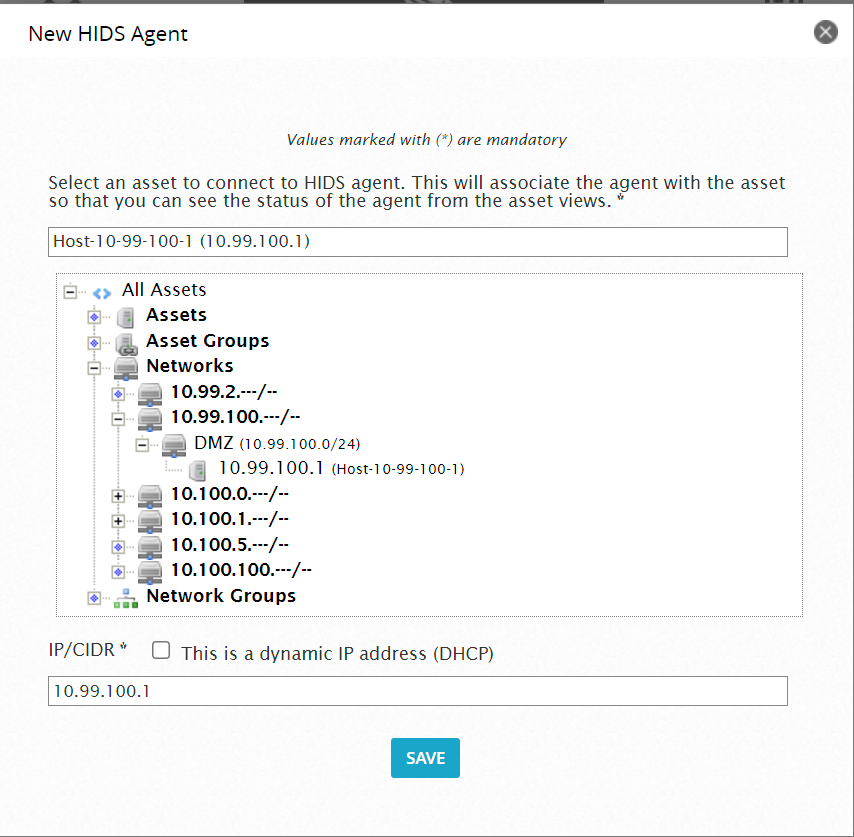
First, go to your OSSIM web interface. Go to ENIORONMENT > DETECTION > AGENTS and select ADD AGENT. Under the “All Assets” section, find your Linux endpoint (hint: this requires that you have added assets to OSSIM either manually or by an asset scan). Select your endpoint and the IP/CIDR box should populate with the endpoint’s IP. Click SAVE. See the screenshot below:
Note: If your endpoint is not set to a static IP address, I highly recommend doing so if possible. While HIDS ultimately should work if you check the “This is a dynamic IP address (DHCP)” checkbox, static addresses work most reliably and have caused me the least amount of headache.
Once saved, you should see an endpoint in the list like shown below in the image. In my image, the status is already “Active,” which is how your endpoint will be once we get to the end of this tutorial.

Remember where we are here, as you will need to extract the Baase64 encoded key (i.e., clicking the key icon next to your endpoint) for that endpoint to paste into your Linux OS later.
Installing OSSEC HIDS
Fortunately, the install process has become much easier and can be handled on most Linux distros without much trouble. From the OSSEC.net downloads, we can see that all supported Linux distros can add the source with the same wget command. Below, the required wget command will be followed by the required package manager commands to install the agent. Notice that Ubuntu and Debian are the same, and Centos/RedHat, Fedora, and Amazon Linux are the same. Also note that configuring all Linux distros will be the same.
Ubuntu & Debian
For Ubuntu and Debian, run the following to install the agent:
wget -q -O - https://updates.atomicorp.com/installers/atomic | sudo bash

sudo apt update && sudo apt install ossec-hids-agent
Centos/RedHat, Fedora, & Amazon Linux
For Centos/RedHat, Fedora, & Amazon Linux, run the following to install the agent:
wget -q -O - https://updates.atomicorp.com/installers/atomic | sudo bash

sudo yum install ossec-hids-agent
From Source
Another option to install is compiling from source. I have only tried this option on Ubuntu and two Raspberry Pis. Your mileage may vary, and you will need to install the
# Install build tools with APT - works on Distros with APT
sudo apt install build-essential libevent-dev libpcre2-dev libz-dev libssl-dev
The next set of steps is the actual install part.
wget https://github.com/ossec/ossec-hids/archive/3.6.0.tar.gz /tmp/3.6.0.tar.gz
sudo tar xzf /tmp/3.6.0.tar.gz
cd /tmp/ossec-hids-3.6.0/
sudo ./install.sh
After running the last script, there will be a handful of questions that are mostly straightforward. Below, I will show my responses related to the numbered steps on the script.
# (en/br/cn/de/el/es/fr/hu/it/jp/nl/pl/ru/sr/tr) [en]:
en OR leave blank
# 1- What kind of installation do you want (server, agent, local, hybrid or help)?
a OR agent
# 2- Setting up the installation environment. - Choose where to install the OSSEC HIDS [/var/ossec]:
leave blank
# 3- Configuring the OSSEC HIDS. 3.1 - What's the IP Address or hostname of the OSSEC HIDS server?:
YOUR OSSIM SERVER IP (e.g., 172.16.7.100)
# 3.2- Do you want to run the integrity check daemon? (y/n) [y]:
y OR blank
# 3.3- Do you want to run the rootkit detection engine? (y/n) [y]:
y OR blank
# 3.4 - Do you want to enable active response? (y/n) [y]: y
y OR blank
Once the script is finished, assuming you do not hit any interesting errors, the HIDS agent should be installed on youyr endpoint. Troubleshooting this process is a bit out of the scope of the post, but I have had general success with it. Feel free to start a Discussion on GitHub to chat more about this process if you hit any errors.
Configuring OSSEC HIDS
Configuring OSSEC HIDS should be the same regardless of the Linux distro, as mentioned above. All of my screenshots will be from SSH connections to Ubuntu endpoints using RoyalTS.
Editing OSSEC.conf
First, we need to edit the ossec.conf, which is a XML configuration file generated during the install. Using your favorite text editor on your Linux endpoint, edit /var/ossec/etc/ossec.conf. (Replace nano with your text editor in the command below)
sudo nano /var/ossec/etc/ossec.conf
There should be a client section at the very beginning of the XML file. Replace the
#example
  <client>
    <server-ip>172.16.7.100</server-ip>
  </client>
In the same file, add a new localfile node under the ossec_config node. There will be many other localfile nodes, and I recommend placing the new node near the bottom for easy access later in case you need it for some reason. Here’s the code:
 <localfile>
   <log_format>syslog</log_format>
   <location>/var/log/vault.log</location>
 </localfile>
Save and close the file (CTRL+X while using nano).
Connect Endpoint to OSSIM Server
After configuring the agent, we can add the endpoint to the OSSIM server. Return to the web interface for OSSIM and return to the where you added the endpoint earlier. Click the Extract Key icon associated with your endpoint. Copy the key, and be sure to copy all characters associated with the key (e.g., sometimes there are two “=” at the end of the key…you need them too"), and DO NOT accidentally copy extra spaces.
Now, on the endpoint, run the following:
sudo /var/ossec/bin/manage_agents
Follow the instructions to import a key. First, type “I”" to import. Next, paste the key you copied from your server. Confirm with “y”. Finally, press “Enter”, followed by “Q” to quit. These steps should look like the following:
To finish the configuration, run the following:
sudo /var/ossec/bin/ossec-control restart
You have successfully configured the endpoint.
Wrapping Up
Congratulations if you made it this far! After a few minutes, your endpoint will connect to your server and will reflect this new connection on the web interface. Your state will then turn to “Active” like my screenshot at the beginning. You will also be able to see events showing on the dashboard and in the event logs.
OSSIM is extremely powerful and can be complicated to use. If you are not already familiar with OSSIM, I recommend doing some intense Google searching about SIEM tools in general and specifically about configuration recommendations for OSSIM. It may be a little overkill for your Home Lab, but it is a valuable tool to be comfortable with for any security practitioner.
As always, if you have any questions, feel free to start a Discussion on GitHub, submit a GitHub PR to recommend changes/fixes in the article, or reach out to me directly at [email protected].
Thanks for reading!
Robert