Introduction
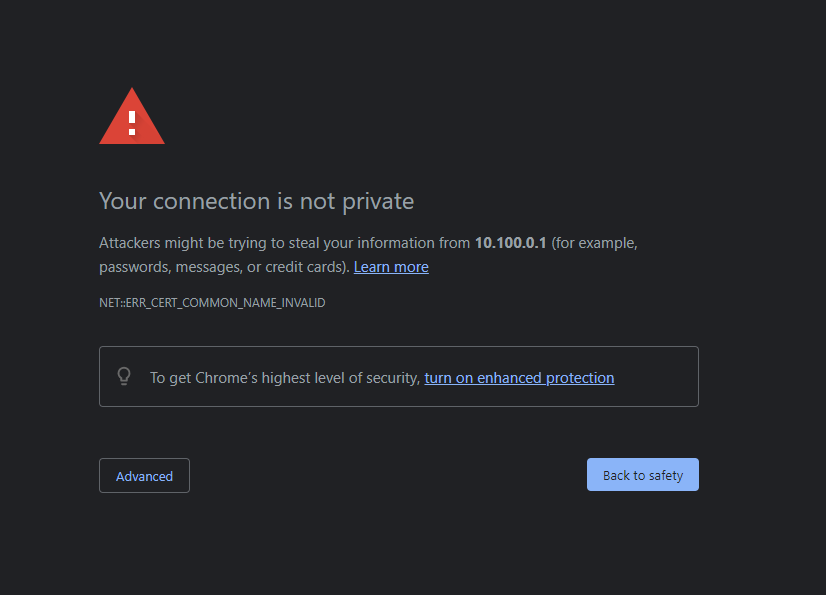
In this previous post, I showed how to connect to a Unifi router with HTTPS, effectively ridding you of the tedious words, “Your connection is not private.”
 However, the method shown in that post directs your connection to an external DNS server (e.g., CloudFlare) in order to resolve your Unifi router. This adds some latency by requiring your traffic to flow out and in rather than staying local. Additionally, it requires opening some ports externally. While this is not necessarily bad, it certainly increases the risks and attack surface of your network.
On this post, I will show you how you can keep the external accessibility with SSL AND show you how you can have the same HTTPS accessibility fully locally (i.e., you do not need to open ports externally or allow access externally). This setup is particularly suited for an overkill homelab.
The Solution: “Split-Brain DNS”
Split-Brain DNS is the ultimate solution for my setup. Split-Brain DNS refers to the concept of having two sets of DNS servers that correctly resolve both internal and external traffic. Specifically, Split-Brain DNS allows the correct name resolution of internal resources both internally and externally.
In my case, PiHole is an internal DNS server that correctly handles all internal DNS requests for internal resources. Externally, CloudFlare handles resolution for my internal resources correctly. For example, if my local network is 10.10.10.0/24, my Unifi Dream Machine Pro’s (UDMP) local address is 10.10.10.1, and my MacBook Pro (MBP) has a local address of 10.10.10.50, when connecting to the UDMP from the MBP, requests are resolved by my PiHole to the internal resource directly (see the first Terminal image below). If my MBP is on another network, the DNS server would resolve my traffic to the public IP of my network to be routed by the reverse proxy to finally reach the UDMP (see the second Terminal image below).
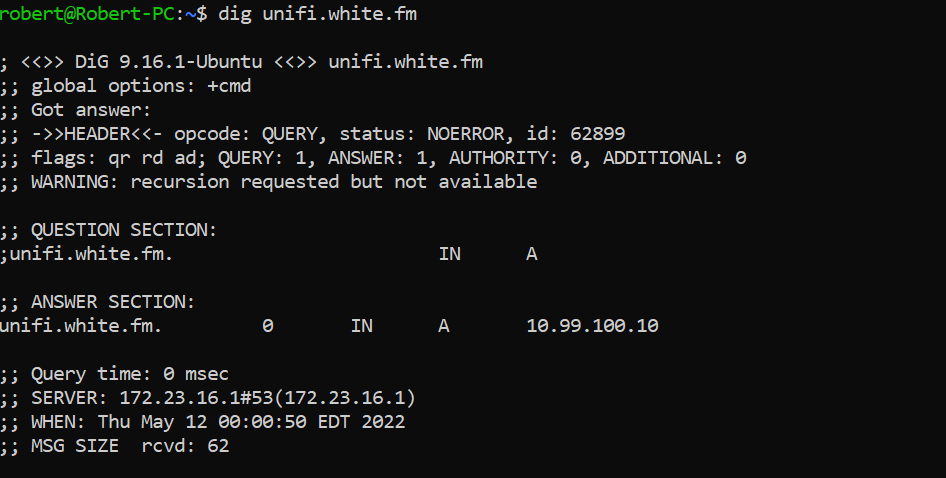 First Image: You can see here that running
 dig unifi.white.fm on an internal machine with PiHole as the DNS server resolves unifi.white.fm straight to the reverse proxy in my network.
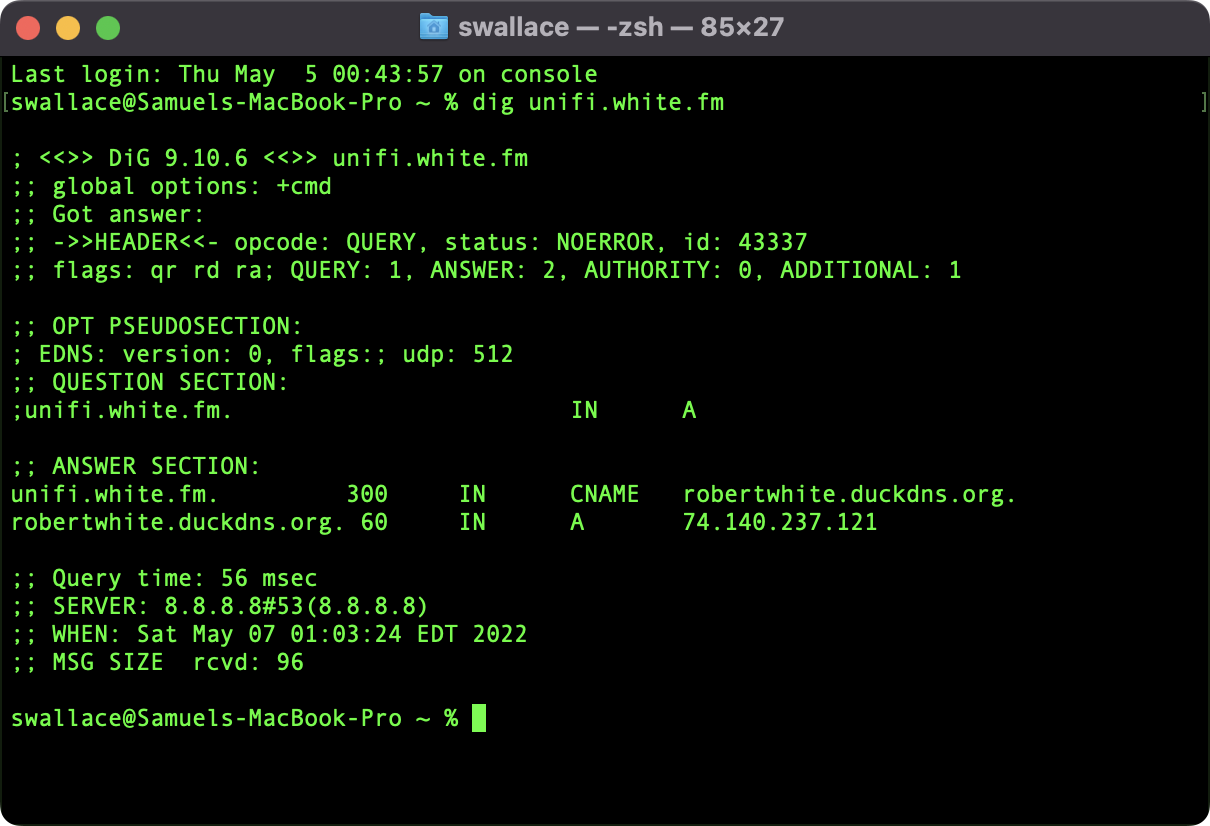 Second Image: You can see here that running
 dig unifi.white.fm on an external machine resolves unifi.white.fm to my dynamic DNS host (i.e., DuckDNS) which points to the public IP of the network. Port forwarding rules would allow and route the traffic to the reverse proxy on the network and then to the UDMP if enabled.
In either case above, my browser connects to my Unifi Machine securely over HTTPS with Let’s Encrypt certs.

Before we get into the specific setup, I will share the tools I am using to accomplish this outcome.
Tools
PiHole
As mentioned above, PiHole is used in this case as the internal DNS server. There are many means of running PiHole instances in your network. I have a few different subnets and VLANs, and each subnet/VLAN has two instances of PiHole. My main subnet/VLAN actually has three instances (two instances installed directly on Raspberry Pis and one Docker instance running on Unraid). The other subnets/VLANs have two Docker instances running on Unraid. This way, I have a bit more simple and finite control of the way each subnet/VLAN resolves.
PiHole is not the only DNS Server that can be used for this tutorial. I chose PiHole because of the simple and powerful DNS blocking capabilities, of which I take full advantage. If you do not need network-wide tracking or ad-blocking capabilities, there will likely be a better tool for you. For the purposes of this tutorial, we will use PiHole.
Unnecessary Note: Each instance of PiHole on my network is set up to resolve “anonymously” via Oblivious DNS Over HTTPS (ODOH). On my Raspberry Pis, I used the following DNSCrypt method from GitHub. For my containerized PiHole instances, I am pointing PiHole to the mschirrmeister/odoh-resolver container (more about this container on GitHub).
Nginx Proxy Manager
As alluded to above, PiHole will be set up to resolve internal resource requests to Nginx Proxy Manager, which will route the traffic to the requested resource and provide HTTPS protection with Let’s Encrypt certs. Check out my previous post on setting up Nginx Proxy Manager with Docker here.
Similarly to PiHole, there are other reverse proxies that may be usable to achieve our goal. I use Nginx Proxy Manager because of its simplicity.
Recommended Gear and Tools
As an Amazon Associate, I earn from qualifying purchases. Thank you for supporting the maintenance of this blog. Pricing is the same for you whether you use my links or not.
- Unifi Dream Machine Pro
- Raspberry Pi
- Managed Switch with VLAN Support
- Mini PC for Nginx Proxy Manager / DNS Services
- UPS Battery Backup for Homelab Gear
Internal Routing
Alright! Let’s get to the fun part.
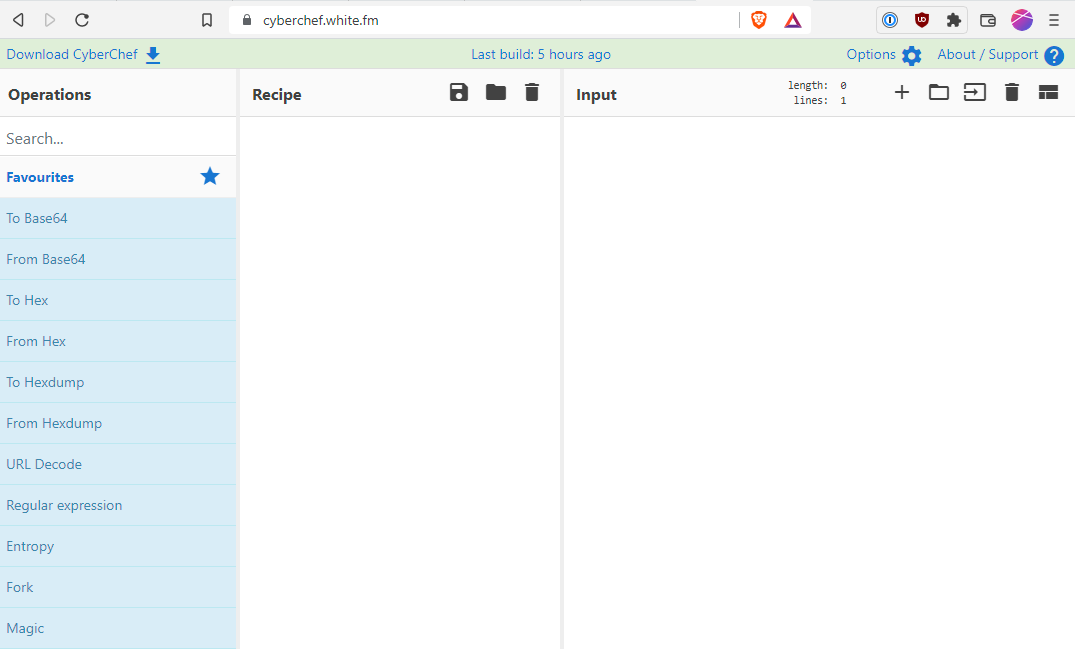
Once you have stood up at least one DNS Server and a reverse proxy, we can set up the internal half of our split-brain. For purposes of this tutorial, my network is 10.99.100.0/24. I have an Nginx Proxy Manager instance hosted on 10.99.100.10. I have a CyberChef Docker container hosted on 10.99.100.82 GUI accessible on port 3000 (i.e., http://10.99.100.82:3000).
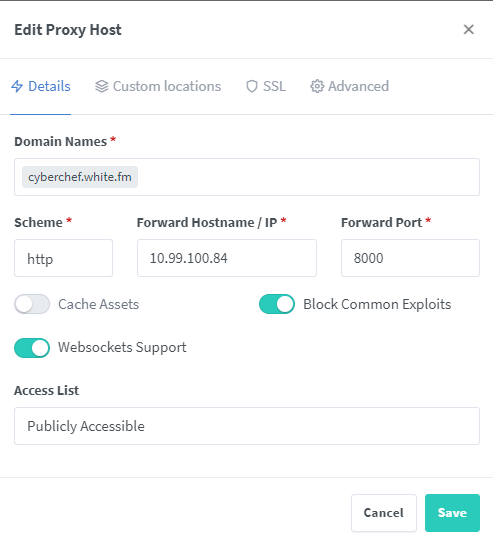
Nginx Proxy Manager receives communication from your clients on ports 80 and 443 and subsequently forwards the traffic to the host and port of your choosing. In the case of CyberChef, this would be 10.99.100.82 on port 3000. The first task is setting up Nginx Proxy Manager to correctly route traffic intended for the host cyberchef.white.fm, which we will later define in our DNS Server. In Nginx Proxy Manager, select Hosts and click Add Proxy Host. Add your intended domain (e.g., cyberchef.white.fm). Most likely, you will want to leave Scheme set to http since original traffic is not encrypted with HTTPS. Add the IP of the host (e.g., 10.99.100.82) and the port your client will use to communicate with the host +(e.g., port 3000)_. I typically enable Block Common Exploits and Websockets Support, but your mileage may vary. I recommend exploring these options and testing them under varying circumstances for the best outcome for your host. See the image below for an example of this page configured as explained above.
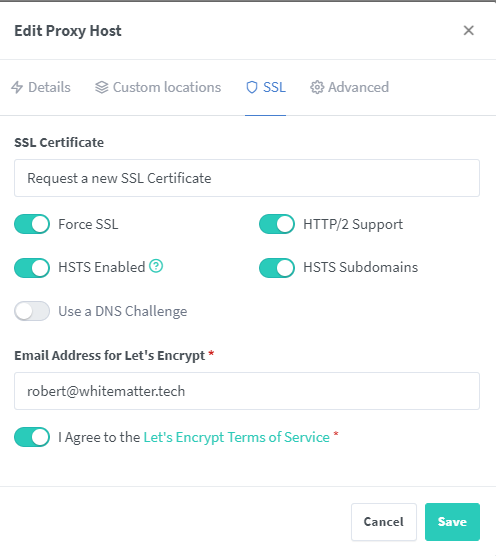
On this same page, select SSL. Choose the dropdown menu and select Request a new SSL Certificate to request a cert from Let’s Encrypt automatically based upon the hostname (e.g., cyberchef.white.fm) you provided on the previous screen. If you already have a cert or prefer to request a wildcard cert that can be used for all of your internal resources, you can choose those options as well. Here, I usually enable all of the options depending on the host. See the image below for an example configuration for this screen.
Once the cert request is complete, click Save. You will now have a new Proxy Host listed on your Nginx Proxy Manager. We can move to PiHole now.
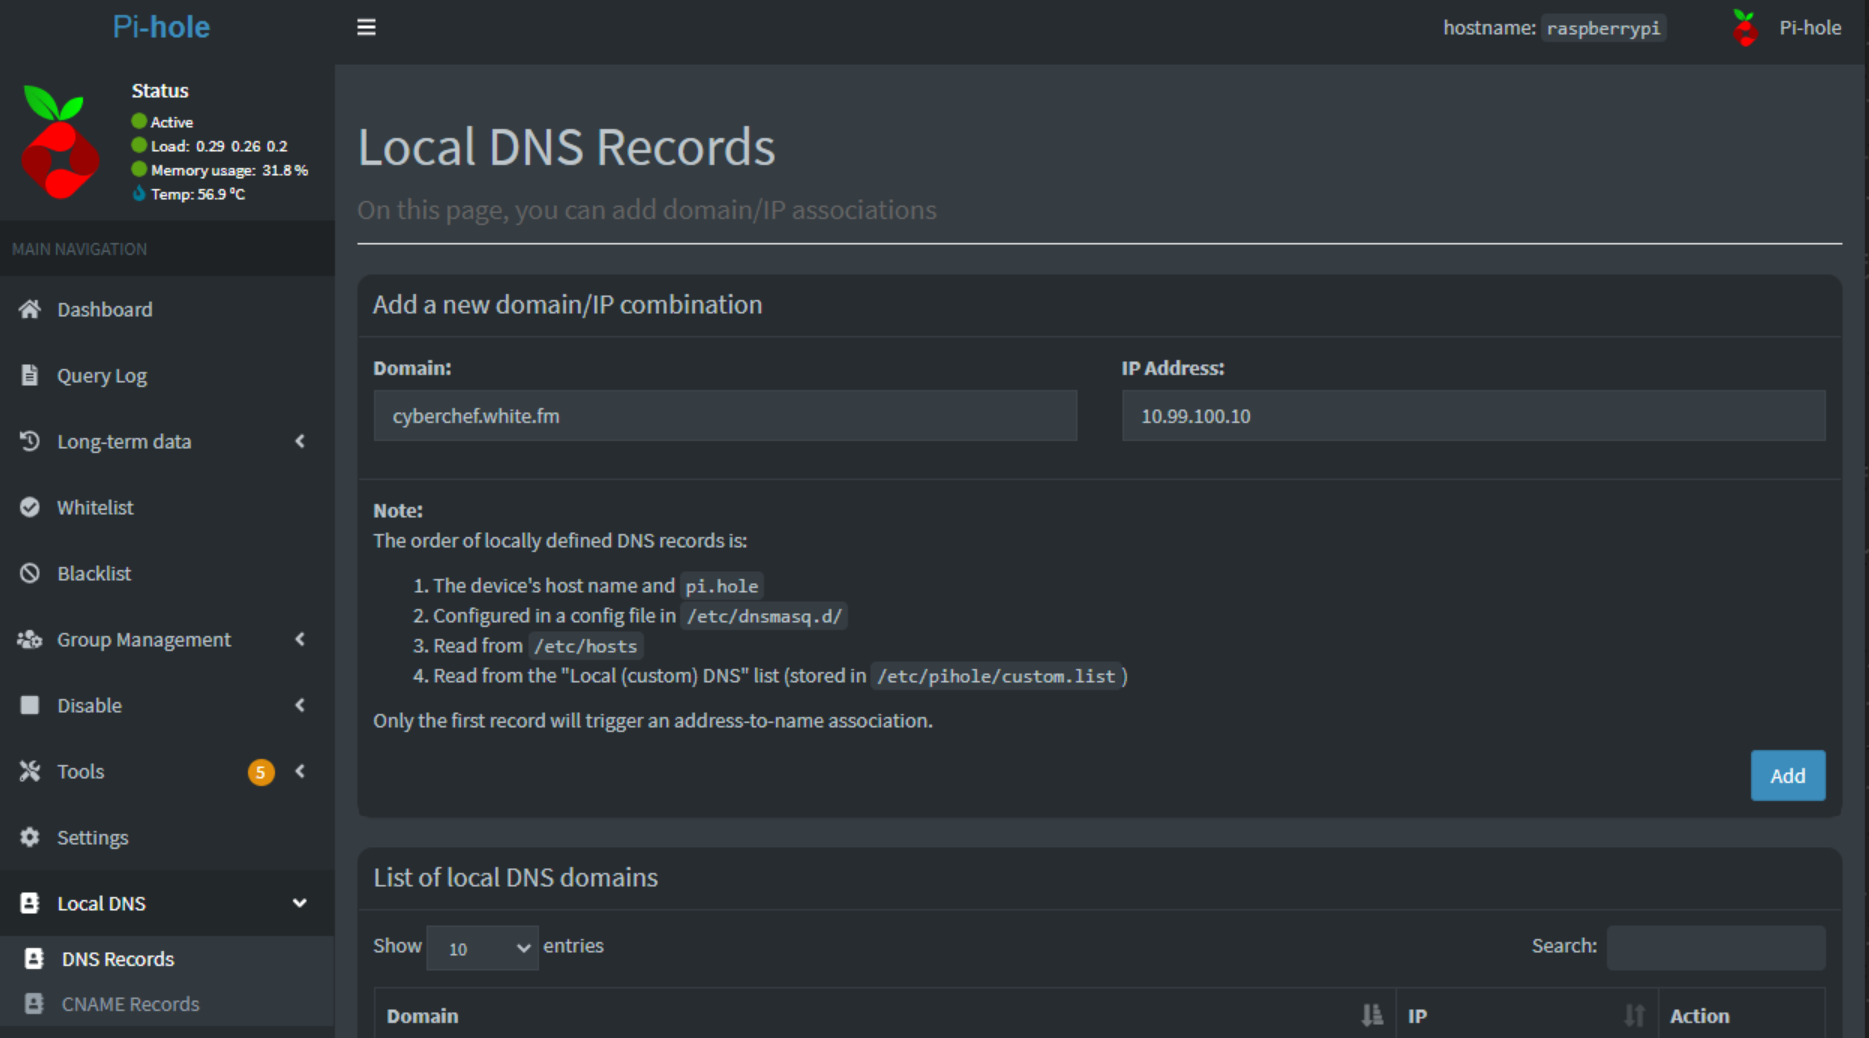
In PiHole, select Local DNS in the left panel, and select DNS Records. From here, under Domain, input your intended domain target from Nginx Proxy Manager (e.g., cyberchef.white.fm) and input the IP address of your Nginx Proxy Manager host (e.g., 10.99.100.10), which is different from your target host. Click the Add button. See the image below for this configuration.
Once you have these configurations saved and in place, you will need to ensure your client is using PiHole (or whatever DNS Server you are using) as its DNS Server.
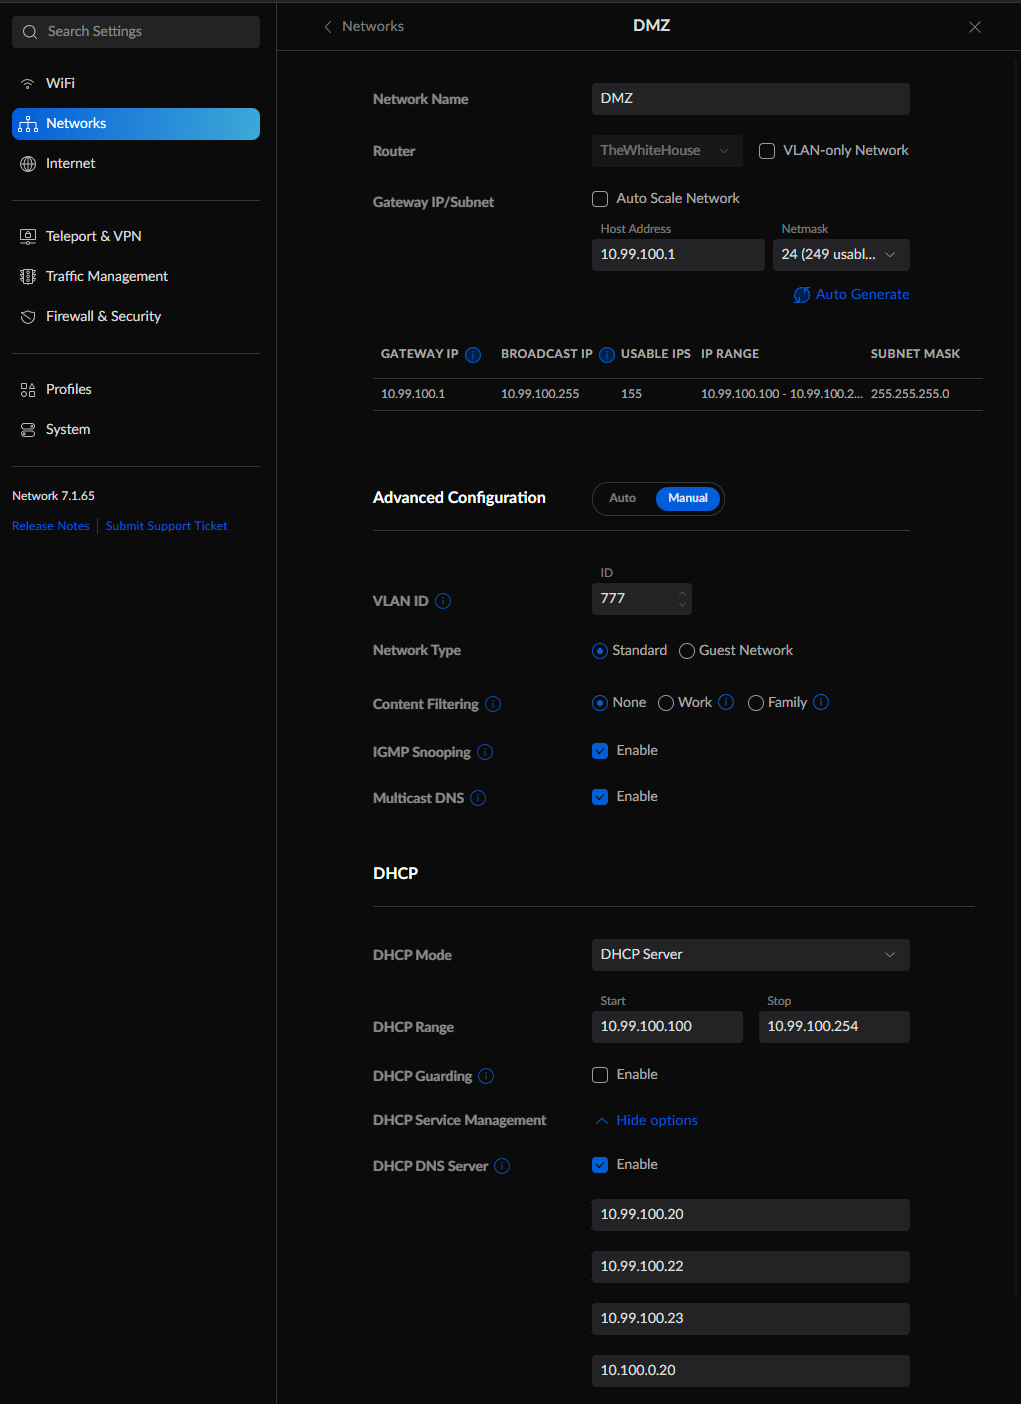
I use Unifi for most of my networking needs. If you are using Unifi with the new User Interface, you can find the setting to add custom DNS Servers to your network by going to Settings > Networks > Name_of_Your_Network > DHCP > DHCP Service Management: Show options > DHCP DNS Server: Enable.
Once this setting is enabled, you can input your PiHole IP(s) in the boxes. Once saved, ensure your client renews its DHCP lease (or reconnects if it is static), and the client will be using your PiHole as its DNS Server. You can also manually assign the DNS Server on your client if you do not want to make this change network-wide. See the image below for the Unifi settings.
Once your client has its new DNS Server(s) added, open up a browser and attempt to connect to your host with HTTPS (e.g., https://cyberchef.white.fm). If everything went smoothly, you should now see the wonderful lock in your browser indicating a secure HTTPS connection (see the image below).
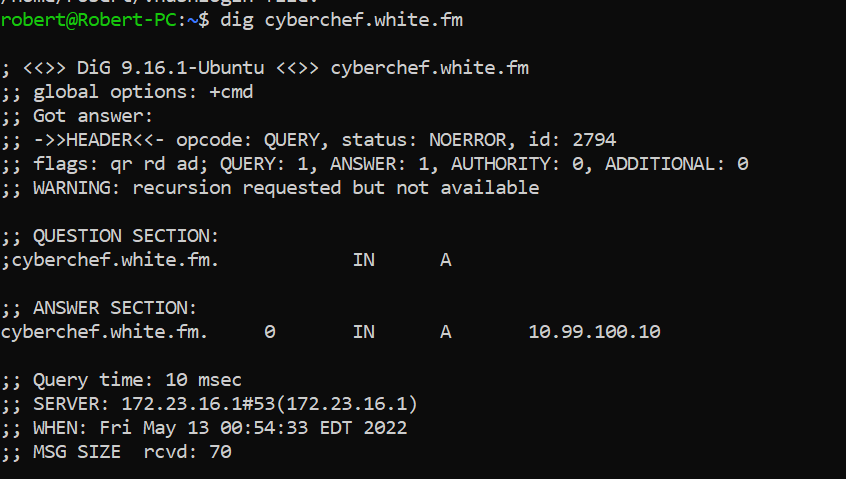
Now, if we do a dig on cyberchef.white.fm, we see that we are resolving to the IP of our Nginx Proxy Manager (IP 10.99.100.10). See the image below.
Finally, if we attempt to sniff the data transmitting over HTTPS, we can see that the data are encrypted. In the screenshot below, you will see WireShark’s capture of data I sent from my PC to an InfluxDB instance on my network via this method. All communications to InfluxDB are now done over HTTPS. I have a large handful of data sources transmitting to InfluxDB such as Unifi Poller, Varken, and Home Assistant. Each of these sources now send the data over HTTPS as well. See the image below.
While the method of adding HTTPS support around your network described in this post is not a perfect solution for security in general, it certainly adds some privacy to the environment, decreasing the likelihood that a bad actor on your network would be able to find or see anything useful.
Great job! You have successfully configured the first half of your “split-brain DNS”. Now, you can repeat the steps above to add all of your hosts to both Nginx Proxy Manager and PiHole. You can even add the Nginx Proxy Manager web page, your Unifi router, your PiHole web interface, an ESXi server, a Proxmox server, or any Docker container you might be running on Unraid or any other host. The possibilities are as confined as your imagination.
External Routing
Prepare Your Domain
Note: The below is a relevant excerpt from my first post: Hosting Your Own Site with Traefik and Wordpress. This section will basically show you the other half of your “split-brain DNS”. This section is also completely optional if you do not want to open up your services and Nginx Proxy Manager externally.
For your domain, you will need to add DNS records pointing your domain, for example, whitematter.tech, to the public IP address of your server (if you are using a bare-metal install on your home network, this would be the public IP your ISP provides you, which can be determined at whatismyip.com). I personally prefer a Dynamic DNS solution like duckdns.org, which allows me to automatically keep updated with my changing public IP since I do not have a static address from my ISP (for tips on exploring DuckDNS for your setup, check out this video on YouTube). The image below shows what CloudFlare looks like for my domain being pointed to my DuckDNS address (if you do not have duckdns, “Content” would be your public-facing IP, like 177.99.88.10).

Add a CNAME record for your hosts that you would like to access externally. For example, I would add a CNAME record for cyberchef so that cyberchef.white.fm would resolve to my dynamic DNS host or public IP.
Now, you will need to forward ports 80 and 443 to your Nginx Proxy Manager host. Consult with your networking equipment instructions on how to best accomplish this.
Once ports 80 and 443 are forwarded to Nginx Proxy Manager, you will be able to access whatever host you add to CloudFlare (or whatever service you use) externally.
Wrapping Up
I hope this post was helpful to you in setting up your own “split-brain DNS.” This post may be a bit more complicated with more moving parts than usual. Please feel free to contact me via the methods below.
As always, if you have any questions, feel free to start a Discussion on GitHub, submit a GitHub PR to recommend changes/fixes in the article, or reach out to me directly at [email protected].
Thanks for reading!
Robert