
Reverse proxies are powerful tools used typically to forward client traffic to a server. In contrast to a forward proxy, a reverse proxy sits in front of web servers or other servers and forwards client traffic to the appropriate server. In this post, I will show you how to easily setup a reverse proxy using Docker, forward the necessary ports to the reverse proxy, and configure the reverse proxy to forward traffic to various servers on your network. Specifically, I will show how to setup the reverse proxy for se with WordPress, though the applications of this reverse proxy are endless!
For this tutorial, we will be setting up Nginx Reverse Proxy with Nginx Proxy Manager, which acts as a GUI frontend to manage your reverse proxy. Managing Nginx without a GUI is definitely doable, but I am not much of a fan of troubleshooting that setup. For this setup, I recommend a singular device or VM that can host your reverse proxy. You will need docker-compose installed on your system.
For this setup, I am using a Ubuntu bare-metal machine behind a Unifi Dream Machine Pro . You can use a VM or an OS on bare-metal capable of running Docker (for this tutorial though, we will use commands and terminology only applicable to Ubuntu, but you can make adjustments where necessary if you are familiar with Docker and choose not to use Ubuntu).
For tips on running a self-hosted WordPress site, which will be referenced in this post, check out this tutorial. You could run your WordPress site from the same machine/VM running your reverse proxy, but you will likely have to edit some docker-compose files. I may follow up with a post about that later, but until then, I suggest separate devices/VMs.
As an Amazon Associate, I earn from qualifying purchases. Thank you for supporting the maintenance of this blog. Pricing is the same for you whether you use my links or not.
Installing Nginx Proxy Manager
To simplify your install, I have hosted the docker-compose.yml I use to deploy my Nginx Proxy Manager: GitHub. You can easily pull this docker-compose.yml with cURL or wget by running the commands below:
curl -LJO [https://raw.githubusercontent.com/robertomano24/nginx-proxy-manager/main/docker-compose.yml](https://raw.githubusercontent.com/robertomano24/nginx-proxy-manager/main/docker-compose.yml)
OR
wget --no-check-certificate --content-disposition [https://raw.githubusercontent.com/robertomano24/nginx-proxy-manager/main/docker-compose.yml](https://raw.githubusercontent.com/robertomano24/nginx-proxy-manager/main/docker-compose.yml)
If you prefer to create your docker-compose.yml file yourself, make a file named “docker-compose.yml” and add the following to the file:
version: '3'
services:
  app:
    image: 'jc21/nginx-proxy-manager:latest'
    restart: unless-stopped
    ports:
      - '80:80'
      - '81:81'
      - '443:443'
    environment:
      DB_MYSQL_HOST: "db"
      DB_MYSQL_PORT: 3306
      DB_MYSQL_USER: "npm"
      DB_MYSQL_PASSWORD: "npm"
      DB_MYSQL_NAME: "npm"
    volumes:
      - ./data:/data
      - ./letsencrypt:/etc/letsencrypt
  db:
    image: 'jc21/mariadb-aria:latest'
    restart: unless-stopped
    environment:
      MYSQL_ROOT_PASSWORD: 'npm'
      MYSQL_DATABASE: 'npm'
      MYSQL_USER: 'npm'
      MYSQL_PASSWORD: 'npm'
    volumes:
      - ./data/mysql:/var/lib/mysql
Once you have either downloaded the file or created your own, build your containers by issuing the following command:
docker-compose up -d
If all goes well, you should now have Nginx Proxy Manager and MariaDB (for the reverse proxy database) running successfully.
Configuring Nginx Proxy Manager
Access your reverse proxy frontend by going to http://youripaddress:81 (e.g., http://192.168.1.10:81). Login with the default user email and password shown below. Immediately change the login email and password for your admin user to secure your reverse proxy.
Email:    [email protected]
Password: changeme
Once your password is changed, you can begin configuration. For an example, I will show you how I am configuring the reverse proxy for this WordPress site. You can fill in your own server information. This particular configuration assumes that you have forwarded your domain name (e.g., whitematter.tech) to your public IP. If you do not have a static public IP address, you might consider a free dynamic DNS service like DuckDNS, which will automatically update the DNS records to point to your IP address if your public IP is changed by your ISP. I have whitematter.tech pointing to a DuckDNS hostname.
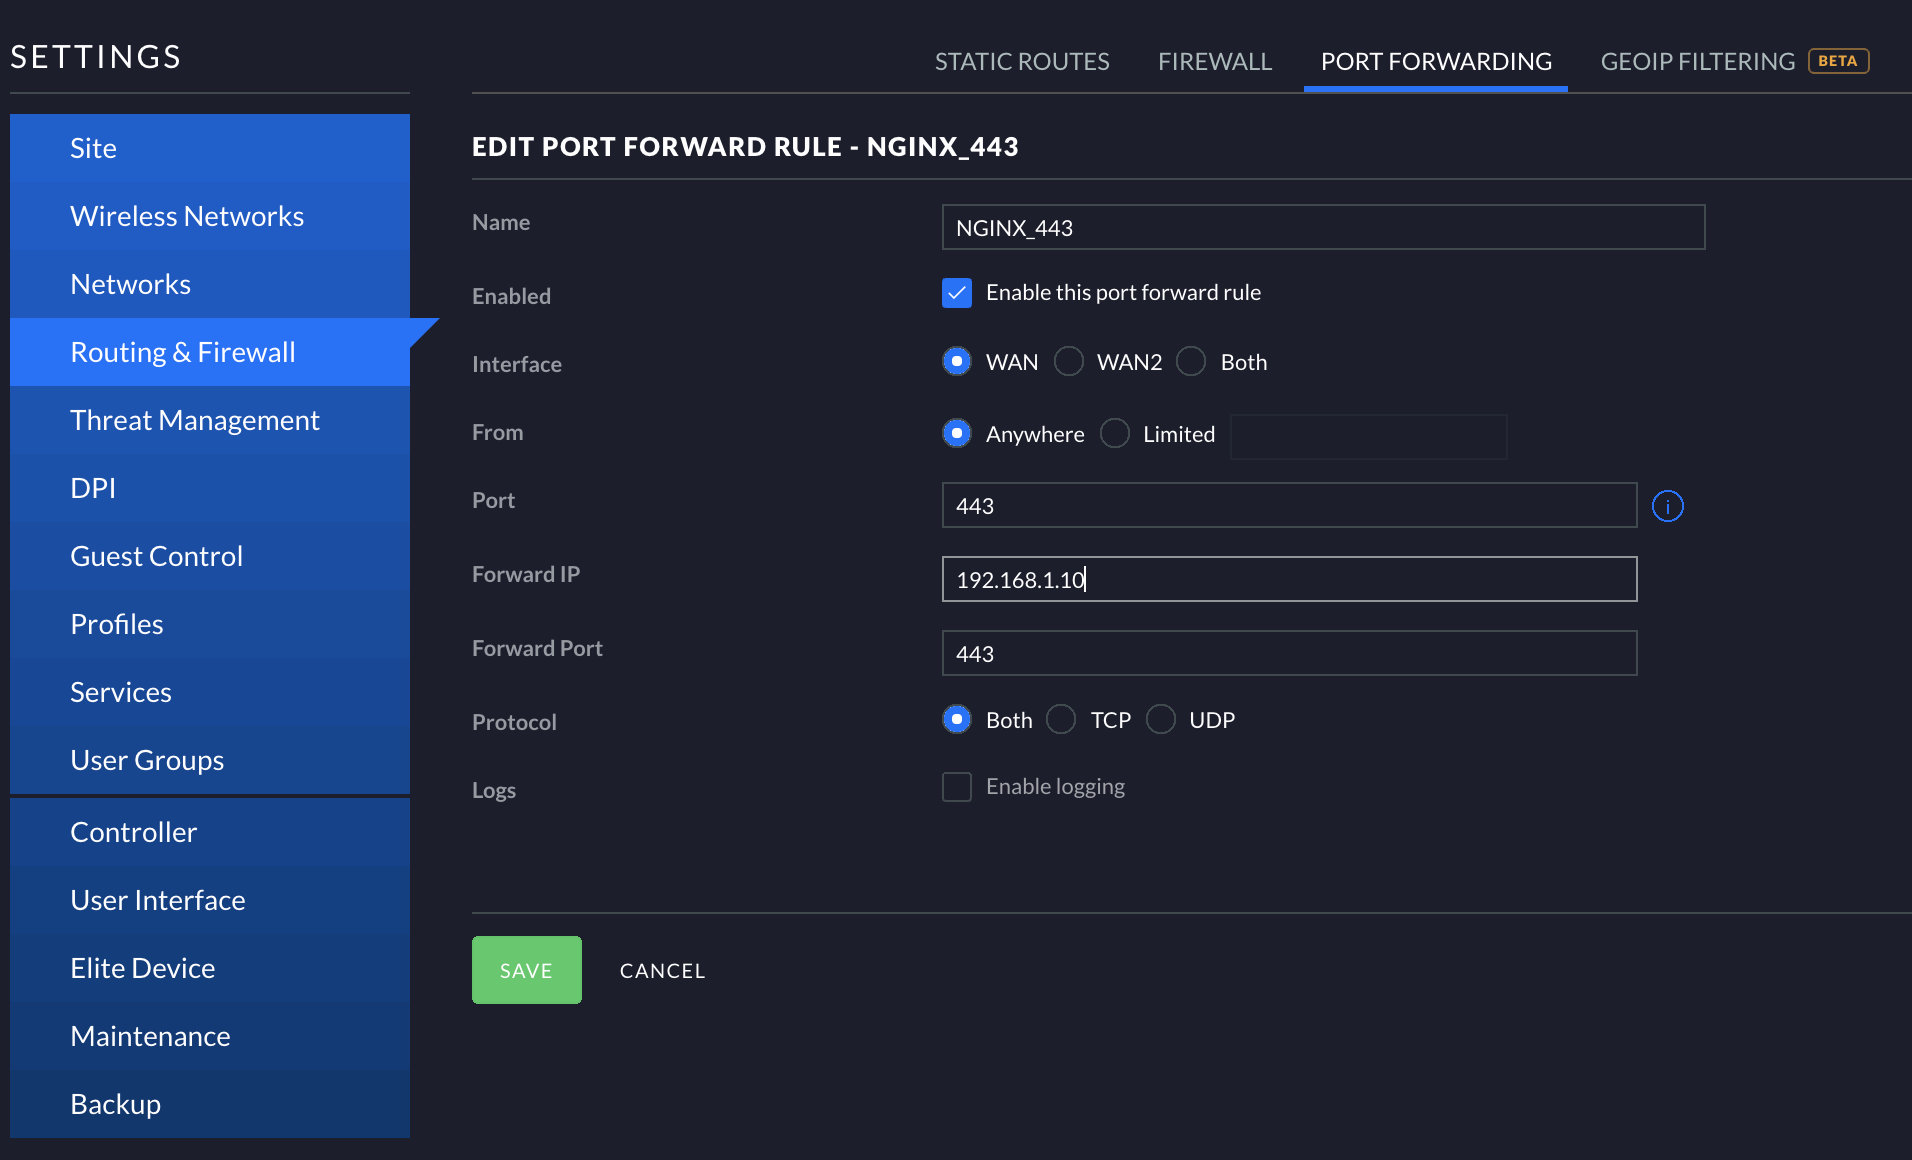
Forward Ports 443 and 80
The first step is to forward ports 80 and 443 to your reverse proxy host (e.g., 192.168.1.10). I use a Unifi Dream Machine Pro (UDMP) as my gateway, so the screenshots will reflect the Unifi Controller. For Unifi users, go to Settings > Routing & Firewall > Port Forwarding. Create a new rule and name it something descriptive (I named mine NGINGX_443). Check to enable the forward, check the WAN interface, and check “Anywhere.” In both the Port and the Forward Port, enter “443.” Add your reverse proxy host local IP in the Forward IP spot (e.g., 192.168.1.10). Save the rule, and create another rule with the same info, but replace “443” with “80.” Be sure to save this rule too! You should then have two rules: NGINX_443 and NGINX_80. This will forward all incoming Internet traffic using ports 443 (HTTPS) and 80 (HTTP) to your reverse proxy server.
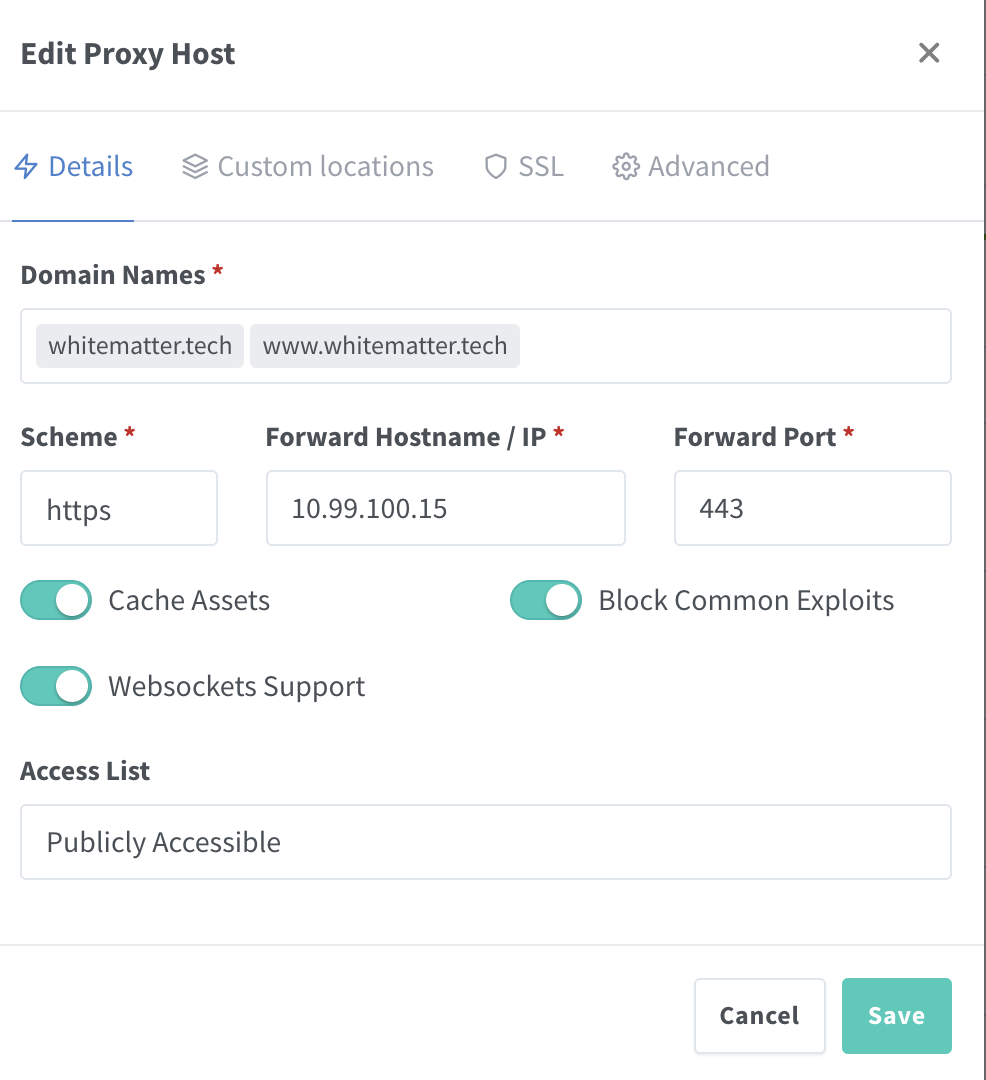
Configure a Proxy Host
Go back to your Nginx Proxy Server at http://youripaddress:81. Select Hosts > Proxy Hosts. Near the top right, select Add Proxy Host. From here, we can add our first proxy host! Under the Details section, fill in the info similarly to the screenshot below. Under Domain Names, enter the URL and subdomains of the traffic that you want forwarded to your server. For example, if you have a webserver like I do hosting a WordPress site, you could inout your domain whitematter.tech and www.whitematter.tech. If you were hosting a Docker container elsewhere on your network, you might have something like homeassistant.whitematter.tech or something. This will certainly vary on your use-case. Feel free to reach out if you have more questions or need assistance with this piece! Under Scheme, I recommend https, but this also may vary. For a WordPress site, definitely select https. Under the Forward Hostname / IP, input your server IP as shown below. For the forward port, you will use the port required for traffic flow. If using a WordPress site, you will use 443. If using a Docker container like HomeAssistant, you would use something like 8123. Finally, check Cache Assets, Block Common Exploits, and Websockets Support.
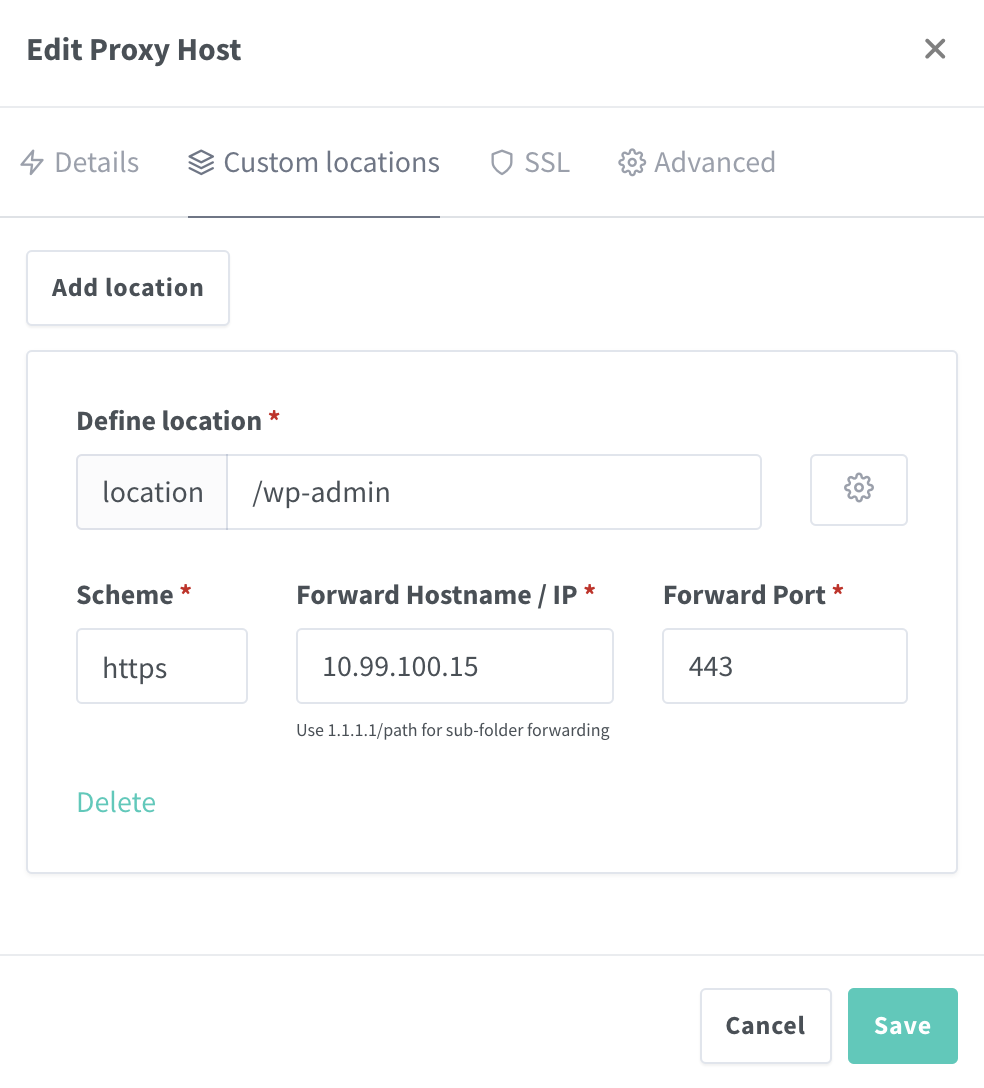
Next, select Custom locations and click Add location. If forwarding to a WordPress server, type “/wp-admin” as the location. The scheme should match the previous page, which is https in this case. Again, add your server IP and forward port like the previous page as well.
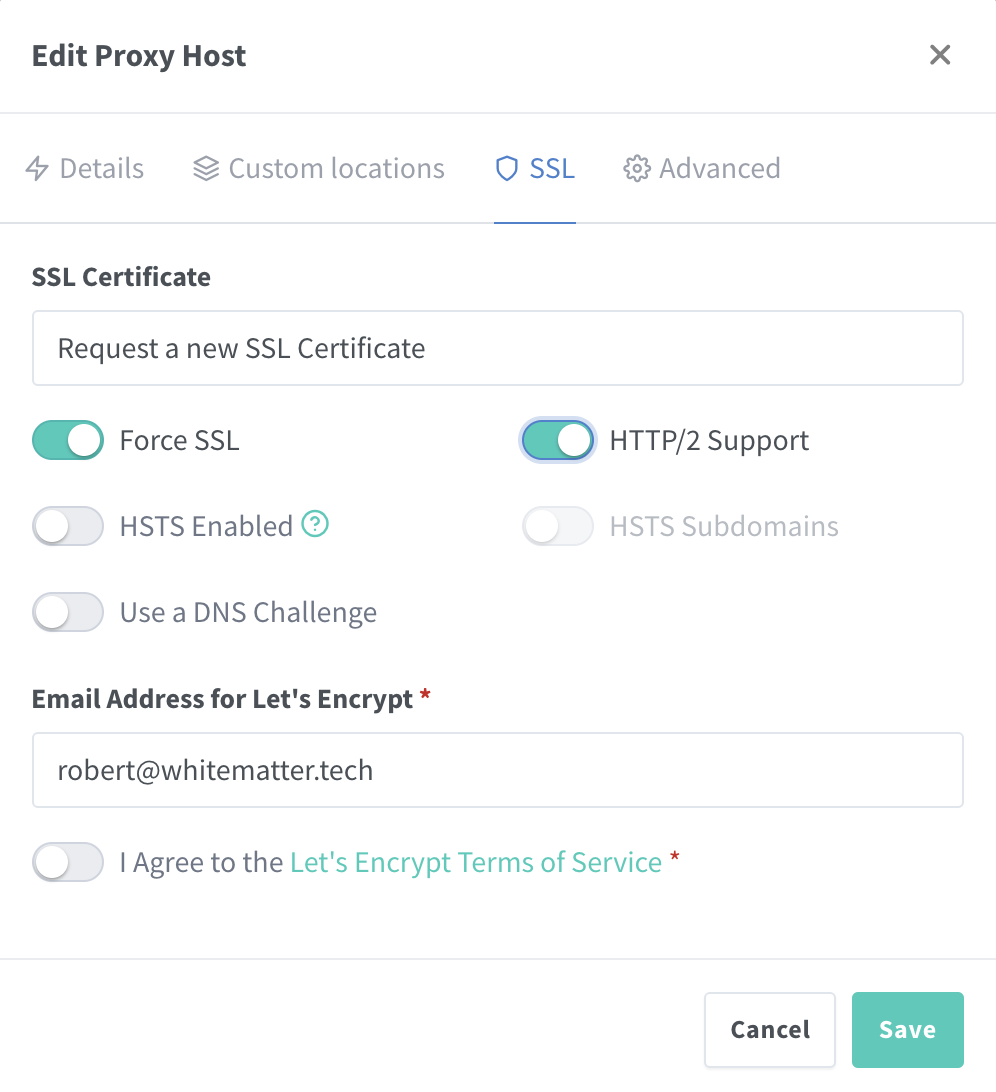
Finally, under SSL, you can easily configure a LetsEncrypt certificate for use with your server, which will secure your connection to that server. You will probably not need this functionality every time you set up a proxy host especially if you use other means to generate SSL/TLS certs, but I will show you this function anyway! Under SSL Certificate, select “Request a new SSL Certificate”. Check Force SSL and HTTP/2 Support. Enter your email address at the bottom of the config and check to agree to LetsEncrypt’s ToS. Click Save. A cert will generate, and your proxy host will be configured!
Your proxy host should look something like this:

Conclusion
Once your host is added, you can add more following similar guidelines! The config may change slightly or substantially depending on your end goal, but the endless possibilities cannot be covered in a single post. However, I use this reverse proxy setup to add SSL for my connection to my Unifi Dream Machine Pro (UDMP). This entails forwarding ports 443 to the UDMP and adding the following Location: “/*”. This is one of many neat applications of this reverse proxy setup.
Please feel free to reach out to me if you have any questions or if this post was helpful! I love to hear how people are running their homelabs or offices.
As always, if you have any questions, feel free to start a Discussion on GitHub, submit a GitHub PR to recommend changes/fixes in the article, or reach out to me directly at [email protected].
Thanks for reading!
Robert