#UPDATE 11/05/2022
Original post date: 2021-04-05
This update contains specific configuration options to use 4096 bit RSA keys, SHA256 Auth digest algorithm, and AES256 encryption. The original post used the default key length of 2048 from PIA, SHA1, and allowed for AES128.
Throughout the post, I will tag updated information with #Update.
Introduction
This post aims to show you how to use pfSense within a Unifi network behind a Unifi Gateway [in my case, the gateway is the Unifi Dream Machine Pro (hereafter referred to as UDMP)]. I will explain my current network configuration including applicable subnets, VLANs, and wireless SSIDs needed to make this setup successful. The end goal is to be able to add a client on my Unifi network to a particular VLAN either by joining this client wirelessly to a particular SSID or by tagging the client’s physical port to that VLAN. This VLAN will be tied to a subnet that sends data through the pfSense machine which is acting as a VPN client (I use Private Internet Access). This method allows the UDMP to continue to act as the DHCP server for these clients while allowing pfSense to anonymize and encrypt the data of the clients in question.
As an Amazon Associate, I earn from qualifying purchases. Thank you for supporting the maintenance of this blog. The pricing will be the same for you regardless if you use my links or not! Thanks for your support!
This post assumes that you have the following: a Unifi Gateway device (e.g., UDMP, Unifi Security Gateway, etc.), a pfSense machine/VM, Unifi wireless APs (only if you want to add wireless devices to the VPN), and Unifi switches (only if you want to tag specific switch ports to the VPN). This post also assumes you have access to or a subscription to a VPN service. In this post, all references to VPN use will be specific to PIA. This guide may or may not work with other VPN providers initially. However, I am confident that, if you can initialize the client connection to your VPN provider from pfSense, you will be able to successfully use the tutorial to anonymous traffic with Unifi VLANs. We will first look at the pfSense setup and VPN configuration. After, we will explore the Unifi setup and configuration.
pfSense Setup and Configuration
I built a custom baremetal pfSense machine with the following components: Intel(R) Core(TM) i5-8500 CPU @ 3.00GHz, GIGABYTE B365M DS3H, Corsair Vengeance LPX 16GB, Thermaltake Smart 500W Power Supply, and a 4-Port PCI-E Network Interface Card.
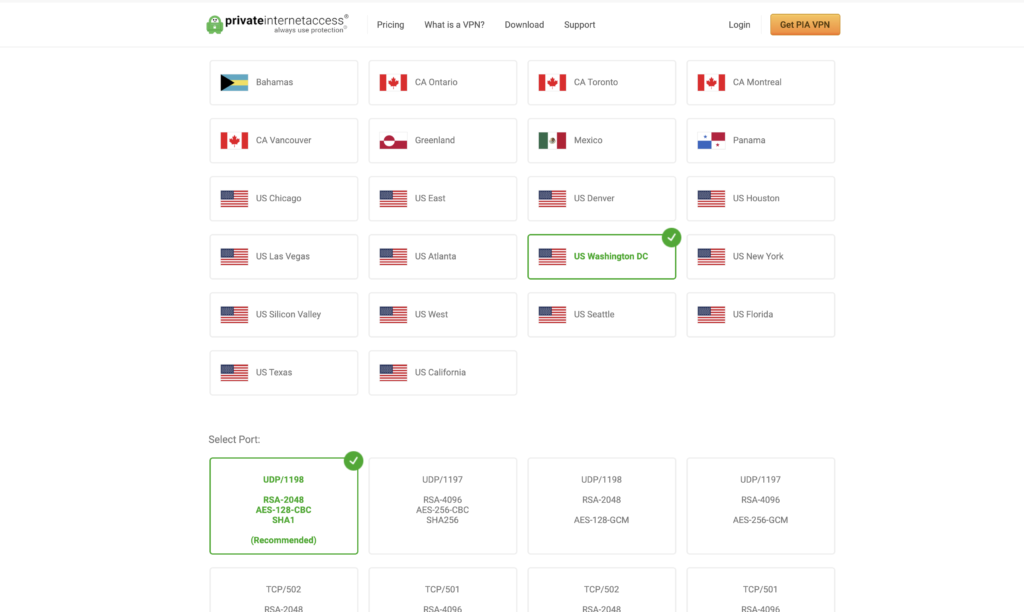
Select a PIA Server
First, we need to select a server that works best. This likely will be mainly determined by your country and geographical area. With your account username and password for PIA, you will be able to see a complete list of servers here: https://www.privateinternetaccess.com/pages/ovpn-config-generator
To import the certificate needed, choose the 1198 port option, and click “Generate”.
#UPDATE
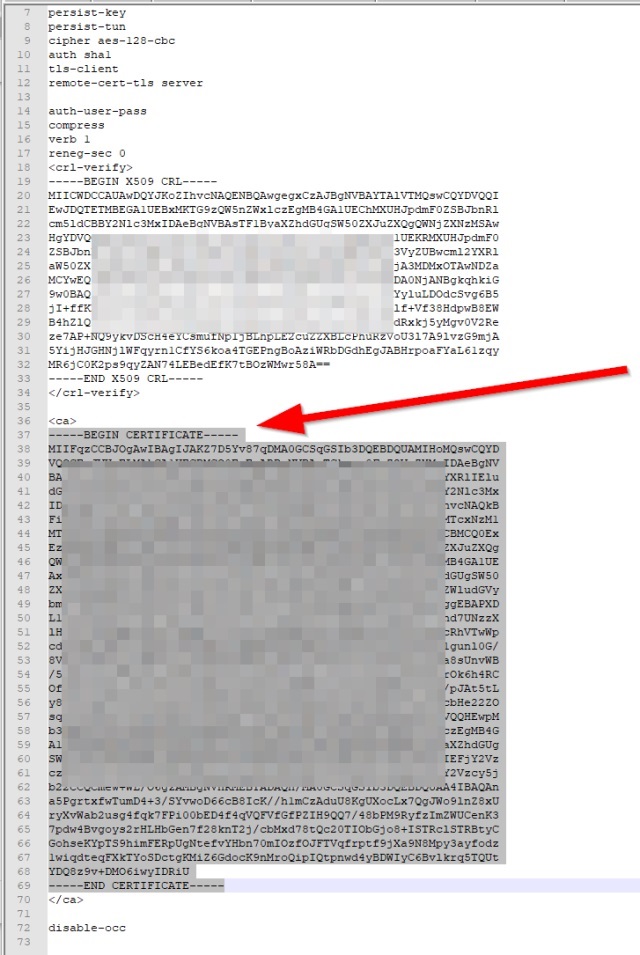
If you prefer to use the more secure 4096 RSA cert, grab the .CRT from here: https://www.privateinternetaccess.com/openvpn/ca.rsa.4096.crt
Once the file is downloaded, open it in your favorite text editor (e.g., Atom, Notepad++, etc.). Copy the portion -—-BEGIN CERTIFICATE—– all the way through -—-END CERTIFICATE—– as shown in the image below.
Create a Certificate Authority in pfSense
In pfSense, navigate to System > Cert Manager and click on the “+ ADD” Button. Change the “Method” to “Import an existing certificate authority” and paste the copied certificate text into the box. It should look like below:
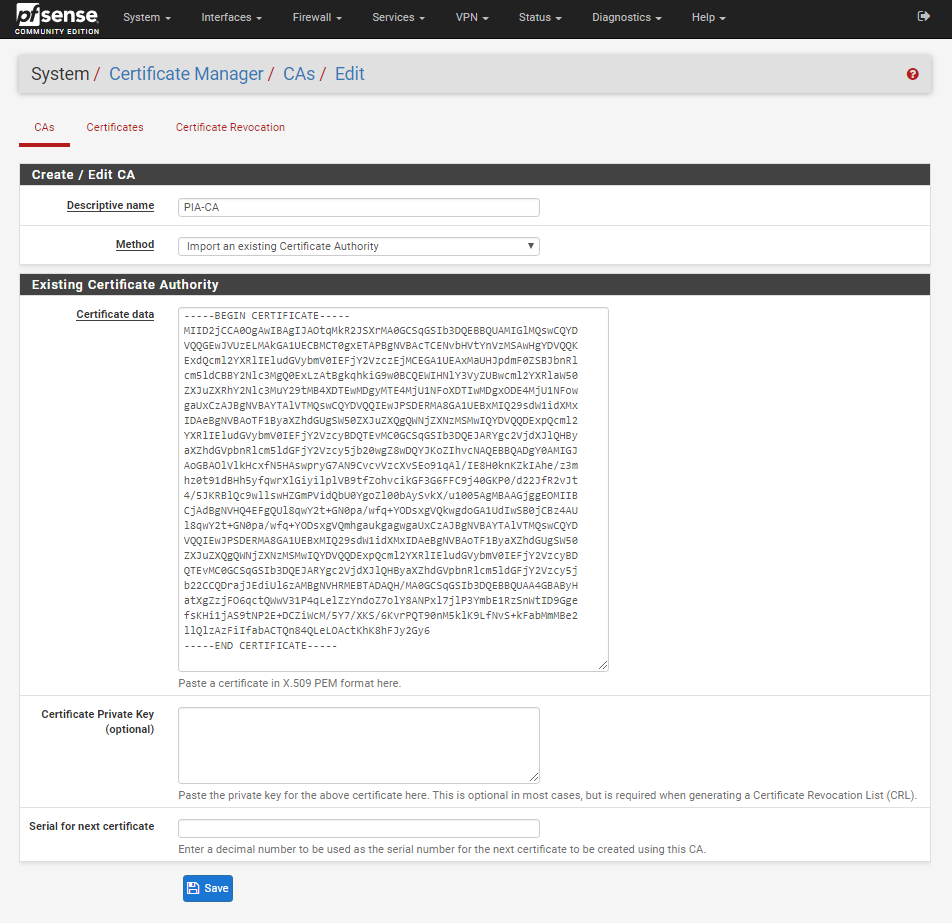
Click Save.
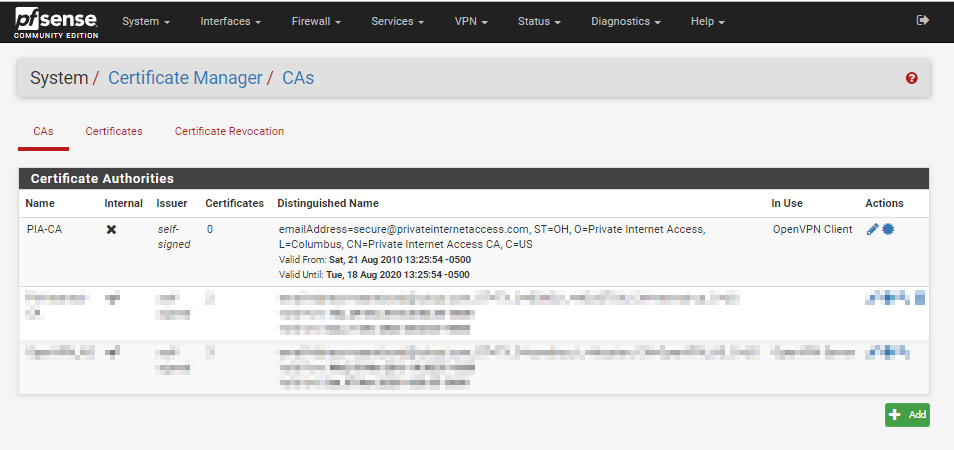
You should now see the certificate listed:
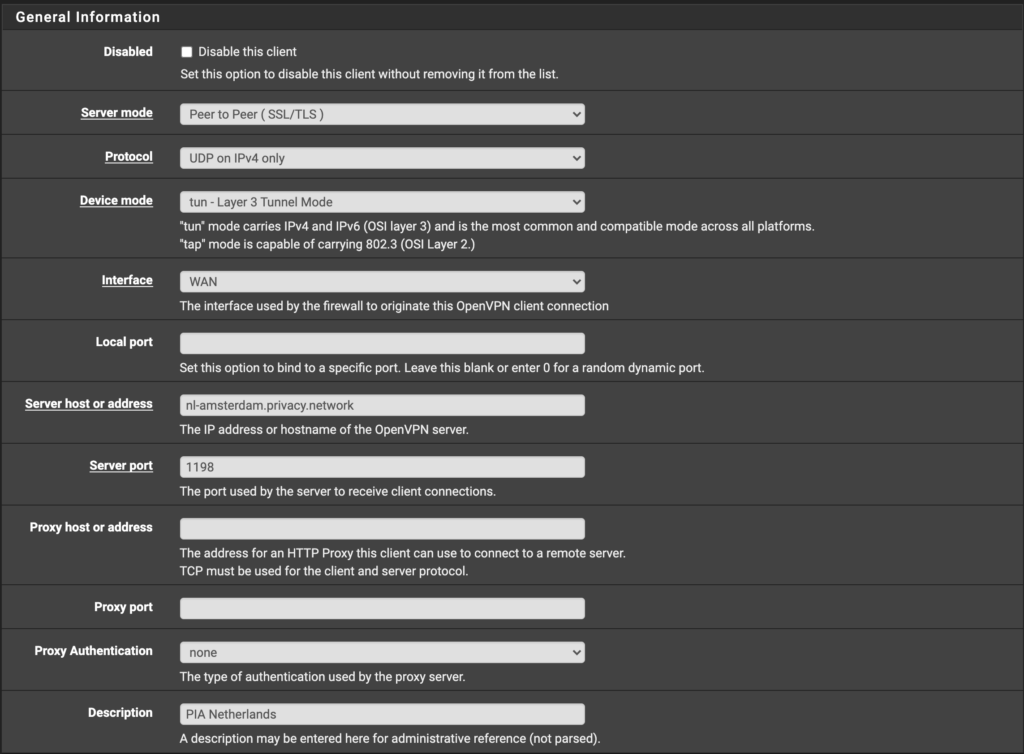
Configure OpenVPN Client
Now we have the certificate listed, navigate to VPN > OpenVPN, then click Clients and finally click ADD.
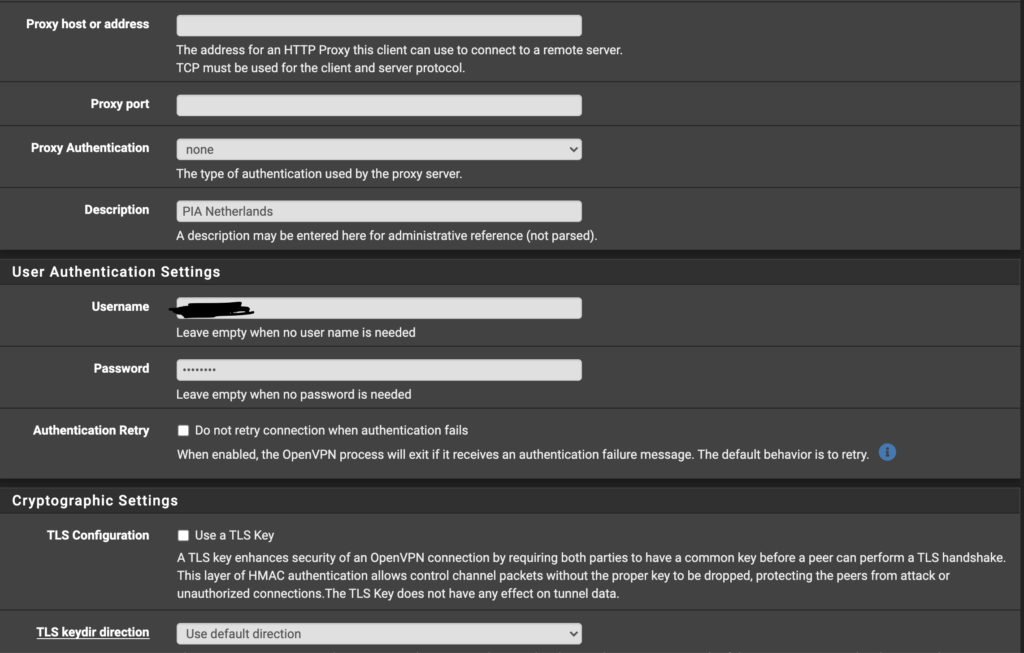
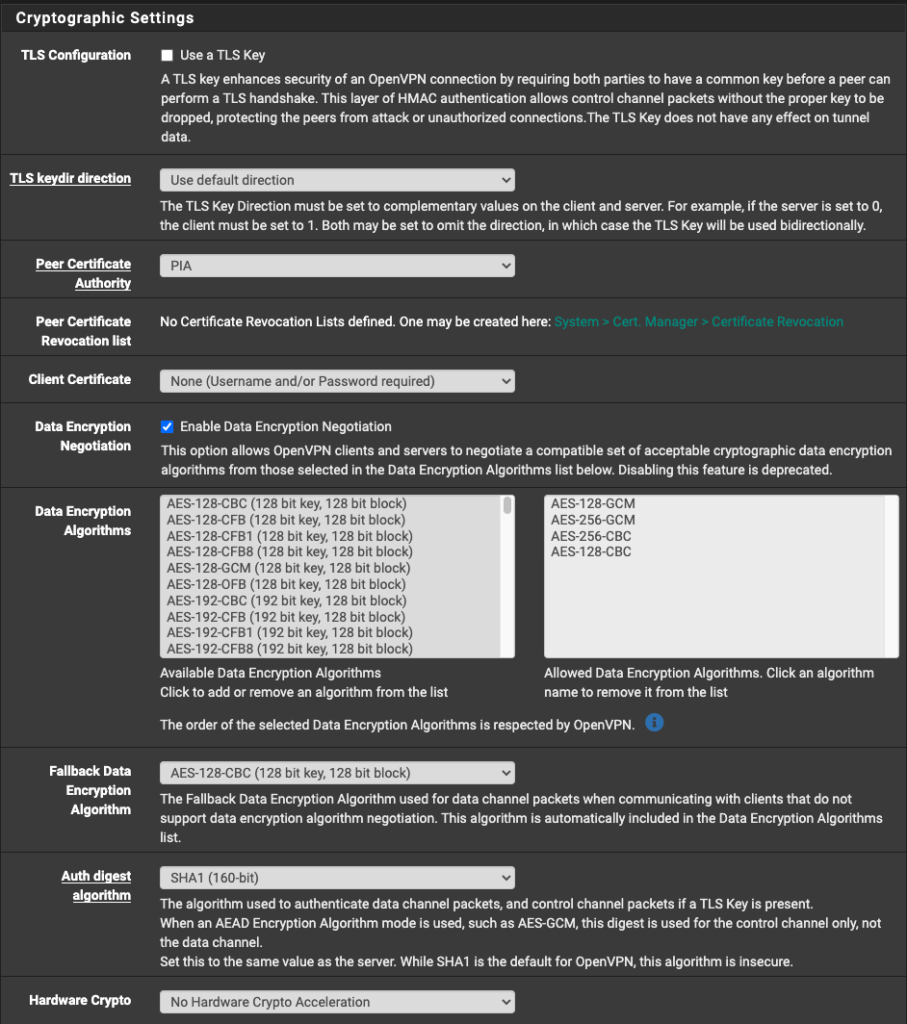
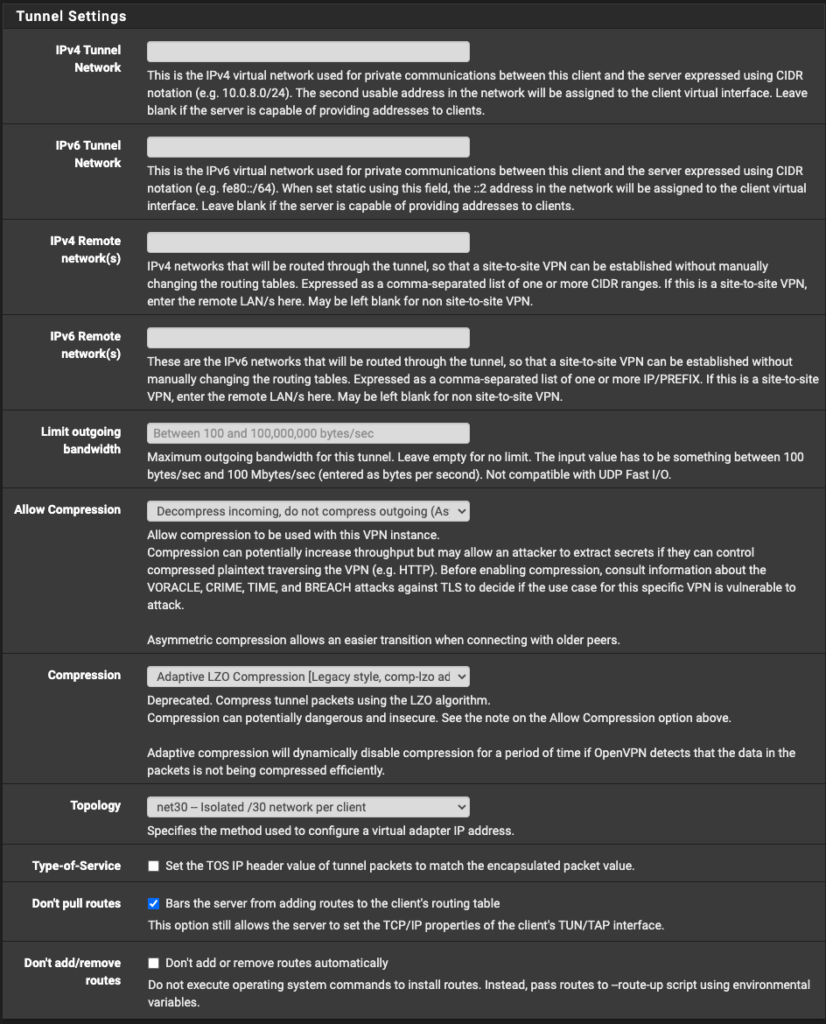
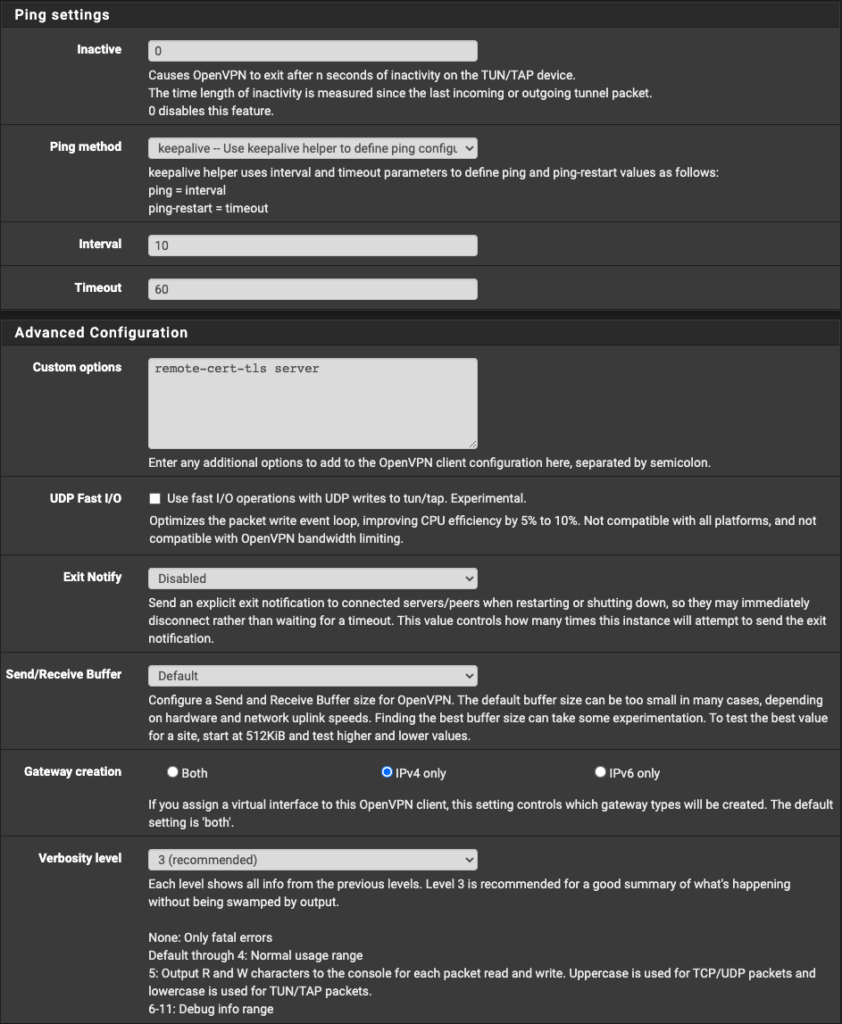
See the following images about changes to make in. your configuration. It should match mine with replacement of the Server Host and your PIA Username and Password. You will find the server host in the .ovpn file you downloaded earlier from PIA. Here is the info needed to copy+paste into the “Custom options” box toward the end of the configuration page:
remote-cert-tls server
#UPDATE
If you prefer to using the more secure 4096 key and want SHA256 as well as AES256 encryption, you must paste the below into the “Custom options” box toward the end of the configuration page, rather than what is stated above.
remote-cert-tls server;
persist-key;
persist-tun;
#UPDATE
If you prefer to using the more secure 4096 key and want SHA256 as well as AES256 encryption, you must use Port 1197 instead of the Port 1198 shown in the image below.
#UPDATE
If you prefer to using the more secure 4096 key and want SHA256 as well as AES256 encryption, in the image below, ONLY select AES-256-CBC under “Data Encryption Algorithms”.
Under “Fallback Data Encryption Algorithm”, select AES-256-CBC (256 bit key, 128 bit block).
Under “Auth digest algorithm”, select SHA256 (256-bit).
With the greater encryption, I highly recommend enabling “Hardware Crypto” if possible. My selection is Intel RDRAND engine - RAND*.
#UPDATE
If you prefer to using the more secure 4096 key and want SHA256 as well as AES256 encryption, you must paste the below into the “Custom options” box, rather than what is shown
remote-cert-tls server;
persist-key;
persist-tun;
pfSense Gateway and Interface Assignment
Now, we move to the complicated part. For this step, we will need to create a Gateway on pfSense for the traffic to use. I will detail this more later, but my setup contains a WAN (corresponding to a 10.99.1.0/24 subnet on Unifi), LAN (corresponding to a 10.99.2.0/24 subnet on Unifi), VLAN500 (which is the VLAN tag on my Unifi setup) and PIA interface. I will detail the setup of each, which will move us to the Unifi setup.
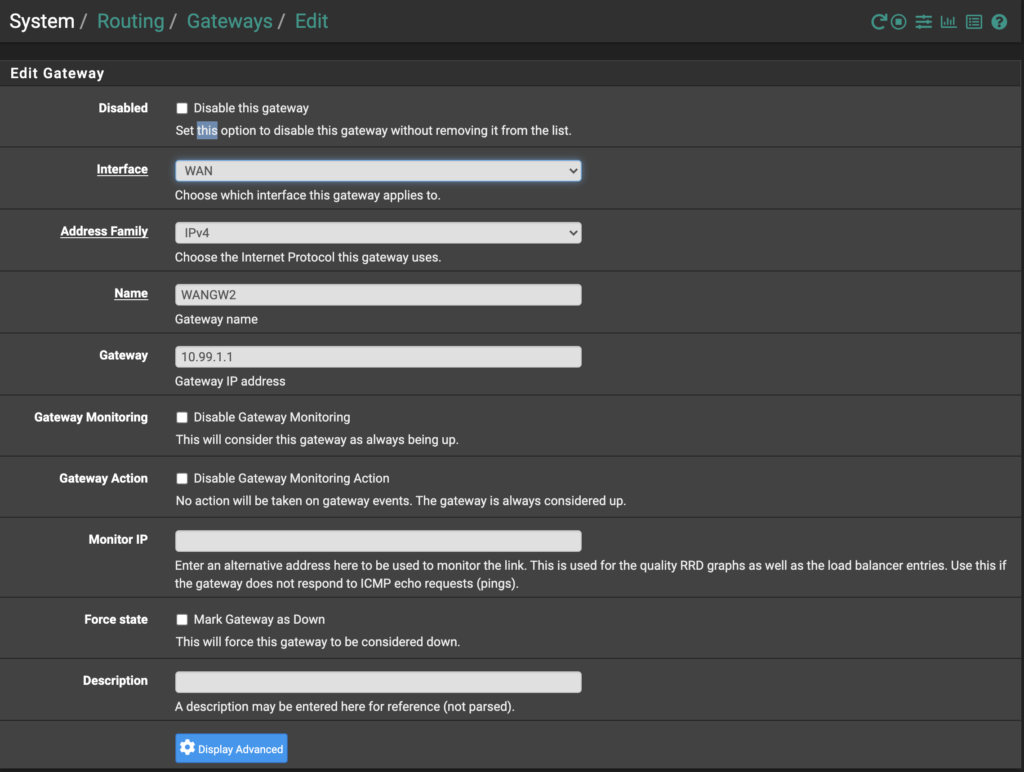
Configure the Gateway
First, go to System > Routing > Gateways and click "+ Add" to add a Gateway for this setup. Add the Gateway IP from your Unifi Gateway, which, in my case, the Gateway IP is 10.99.1.1 corresponding to the Unifi UDMP’s address in that subnet (subnet is 10.99.1.0/24, named pfSense WAN on Unifi). Save and continue.
Interface Assignments
Now go to Interfaces > Assignments. If a WAN interface is already assigned, great! Edit to ensure it looks similar to below (I chose 10.99.1.15 for my static WAN IP because it was easy to remember. You can use any address in the 10.99.1.0/24 subnet EXCEPT for the Gateway, 10.99.1.1). Be sure the IPv4 Upstream gateway is set to the Gateway we just made. Additionally, check “Block bogon networks” at the bottom of the configuration page.

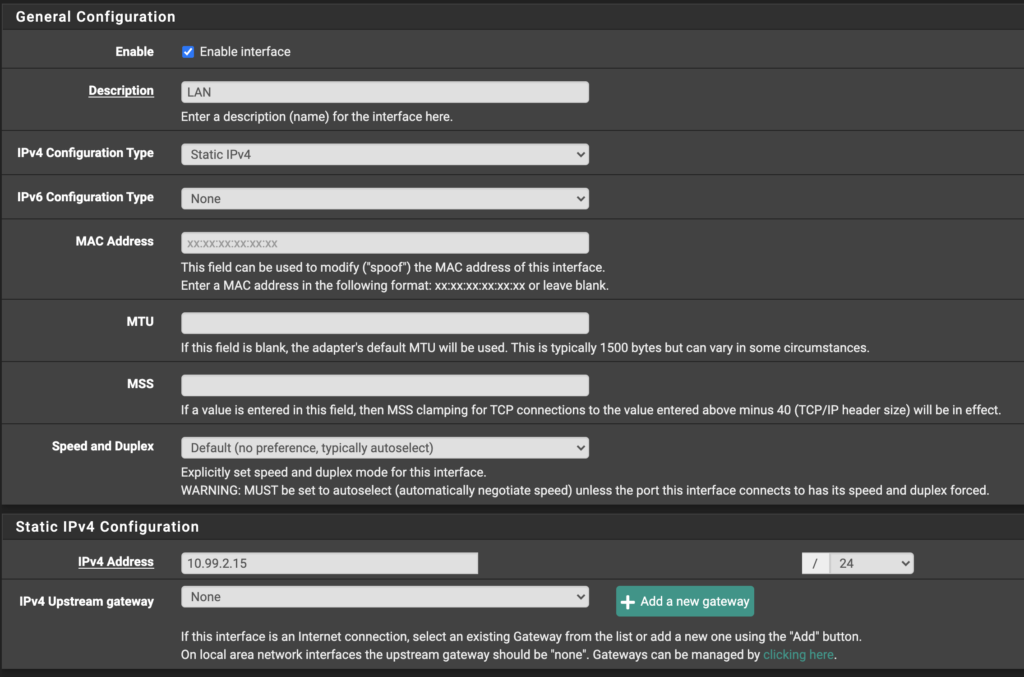
Likewise, check your existing LAN interface, if it exists, or create one as follows below. The LAN interface corresponds to the 10.99.2.0/24 subnet, where devices tagged with the VLAN 500 will go and retrieve their DHCP lease on Unifi. Again, I set my LAN interface IP to 10.99.2.15 because it seemed easy to remember for me. Make sure the IPv4 Upstream gateway is set to “None.” DO NOT block bogon networks on the LAN interface.
Add a PIA Interface
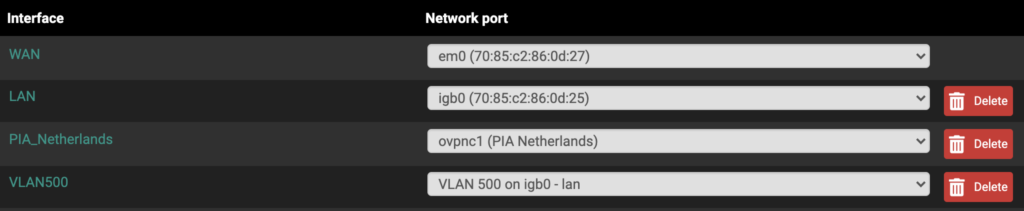
On the dropdown for “Available Network Ports” you should see your PIA VPN listed. Select your PIA VPN, and click add.
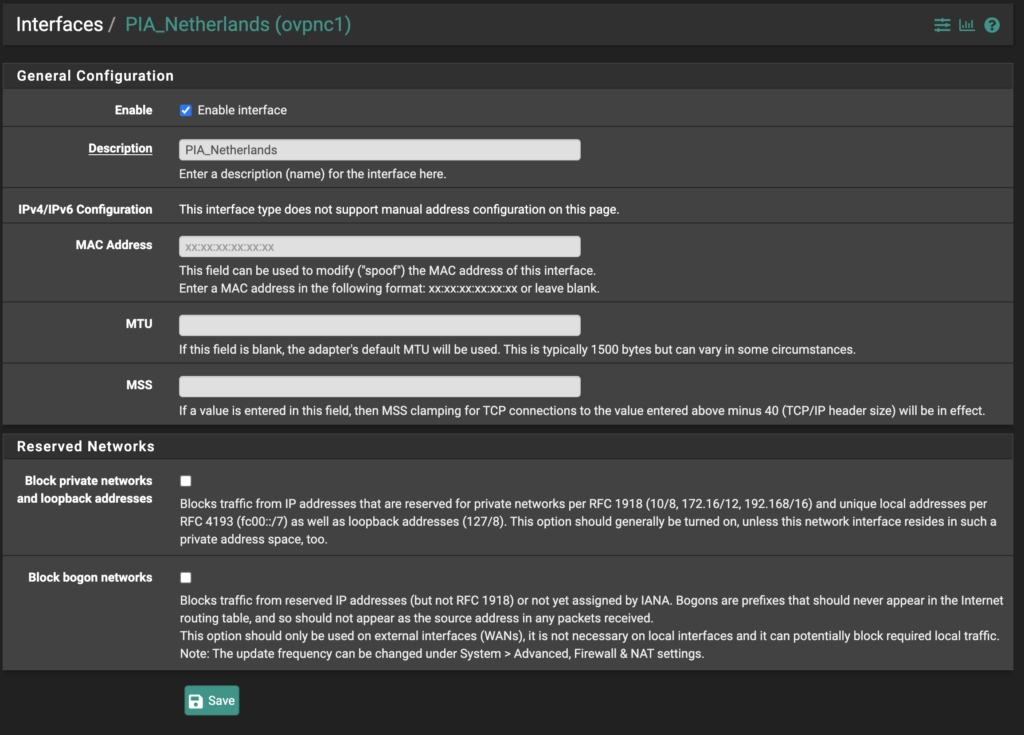
Now that the interface has been added, click on the interface name (it will likely be something like OPT2 or OPT3, but yours may be different…it should be at the bottom of the list). Now you can check the box to enable the interface and give it a better name, I called mine PIA_Netherlands. Also, make sure the reserved network checkboxes are unchecked.
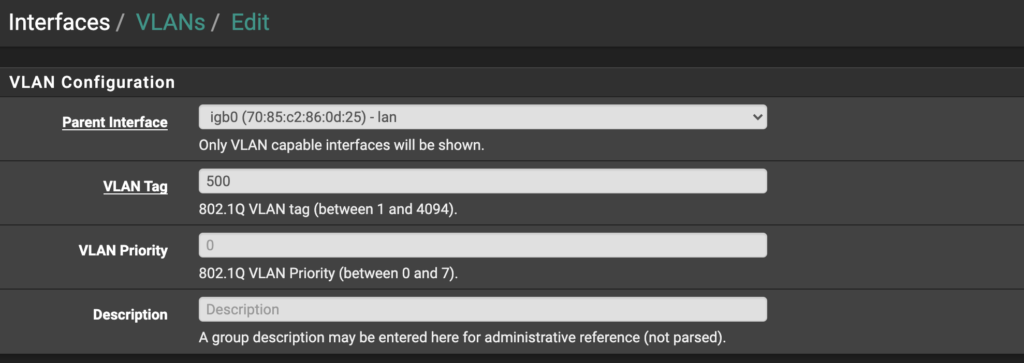
Finally, go to Interfaces > VLANs and add a VLAN. Here, choose your previously configured LAN interface as the parent interface, and choose a VLAN tag between 1 and 4094. This tag will be used in Unifi. I chose 500.
Finally, you will need to plug in both physical interfaces corresponding to your WAN and LAN interfaces. If you have only two NICs on your pfSense box, you should easily be able to figure out which port corresponds to which interface. If you have more than two NICs, it may be more difficult. You need to know which port is which because you will need to tag the LAN interface with the VLAN 500 in Unifi (you can do this now, but we will cover it shortly).
Outbound NAT Rules
Select Firewall > NAT, and click Outbound.
Click the radio button to change the outbound NAT mode to Hybrid, and click Save.
You will need to make rules for the traffic that will need to reach the VPN, which will be the subnet from Unifi that you will add (e.g., in my case, 10.99.2.0/24 is the PIA Subnet). The rules are as follows (see the image below): Localhost to PIA rule, ISAKMP Localhost to PIA rule, LAN (Subnet) to PIA rule, ISAKMP LAN (Subnet) to PIA rule.
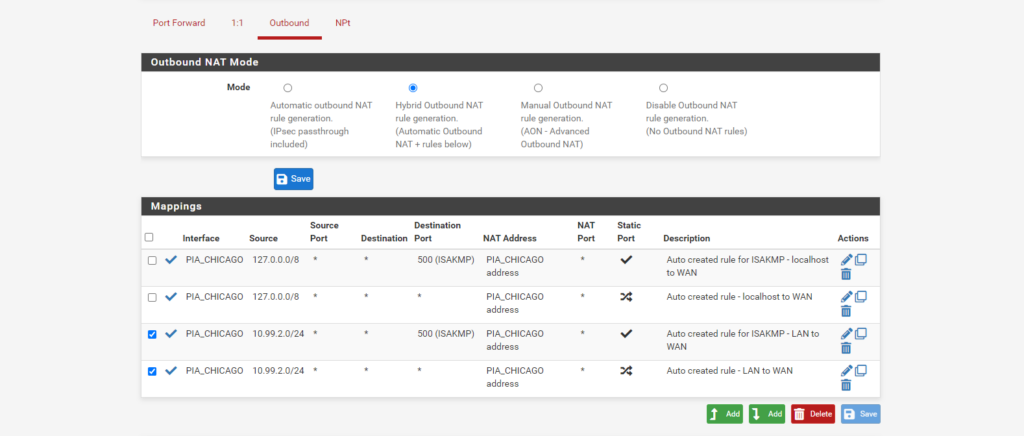
Outbound NAT Rules
Below, I will show the settings page for each of the rules that I needed. If you have more interfaces or subnets, you will need to create your own rules to match. Just replace my values with your own.
Your “localhost” and “127.0.0.0” information will be the same as mine. You will just need to replace the PIA_CHICAGO with your own PIA Interface you created earlier along with your intended subnet to be created in Unifi (e.g., 10.99.2.0/24).
ISAKMP - localhost to WAN
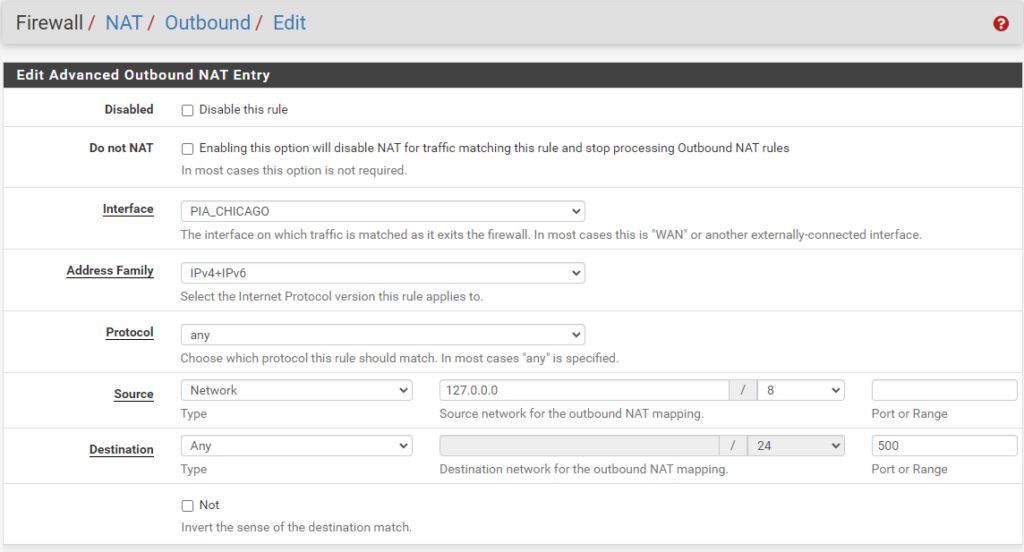
ISAKMP - localhost to WAN
localhost to WAN

localhost to WAN
ISAKMP - LAN (Subnet) to WAN
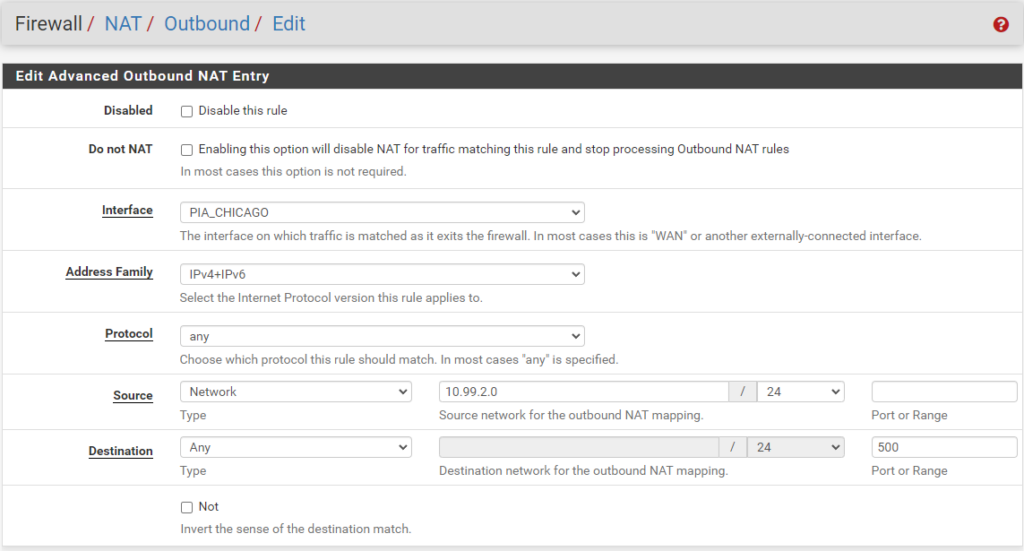
ISAKMP - LAN (Subnet) to WAN
LAN to WAN
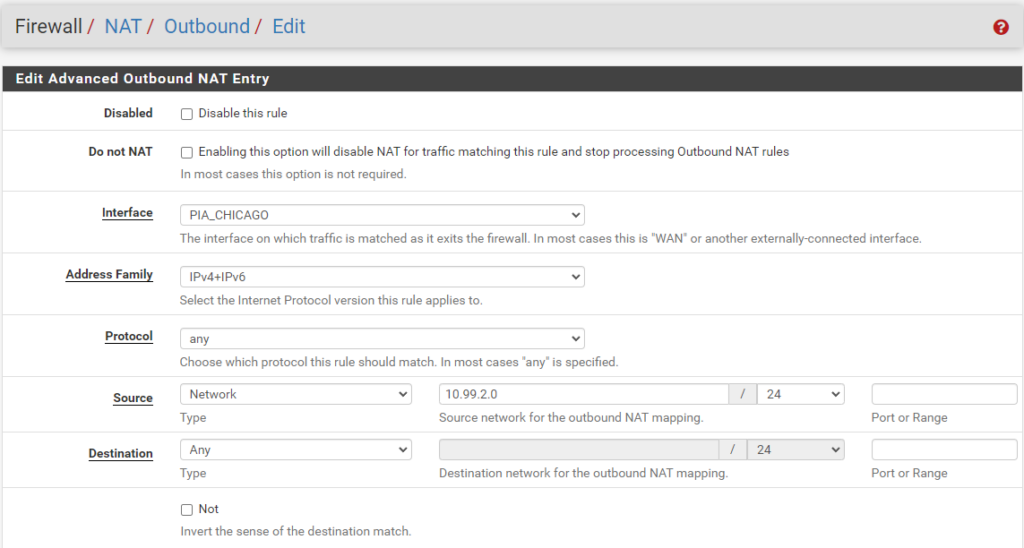
LAN to WAN
This concludes our setup of pfSense.
We can now head over to Unifi!
Unifi Setup and Configuration
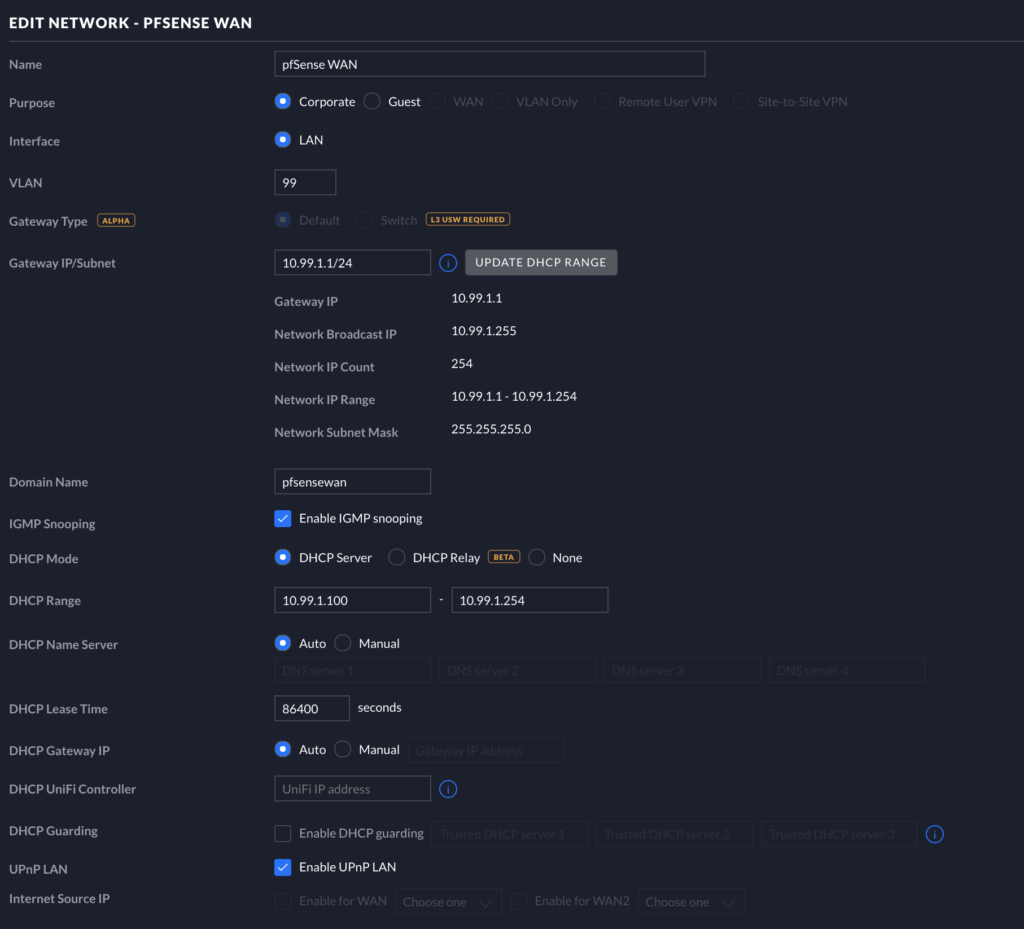
In our Unifi Settings page, we will create two Corporate LAN networks: one will be for the pfSense WAN, and the other will be for the pfSense LAN. As shown in the image below, the subnets correspond to the subnets we mentioned and configured for pfSense above.

pfSense WAN on Unifi
Make a new Corporate LAN on Unifi for your pfSense WAN, and match the options to the options in the image below. Make sure your subnet matches the subnet added to pfSense earlier for the WAN interface.
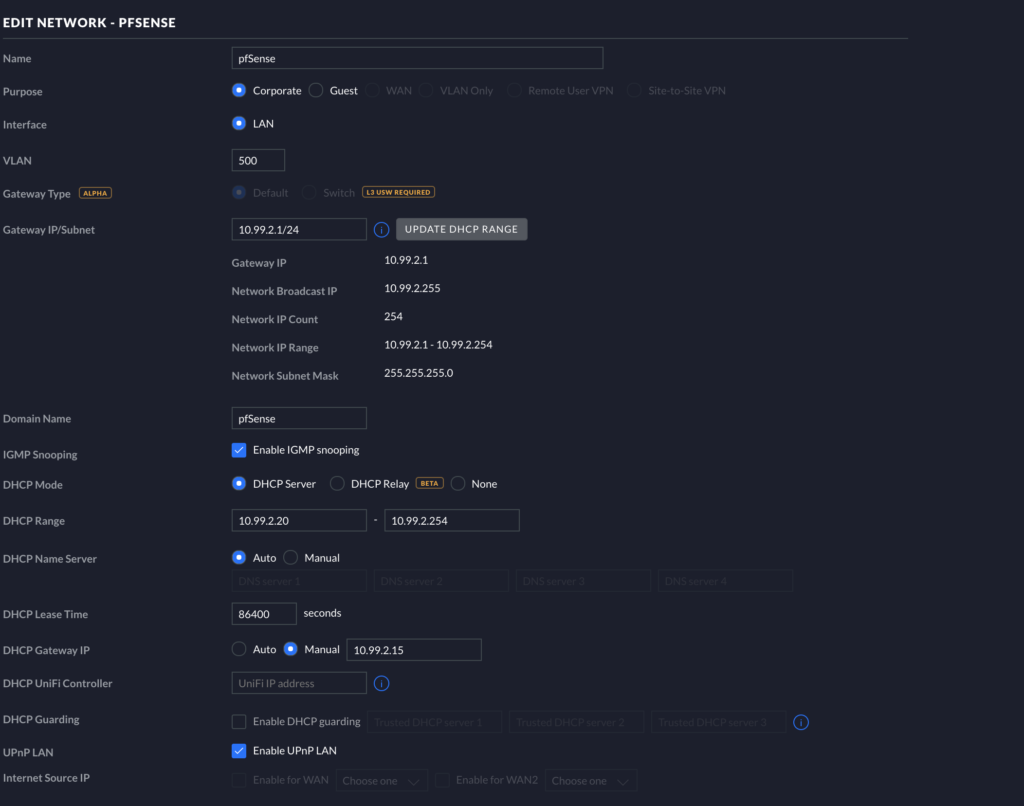
pfSense LAN on Unifi
Make another Corporate LAN in Unifi. Below is my settings page for the pfSense LAN. You can match your settings to mine. Be sure to set the DHCP Gateway IP to the static IP address you gave to the pfSense LAN Interface earlier (e.g., 10.99.2.15). Also be sure to add THE SAME VLAN as you did in pfSense earlier (e.g., VLAN 500).
Finally for the Unifi LAN, you will need your pfSense physical port (the one corresponding to the LAN interface) plugged into Unifi, and you will need to manually set the port to use the VLAN you set up.
Tagging Ports on Unifi Switches
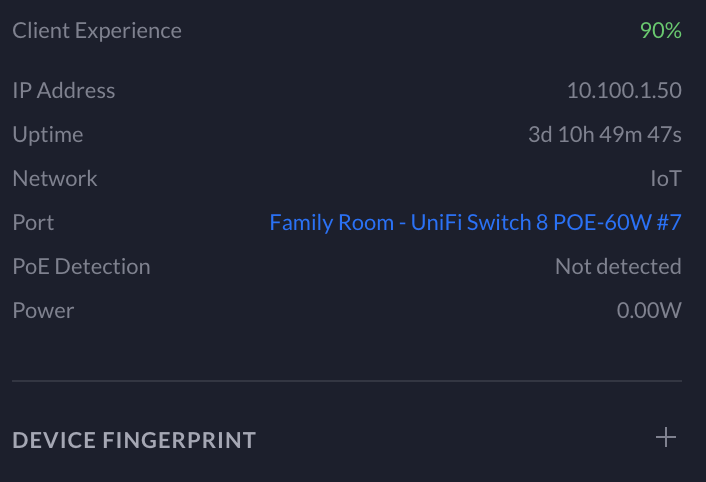
From your Unifi clients page, select a client you want to add to pfSense. Under the overview of the client, select the Port it is plugged into (e.g., Family Room - UniFi Switch 8 POE-60W #7 as shown below).
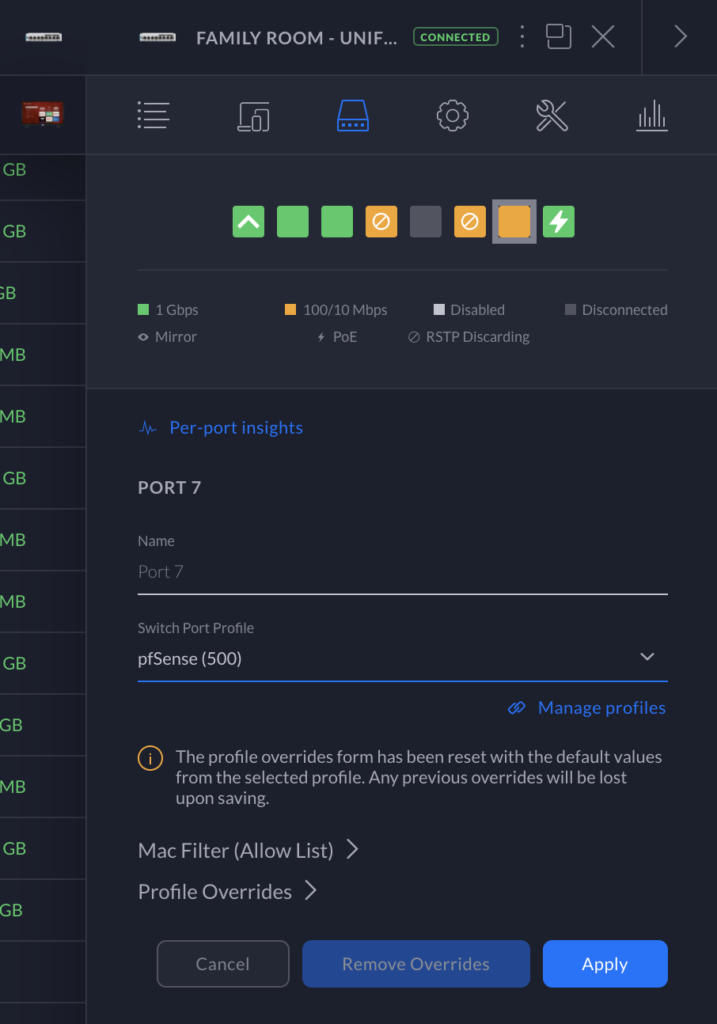
This should bring up a page that allows you to specifically override the configuration of that port. At this point, select the new pfSense (500) Port Profile (if the Port Profile is not here, please skip to the end of the article to find out how to add the profile). Once you apply the configuration, your device will obtain a new DHCP lease from Unifi in the new pfSense subnet. Then, your wired device will be sending its traffic through PIA.
Adding Wireless Clients to pfSense on Unifi APs
Go to Settings > Wireless Networks and click “CREATE NEW WIRELESS NETWORK.” You can mimic the setup from the image below, but the important aspect here is to select pfSense as the Network with which the WLAN is associated (see pic below). Now, any devices connected to this Wireless network will have their traffic sent through PIA! Verify this is working by going to “whatismyip.com” on a mobile device or some other device on this WLAN.

END
Congratulations if you made it this far and everything is working!
I hope this tutorial aids you in your endeavors to anonymize certain portions of your network. This post will be a pre-requisite for a following post, (Policy Based Routing with Unifi, PIA, and pfSense: How I route my IoT External Traffic through PIA VPN)(https://whitematter.tech/posts/VPN-policy-based-routing-with-unifi-and-PIA)
As always, if you have any questions, feel free to start a Discussion on GitHub, submit a GitHub PR to recommend changes/fixes in the article, or reach out to me directly at [email protected].
Thanks for reading!
Robert
TROUBLESHOOTING
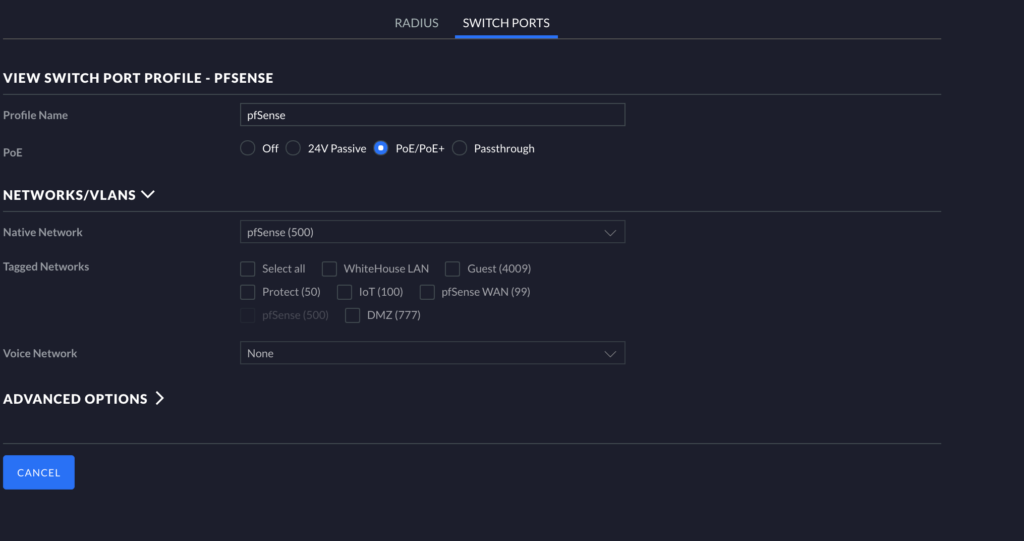
Adding Missing Port Profiles
If for some reason the Port Profile was not made automatically when you created your respective networks, you may need to go to Settings > Profiles in the Unifi dashboard. On this page, switch from RADIUS to SWITCH PORTS. Click “ADD NEW PORT PROFILE.” Name the Profile and then click Native Network, and assign the pfSense network to this profile as shown below. Once selected, click Save/Apply. You can return to the assignment area and assign ports appropriately to use the pfSense VPN.