Introduction
In this post, I will show you how to use policy-based routing in Unifi to route specific traffic through a VPN client (I use Private Internet Access) on pfSense. This setup allows you to retain complete control of your devices and subnets via Unifi’s Network app while taking advantage of pfSense’s ability to host a VPN client.
With this setup, I am getting my full ISP speeds on devices using a VPN for encryption. Depending on your hardware, you should be able to get full speeds as well.
This post will not detail how to setup the VPN client or how to segment a Unifi network with subnets and VLANs. Instead, this post complements a previous post about adding VLAN segmentation for HomeKit IoT devices with Unifi and requires setting up a routable VPN client on pfSense as explained in a previous post.
Requirements
- Unifi Gateway with at least two WAN capable ports [in my case, the gateway is the Unifi Dream Machine Pro (hereafter referred to as UDMP)])
- VPN Client (I use Private Internet Access)
- pfSense (I built a custom baremetal pfSense machine with the following components: Intel(R) Core(TM) i5-8500 CPU @ 3.00GHz, GIGABYTE B365M DS3H, Corsair Vengeance LPX 16GB, Thermaltake Smart 500W Power Supply, and a 4-Port PCI-E Network Interface Card.)
- An unused port on pfSense connected to Unifi
Overview
The finished project will have a few coordinating components. On the pfSense side, we will be creating a subnet (for the purposes of this post, 10.99.3.0/24) and an interface (which will be 10.99.3.15) which will act as the gateway for WAN2 on Unifi. The pfSense subnet will be routed through your VPN client, which will encrypt the traffic and send it out through pfSense’s WAN connection, which is in the 10.99.1.0/24 subnet on Unifi. Here, the traffic will exit via WAN1 (e.g., your ISP).
client —policy-based routing—> Unifi WAN2 (10.99.3.10) —> pfSense subnet (10.99.3.0/24) (via pfSense Interface acting as gateway [10.99.3.15])—> PIA Gateway (traffic is encrypted) —> pfSense WAN (10.99.1.15) —> Unifi “pfSense WAN” subnet (10.99.1.0/24) —> Unifi WAN1 (ISP)
Don’t worry if this doesn’t make sense right now. I am finding it challenging to describe the flow better. A picture would be worth a thousand words. Check back sometime in the future, and maybe this description will be a nice, pretty image instead of a blob of text.
Preparing pfSense
As a reminder, these instructions assume you have already setup a VPN client on pfSense and have that client assigned to an interface with appropriate NAT rules. If you have not done this yet, please check out my previous post on this topic.
If you have already completed these steps, proceed.
Setting the Interface
First, we will create an interface and subnet that will be used for Unifi’s WAN2 connection. Go to Interfaces > Assignments, and select one of the available Network ports. You will need to know where this interface is connected to Unifi, and taking note of the MAC address may prove useful. Once the interface is selected, click Add. Then, select the newly created interface in your list of interfaces.
Setup your new interface to look similar to the image below. Be certain to select Enable interface, and set a static address that can be used in Unifi (in my case, 10.99.3.15/24). Be sure not to overlap subnets with existing Unifi/pfSense subnets. Also, be sure to choose a reasonable CIDR that will allow your Unifi WAN2 to have an address that can communicate with the pfSense address (10.99.3.15/24). It is easy to accidentally leave the CIDR set to the /32 default.
Outbound NAT Rules
If you followed the instructions in my previous post, these instructions will be identical with the exception of changing your subnet addresses where applicable.
Select Firewall > NAT, and click Outbound.
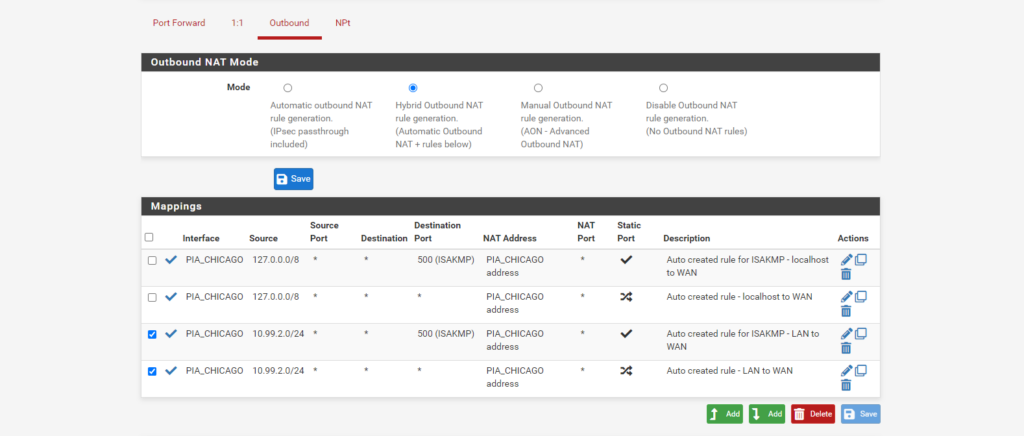
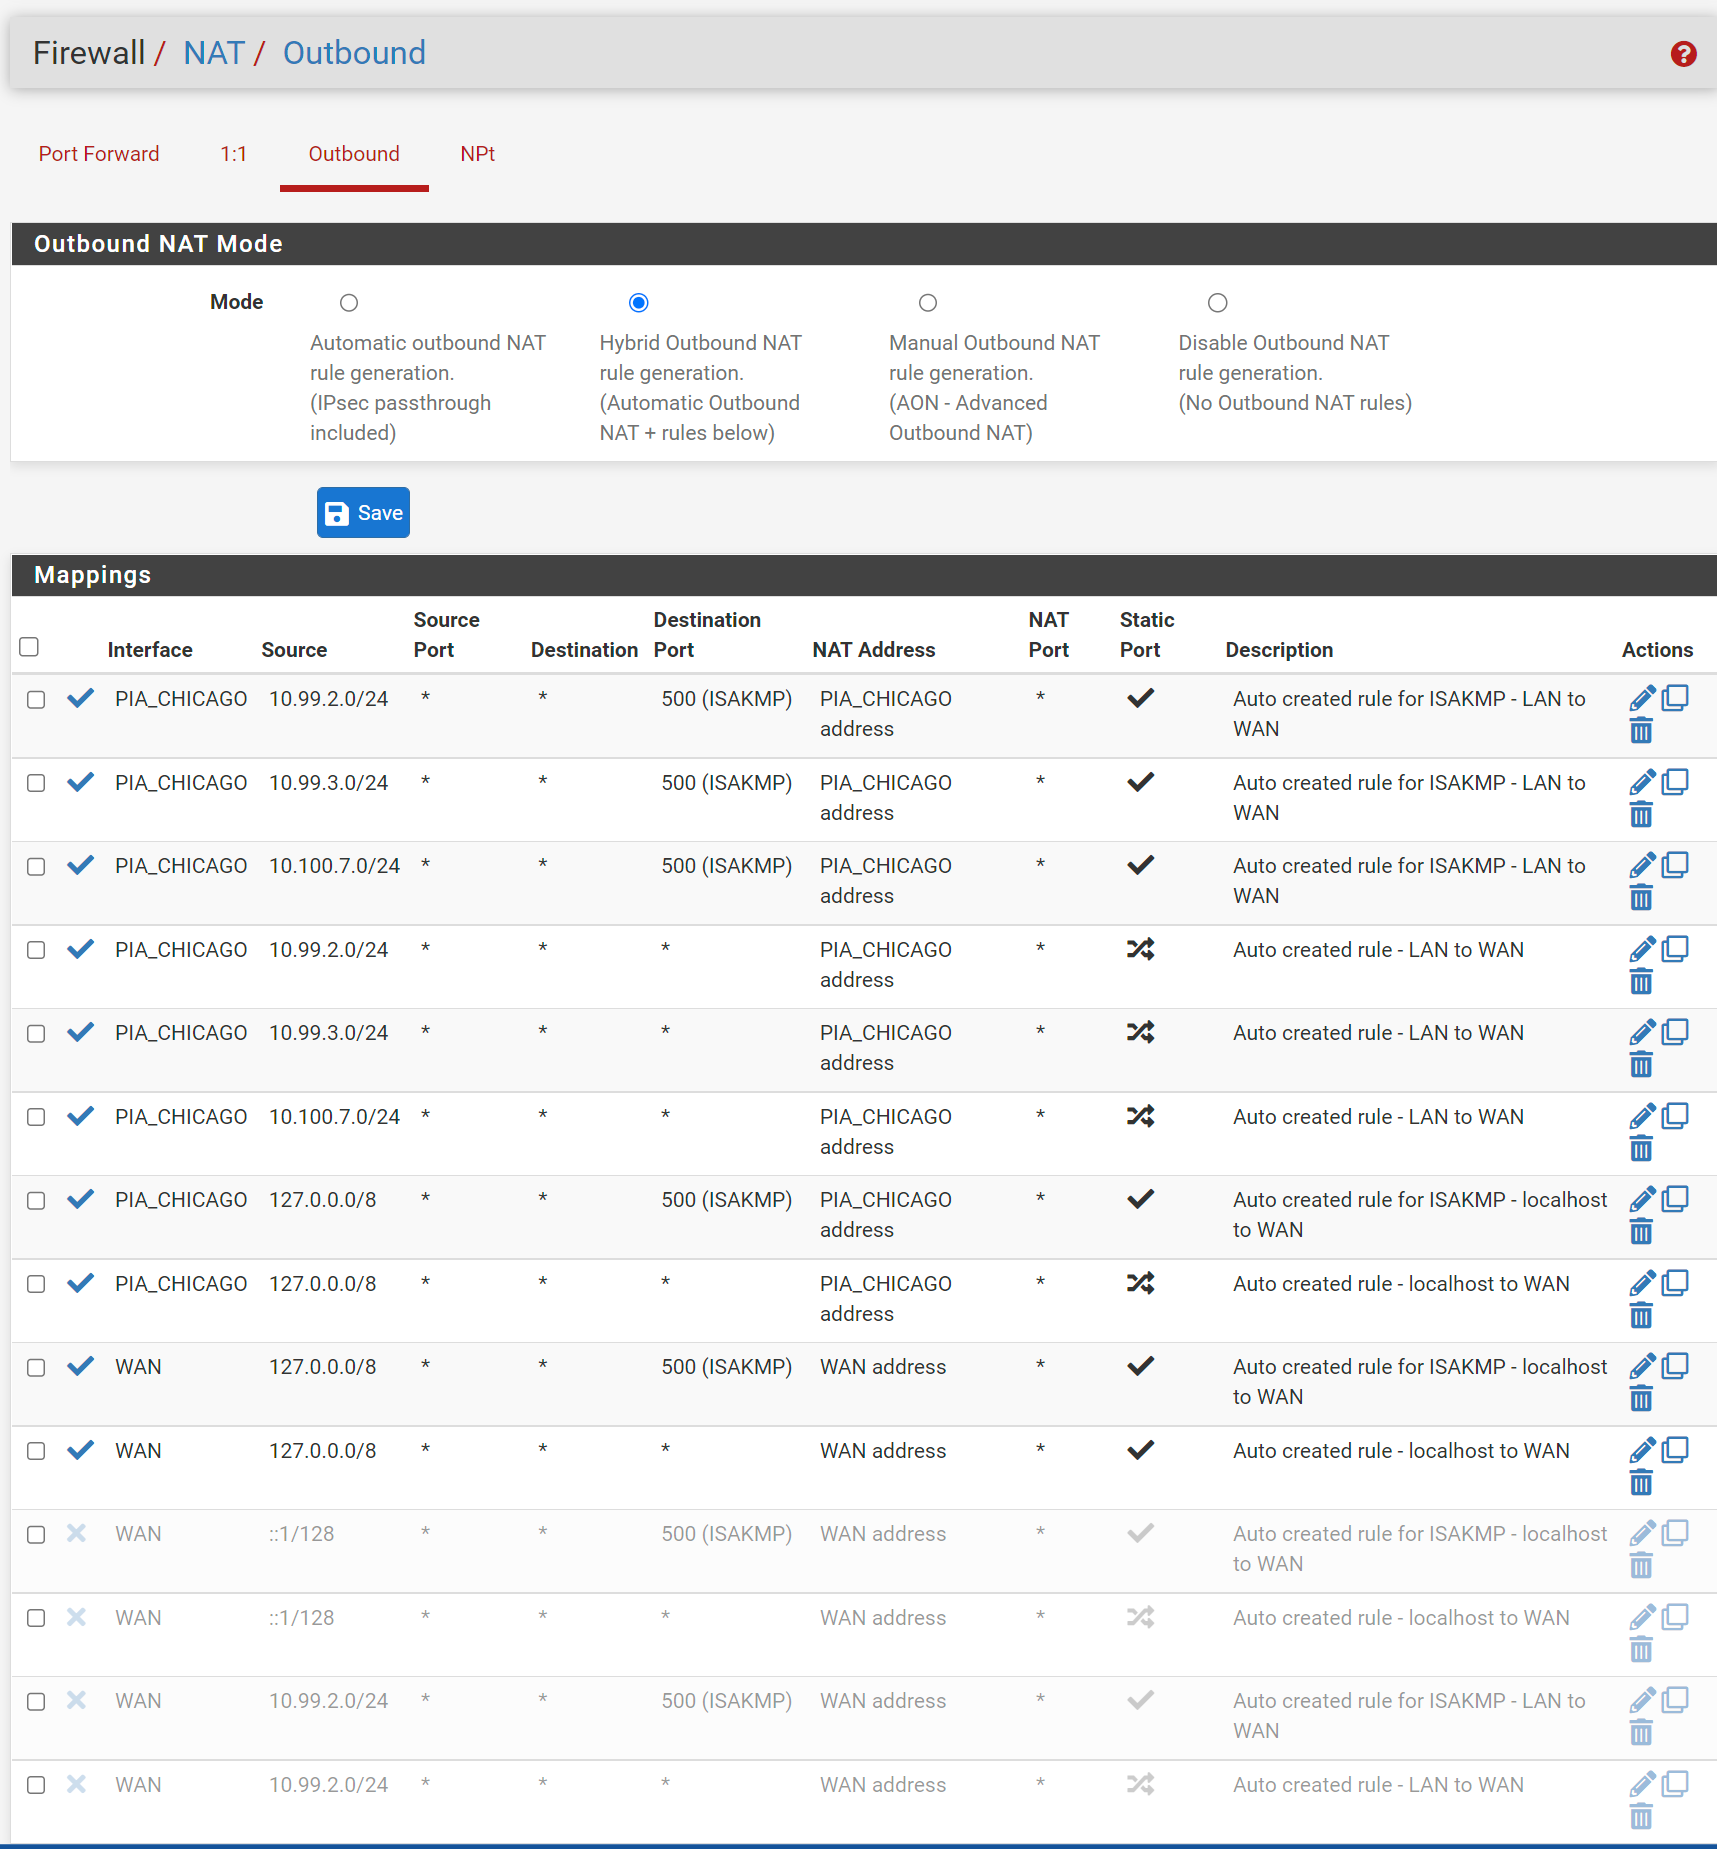
Click the radio button to change the outbound NAT mode to Hybrid, and click Save.
You will need to make rules for the traffic that will need to reach the VPN, which will be the subnet from Unifi that you will add (e.g., in my case, 10.99.2.0/24 is the PIA Subnet). The rules are as follows (see the image below): Localhost to PIA rule, ISAKMP Localhost to PIA rule, LAN (Subnet) to PIA rule, ISAKMP LAN (Subnet) to PIA rule.
Below, I will show the settings page for each of the rules that I needed. If you have more interfaces or subnets, you will need to create your own rules to match. Just replace my values with your own.
Your “localhost” and “127.0.0.0” information will be the same as mine. You will just need to replace the PIA_CHICAGO with your own PIA Interface you created earlier along with your intended subnet to be created in Unifi (e.g., 10.99.3.0/24).
ISAKMP - localhost to WAN
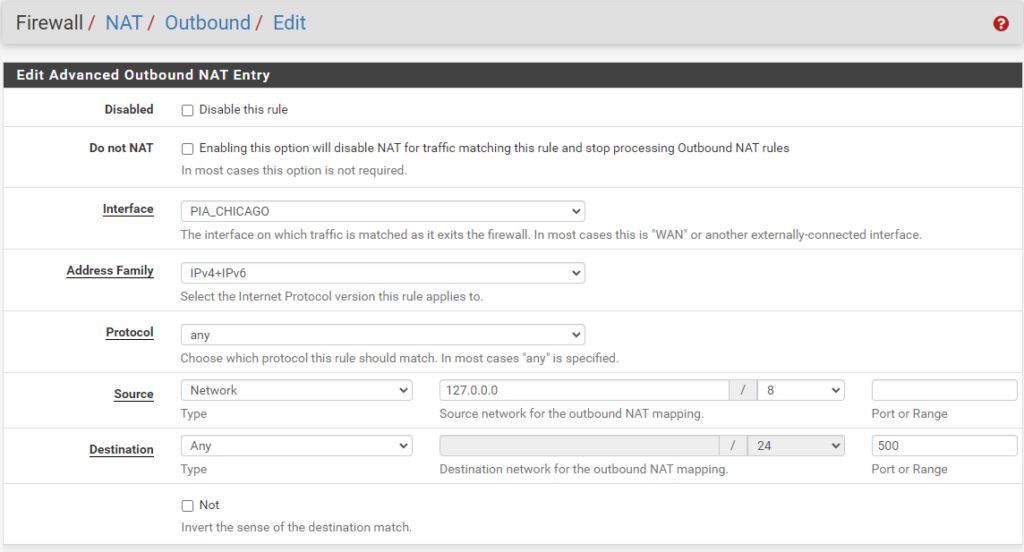
ISAKMP - localhost to WAN
localhost to WAN

localhost to WAN
ISAKMP - LAN (Subnet) to WAN
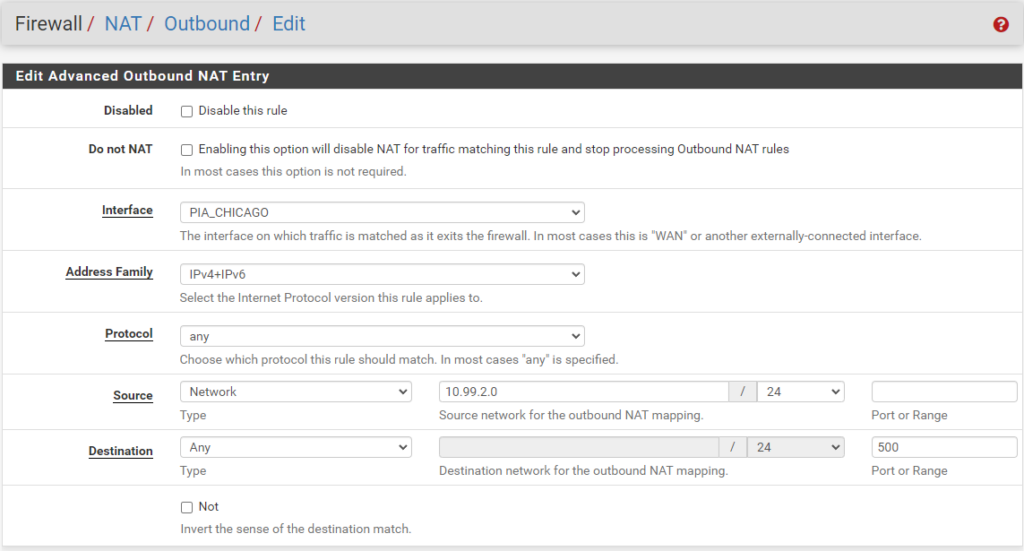
ISAKMP - LAN (Subnet) to WAN
LAN to WAN
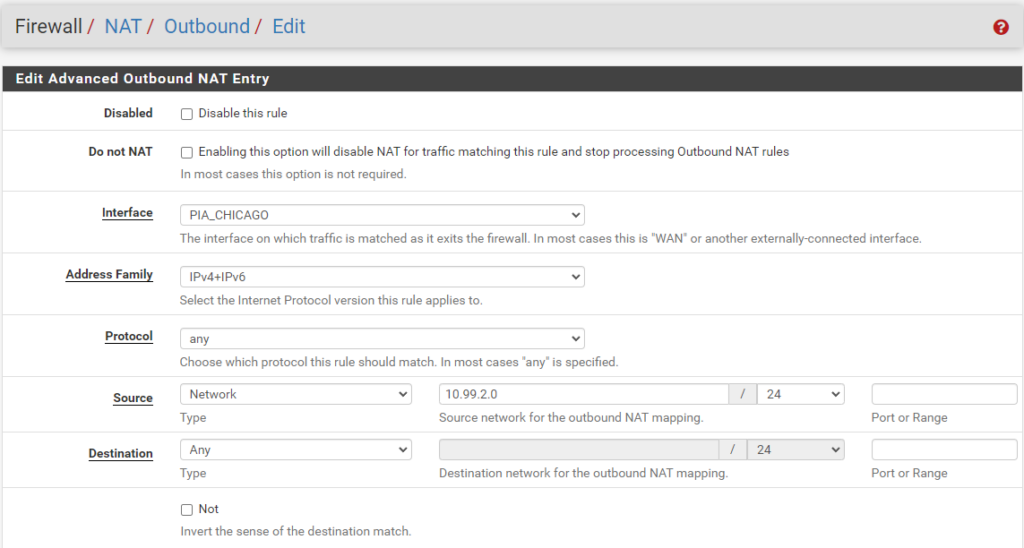
LAN to WAN
When you are finished with these rules, your setup will likely look a bit more like this:
Firewall in pfSense
To ensure you do not have traffic leaks from your subnet that are not encrypted, we need to create an allow rule and a block rule.
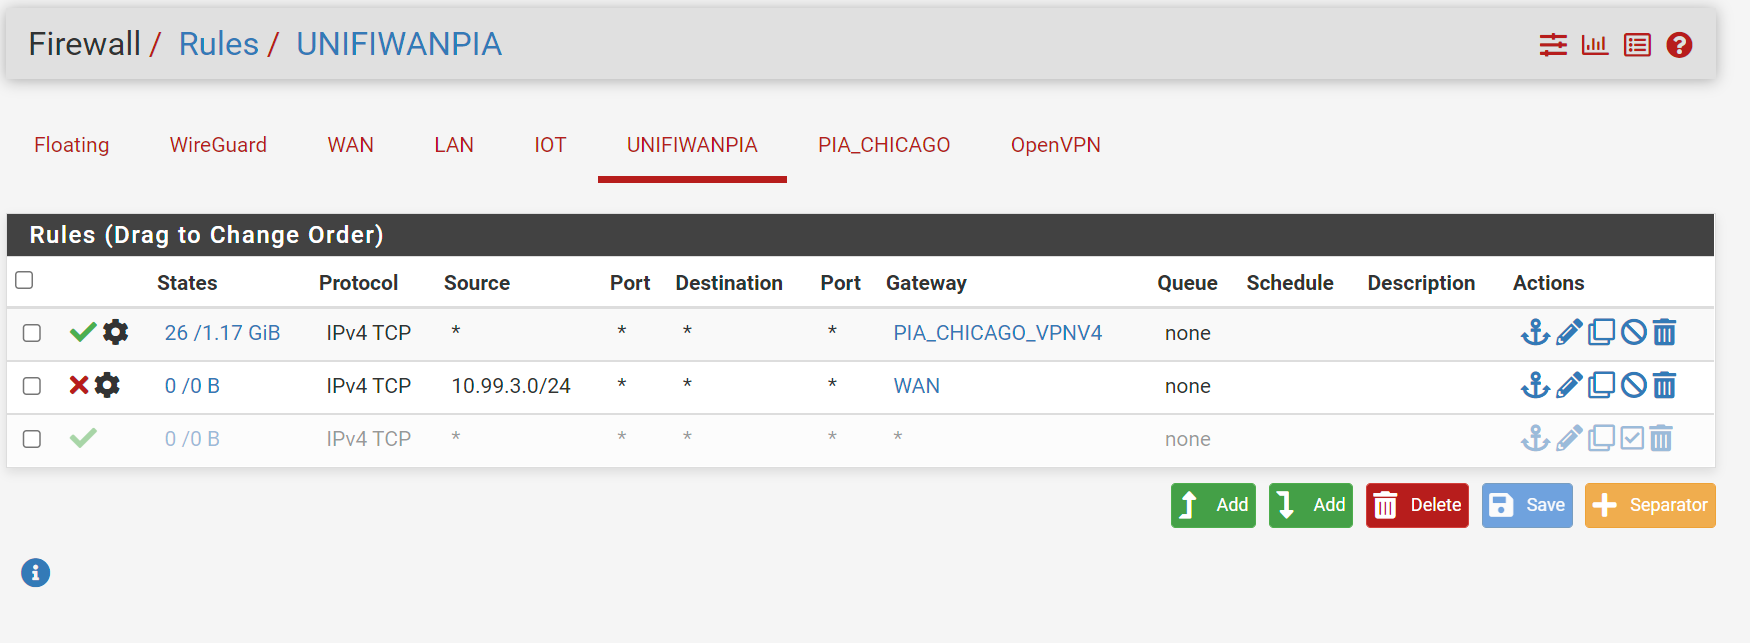
Go to Firewall > Rules and select the name of the Interface you created earlier. Click Add and create an allow rule from any source/port to any source/port. Under the Advanced options for this rule, select the PIA_CHICAGO Gateway under Gateway. Save the rule.
Now, create another rule. This time, under Source, select Network and input your 10.99.3.0/24 subnet (remember to change the CIDR to /24).
Preparing Unifi
The screenshots taken from Unifi will be on the new interface. If you are using the old interface, your setup will be slightly different.
Assign WAN2
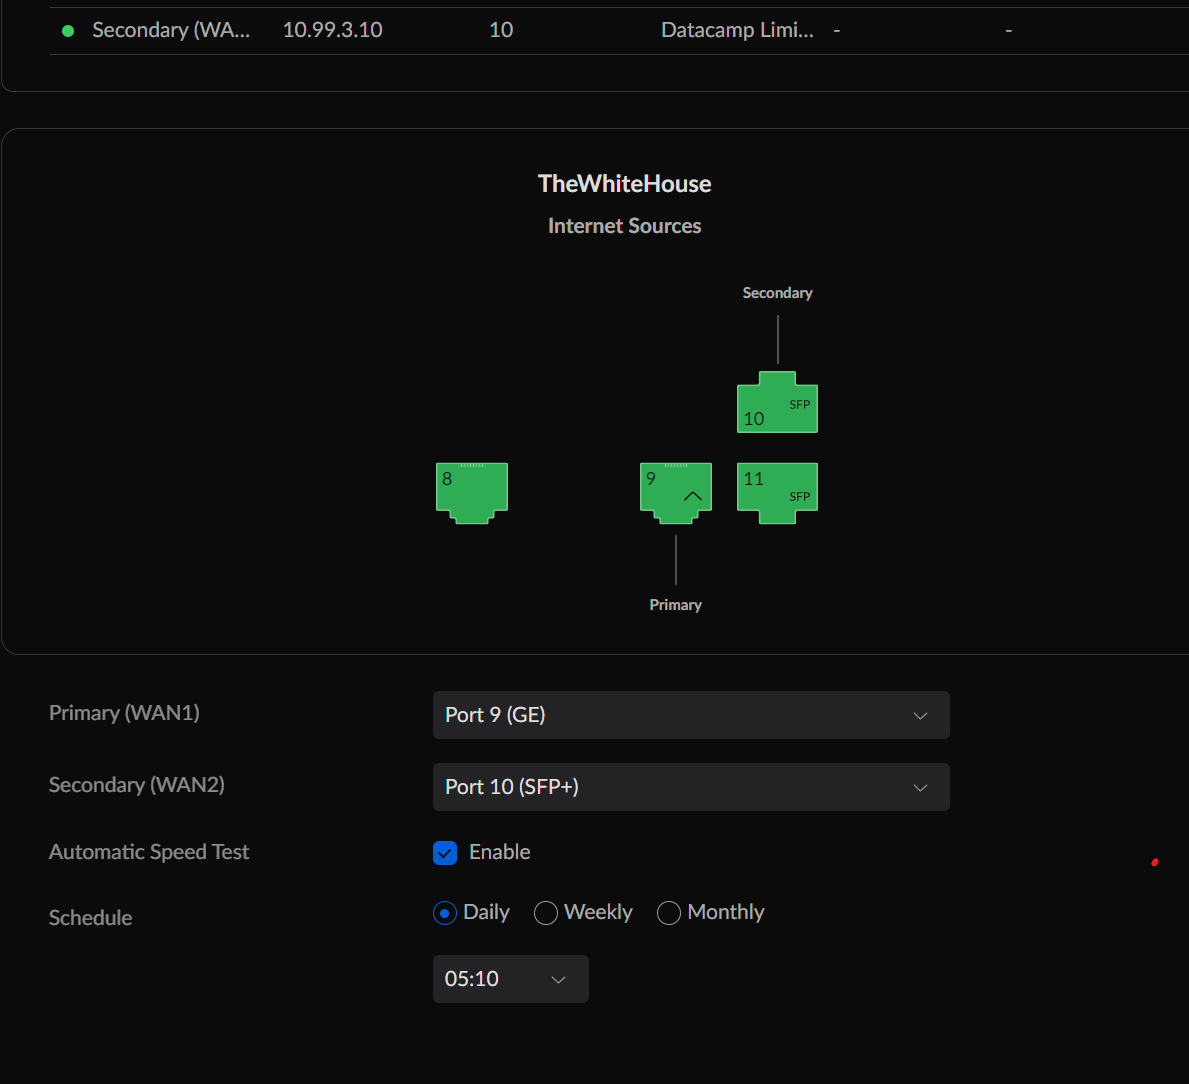
Now, in Unifi, go to Settings > Internet. Select the second WAN option from the list. The cable connected to your pfSense Interface created above should be plugged into the WAN2 port.
Set your WAN2 settings to match the image below, taking specific care to set a static IP address in the subnet you defined earlier (e.g., 10.99.3.10). For the gateway, set the pfSense static address you defined above (e.g., 10.99.3.15). Once complete, click save.

Policy-Based Routing
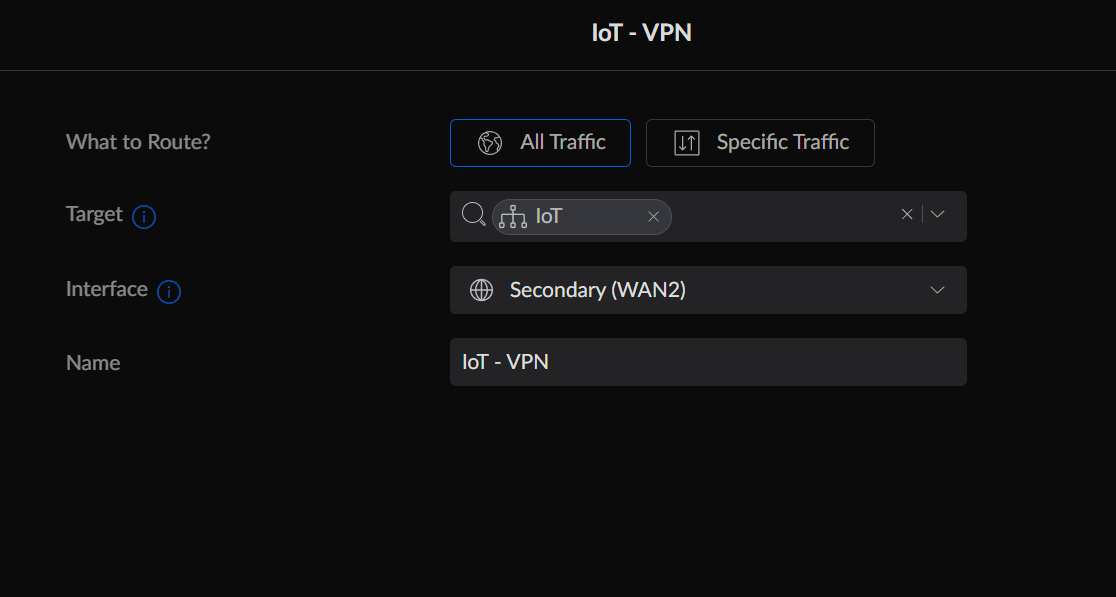
Finally, go to Settings > Traffic Management. Under Routes, click Create New Route. Here, you can define the type of traffic you want to route. For example, see the image below, where I am targeting my IoT subnet and routing it to WAN2. It really is that simple!
All the traffic routed through WAN2 should now be encrypted via your VPN client.
END
Congratulations if you made it this far and everything is working!
I hope this tutorial aids you in your endeavors to anonymize certain portions of your network.
As always, if you have any questions, feel free to start a Discussion on GitHub, submit a GitHub PR to recommend changes/fixes in the article, or reach out to me directly at [email protected].
Thanks for reading!
Robert
As an Amazon Associate, I earn from qualifying purchases. Thank you for supporting the maintenance of this blog. The pricing will be the same for you regardless if you use my links or not! Thanks for your support!