Overview
In this post, I will detail how I run my Matrix Server with Docker-Compose, how I use my Matrix Server as an encrypted notifications hub, and how I federate my Matrix Server over a Cloudflare tunnel (using Cloudflare’s Zero Trust interface).
Short Cybersecurity Note
Matrix Servers can be a part of your cybersecurity stack in your homelab or business. The component pertinent to cybersecurity related to Matrix Servers is encryption. If you’re pursuing a CISSP, you will want to be highly familiar with encryption and the process by which it is achieved.
Encryption is a process of encoding information in such a way that only authorized parties can access and read it. It protects the C from the CIA triad, confidentiality, by transforming plaintext (readable data) into ciphertext (unreadable data) using a mathematical algorithm and a secret key. Without the key, the ciphertext cannot be decrypted and remains unreadable, ensuring that only those who have the key can access the original data. Encryption is widely used in various applications, including email, online banking, and file sharing, to ensure that sensitive information is kept confidential and secure.
What is a Matrix Server?
Matrix is a communication protocol that enables chat and other real-time communication applications to be decentralized and federated. It provides a secure and flexible messaging platform that allows users to communicate with each other regardless of their choice of application, device, or service provider.
Matrix servers operate by creating a decentralized network of interconnected servers that use a common set of standards and protocols to exchange messages. This means that users on one Matrix server can communicate with users on another Matrix server, regardless of which application they are using or which service provider they are subscribed to. This is known as “federation.”
Matrix servers also provide end-to-end encryption, which ensures that messages are encrypted from the moment they are sent until they are received by the intended recipient. This means that even the server administrators cannot read the messages, providing an added layer of privacy and security.
Matrix servers can be self-hosted or hosted by third-party service providers, and there are a variety of applications that support the Matrix protocol, including Element (which I use) and several others.
What is a “Cloudflared” Tunnel?
A Cloudflared tunnel is a command-line tool developed by Cloudflare that provides a secure way to expose HTTP and HTTPS services running on a server to the Internet. Cloudflared tunnels work by creating a secure, encrypted tunnel between the server and Cloudflare’s edge network, which acts as a reverse proxy for the service.
With a Cloudflared tunnel, users can access a service on a private network using a public URL, without the need to expose the service directly to the Internet. This provides an added layer of security, as the service is only accessible through the encrypted tunnel, and not directly over the public Internet.
What is Cloudflare’s Zero Trust Interface?
Cloudflare’s Zero Trust solution is a security framework that helps an organization or individual to secure their network and data by treating all traffic, users, and devices as untrusted. Cloudflare’s Zero Trust solution is built around a Zero Trust Access (ZTA) interface, which is a secure way to manage and control access to an organization’s resources.
The ZTA interface is designed to ensure that only authenticated and authorized users, devices, and applications are allowed access to an organization’s resources. This is done by enforcing strict authentication and access control policies, which can be customized to meet the specific needs of each organization.
Cloudflare’s ZTA interface works by creating a secure tunnel between the user’s device and the organization’s network. This tunnel is encrypted and authenticated, and only allows traffic to flow between authorized endpoints. This means that even if a user’s device is compromised or if traffic is intercepted, the data remains secure.
Cloudflare’s ZTA interface also includes advanced monitoring and analytics capabilities, which allows you to monitor user behavior and identify potential threats. This helps you detect and respond to security incidents quickly, before they can cause damage.
Setting Up the Environment
For this project, I am using an overprovisioned (4core/4GB) Ubuntu 22.10 VM on an ESXi server. The Matrix server stack includes a Synapse container (the Matrix server), a Postgres DB container for a more powerful Matrix installation, an Element container (the frontend application), a Webhooks container (for receiving webhooks to specified channels), a Maubot container (for GitHub and RSS integrations), a Postgres DB container for Maubot, an Nginx Proxy Manager container and required DB container, and a Postfix container (to send emails from the Matrix server through GMail SMTP).
Technically, the only required container for a successful install is the Synapse container. You also need an application to interface with the server such as Element, but the Matrix server will run regardless. The rest of the containers are personal preferences. All of the required files are tailored to my stack though, and using different containers will require you to tweak the environment to match your stack respectively.
Requirements
- A Ubuntu Host
- Docker and Docker-Compose
- A domain name (e.g., whitematter.tech)
- A Cloudflare instance
- A working, routable Cloudflare tunnel (see my previous post)
Recommended Gear and Tools
As an Amazon Associate, I earn from qualifying purchases. Thank you for supporting the maintenance of this blog. Pricing is the same for you whether you use my links or not.
- Mini PC / Low-Power Host Options
- 32GB DDR4 RAM Kit
- 1TB NVMe SSD
- Unifi Dream Machine Pro
- YubiKey Hardware Security Key
For simplicity and convenience, I have compiled the required files and secrets directory you will need on GitHub. Download the files and the secrets directory all to the same directory on your Ubuntu host (e.g., /home/username/docker).
Throughout the tutorial, you will be required to generate and use secure passwords. I strongly recommend using a password manager (I use 1Password) to generate a high bit-count password to use in these steps.
Modify the docker-compose.yml
The docker-compose.yml file you downloaded from GitHub will need some tweaking.
You will notice the Maubot, Maubot Postgres, and the Webhooks containers are all commented out to start. These containers are best configured AFTER successfully starting a Matrix server. I will go through the basic setup steps for those containers as if you were starting them with the Matrix service initially, but I do not recommend actually starting them until you have established your server and created some initial channels.
First, let’s take a look at the Synapse container. Using nano or some other text editor, replace YOURSERVERNAME on Lines 16 and 30 with your domain name (e.g., whitematter.tech), and replace YOURSECRETPASSWORD on Line 22 with a password to be used for the database.
Edit the postgres database below synapse and replace YOURSECRETPASSWORD on Line 39 with the same password you added above.
If using Maubot, you will need to edit Line 108 and replace YOURSECRETPASSWORD with a new password. You will need this password in the maubot/config.yaml file later–keep it handy!
If using postfix to send mail through a SMTP relay, you will need to edit Lines 120 - 124 to match your SMTP relay service. In my case, I am using GMail as an SMTP relay and my main user as the SMTP username. Google requires an application specific password to use the SMTP relay. Find out how to use Google’s SMTP relay. If you do not have access to a SMTP relay service, simply consider setting up a containerized SMTP server to replace the postfix container.
The Webhooks container cannot be configured quite yet as you will need IDs for the channels you wish to send webhooks. Skip this for now.
Comment out or delete any of the containers you do not want to use, and your docker-compose.yml file is complete for now. Save, and exit.
Modify the element-config.json
The only lines needing edited in this file are Lines 4 and 5. Replace YOURDOMAIN.COM with your domain (e.g., whitematter.tech). Save and exit.
Modify the homeserver.yaml
This file is the most complicated of the whole stack. The settings in my homeserver.yaml file are extremely personalized, and you may want to personalize your file as well. Unfortunately, due to the complexity of the file and the endless possibilities, I will only cover my settings.
YOURDOMAIN.COM needs replaced (e.g., with your domain such as whitematter.tech) on Lines 4, 5, 72, 75, 76, 92, and 95.
Replace SAME-PASSWORD-DEFINED-IN-DOCKERCOMPOSE on Line 33 with the same password you used as your postgres DB password in the docker-compose file.
Generate new random strong passwords for Lines 61, 70, and 71.
If you are not using postfix as a SMTP relay like I am, you will need to majorly edit Lines 88-103 to match your configuration.
You can safely save and exit.
Modify secrets/matrix_admin_pass.txt
In the secrets directory you retrieved from GitHub, edit the “matrix_admin_pass.txt” file. Simply replace YOUR_VERY_SECURE_PASSWORD with a very secure password.
Modify secrets/synapse_secrets.env
In the secrets directory you retrieved from GitHub, edit the “synapse_secrets.env” file. Simply replace YOURDOMAIN.COM with your domain (e.g., such as whitematter.tech).
Modify maubot/config.yaml
In the maubot directory you retrieved from GitHub, go to Line 6 and replace the text THEPOSTGRESDB_PASSWORD_FROM_DOCKERCOMPOSE with the postgres DB password you generated for the Maubot Postgres database (this is the password you needed to keep handy from Line 108 in the docker-compose.yml file).
Edit Lines 63, 72, and 75 with strong random passwords.
Replace YOURSERVERNAME.TLD on Lines 53 and 71 with your domain name (e.g., whitematter.tech).
You can safely save and close the file.
Start the Matrix Server
If you have followed all the steps above, you should be ready to start the container stack. In a shell, navigate to the directory containing the docker-compose.yml file and run:
docker-compose up -d
Configure Cloudflare
The Cloudflared Tunnel
As mentioned in the requirements, you will need a working, routable Cloudflare tunnel (for help setting up a tunnel, see my previous post, updated). The following steps will assume you have one working.
The tunnel I am using is a full cloud tunnel. My description and screenshots will reflect that, but the concepts will also apply to you if you use the local routing configuration for your tunnel.
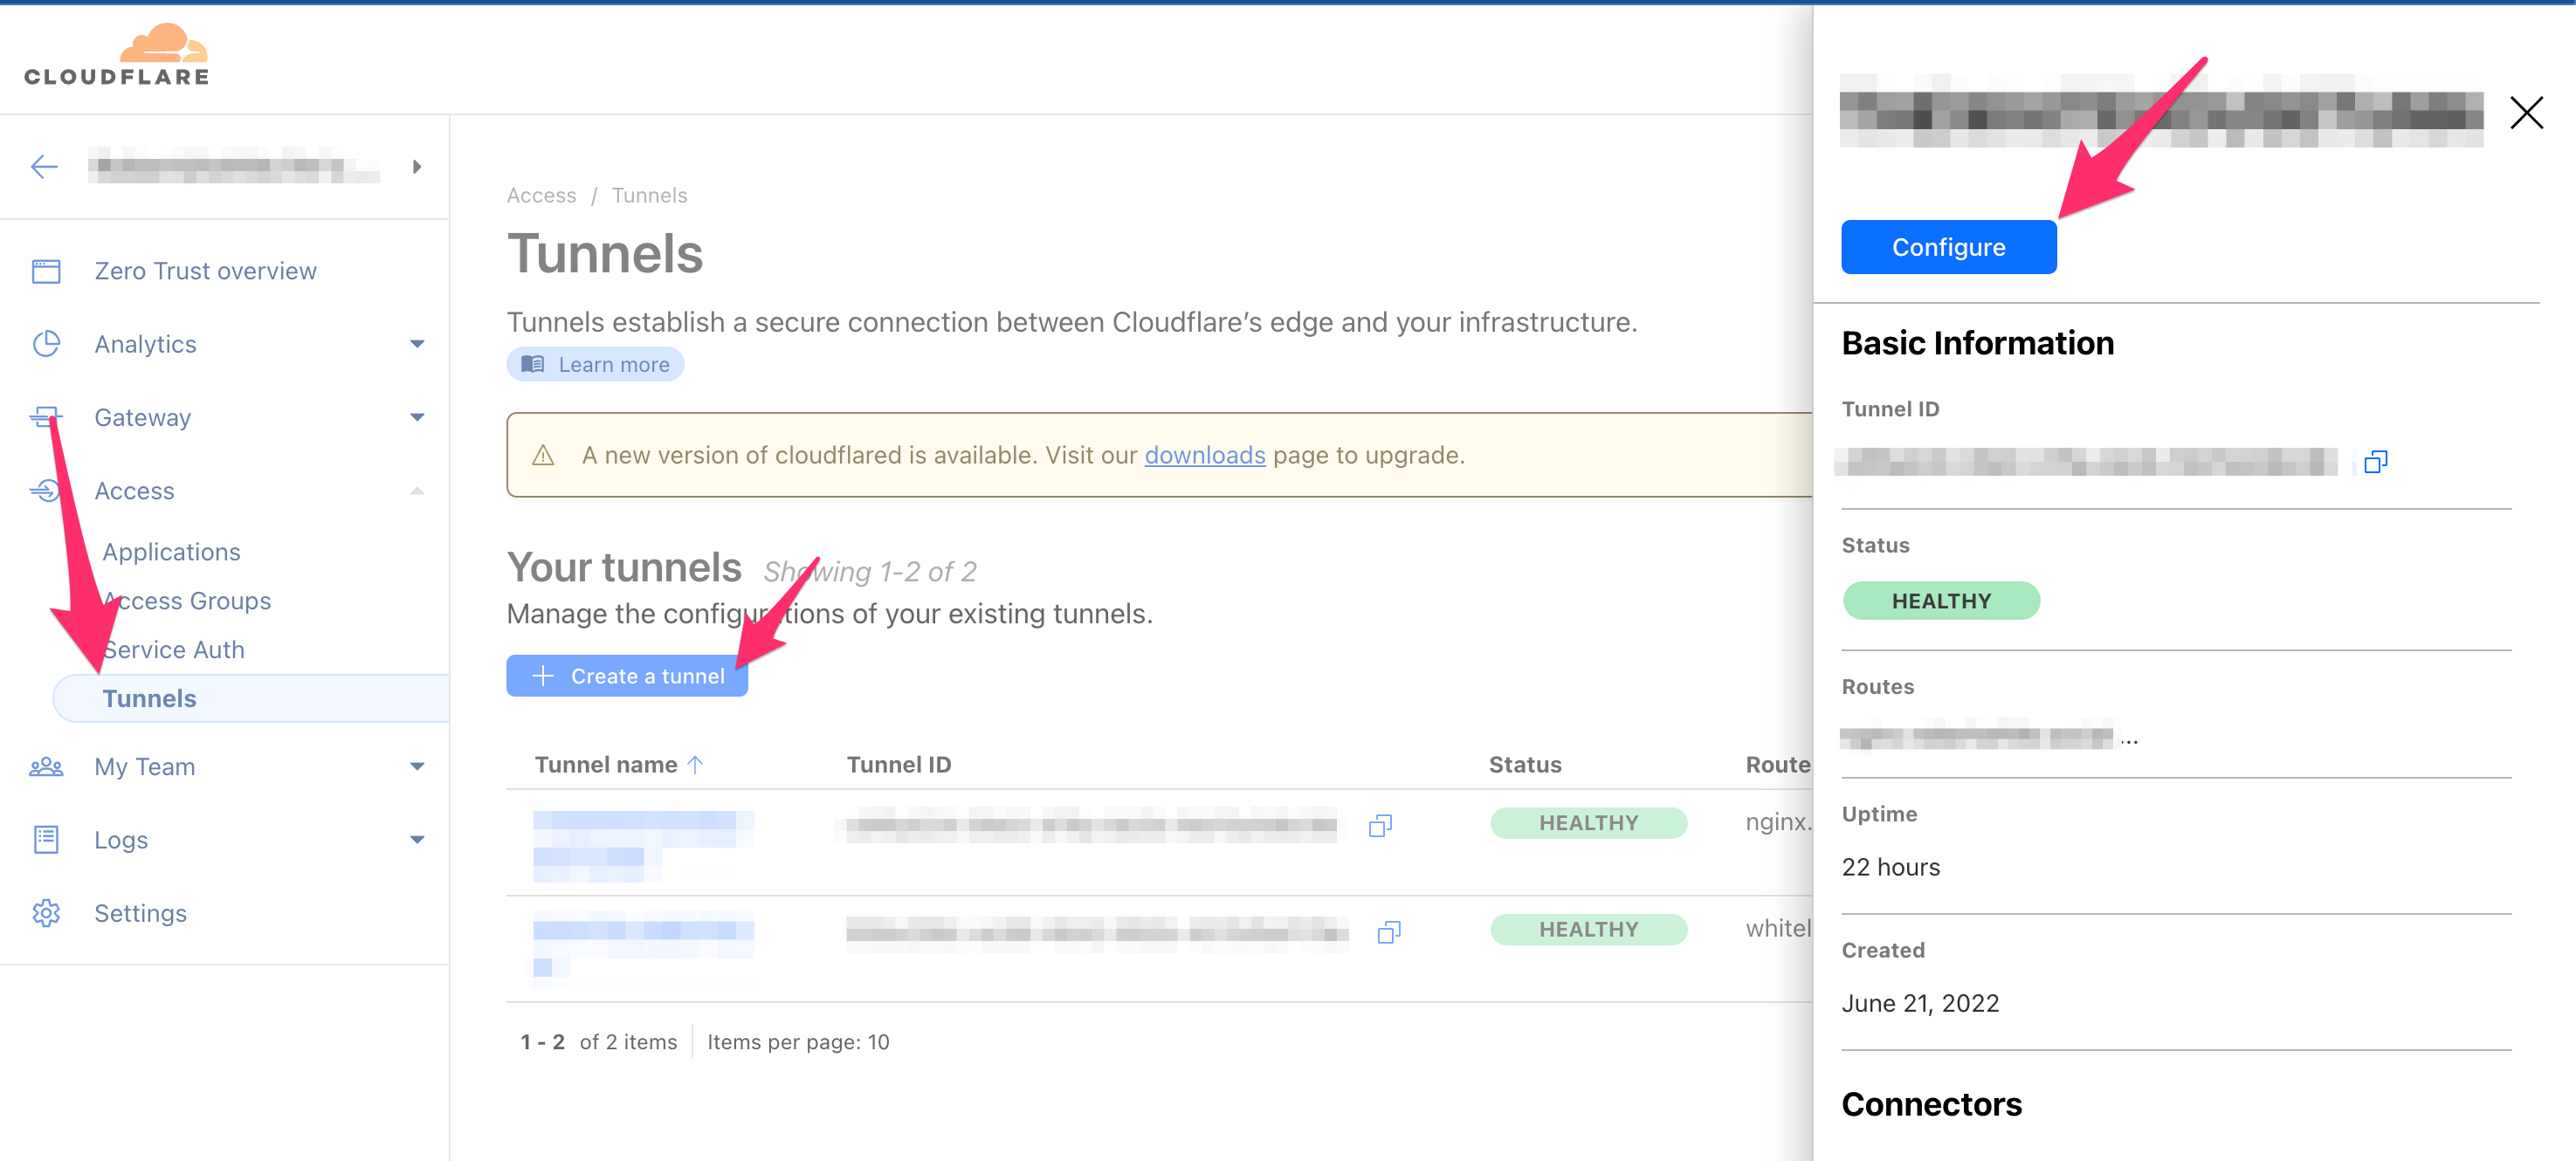
Go to Cloudflare’s Zero Trust Dashboard and click Access > Tunnels in the left navigation pane. Select the tunnel you will be using, and click Configure.
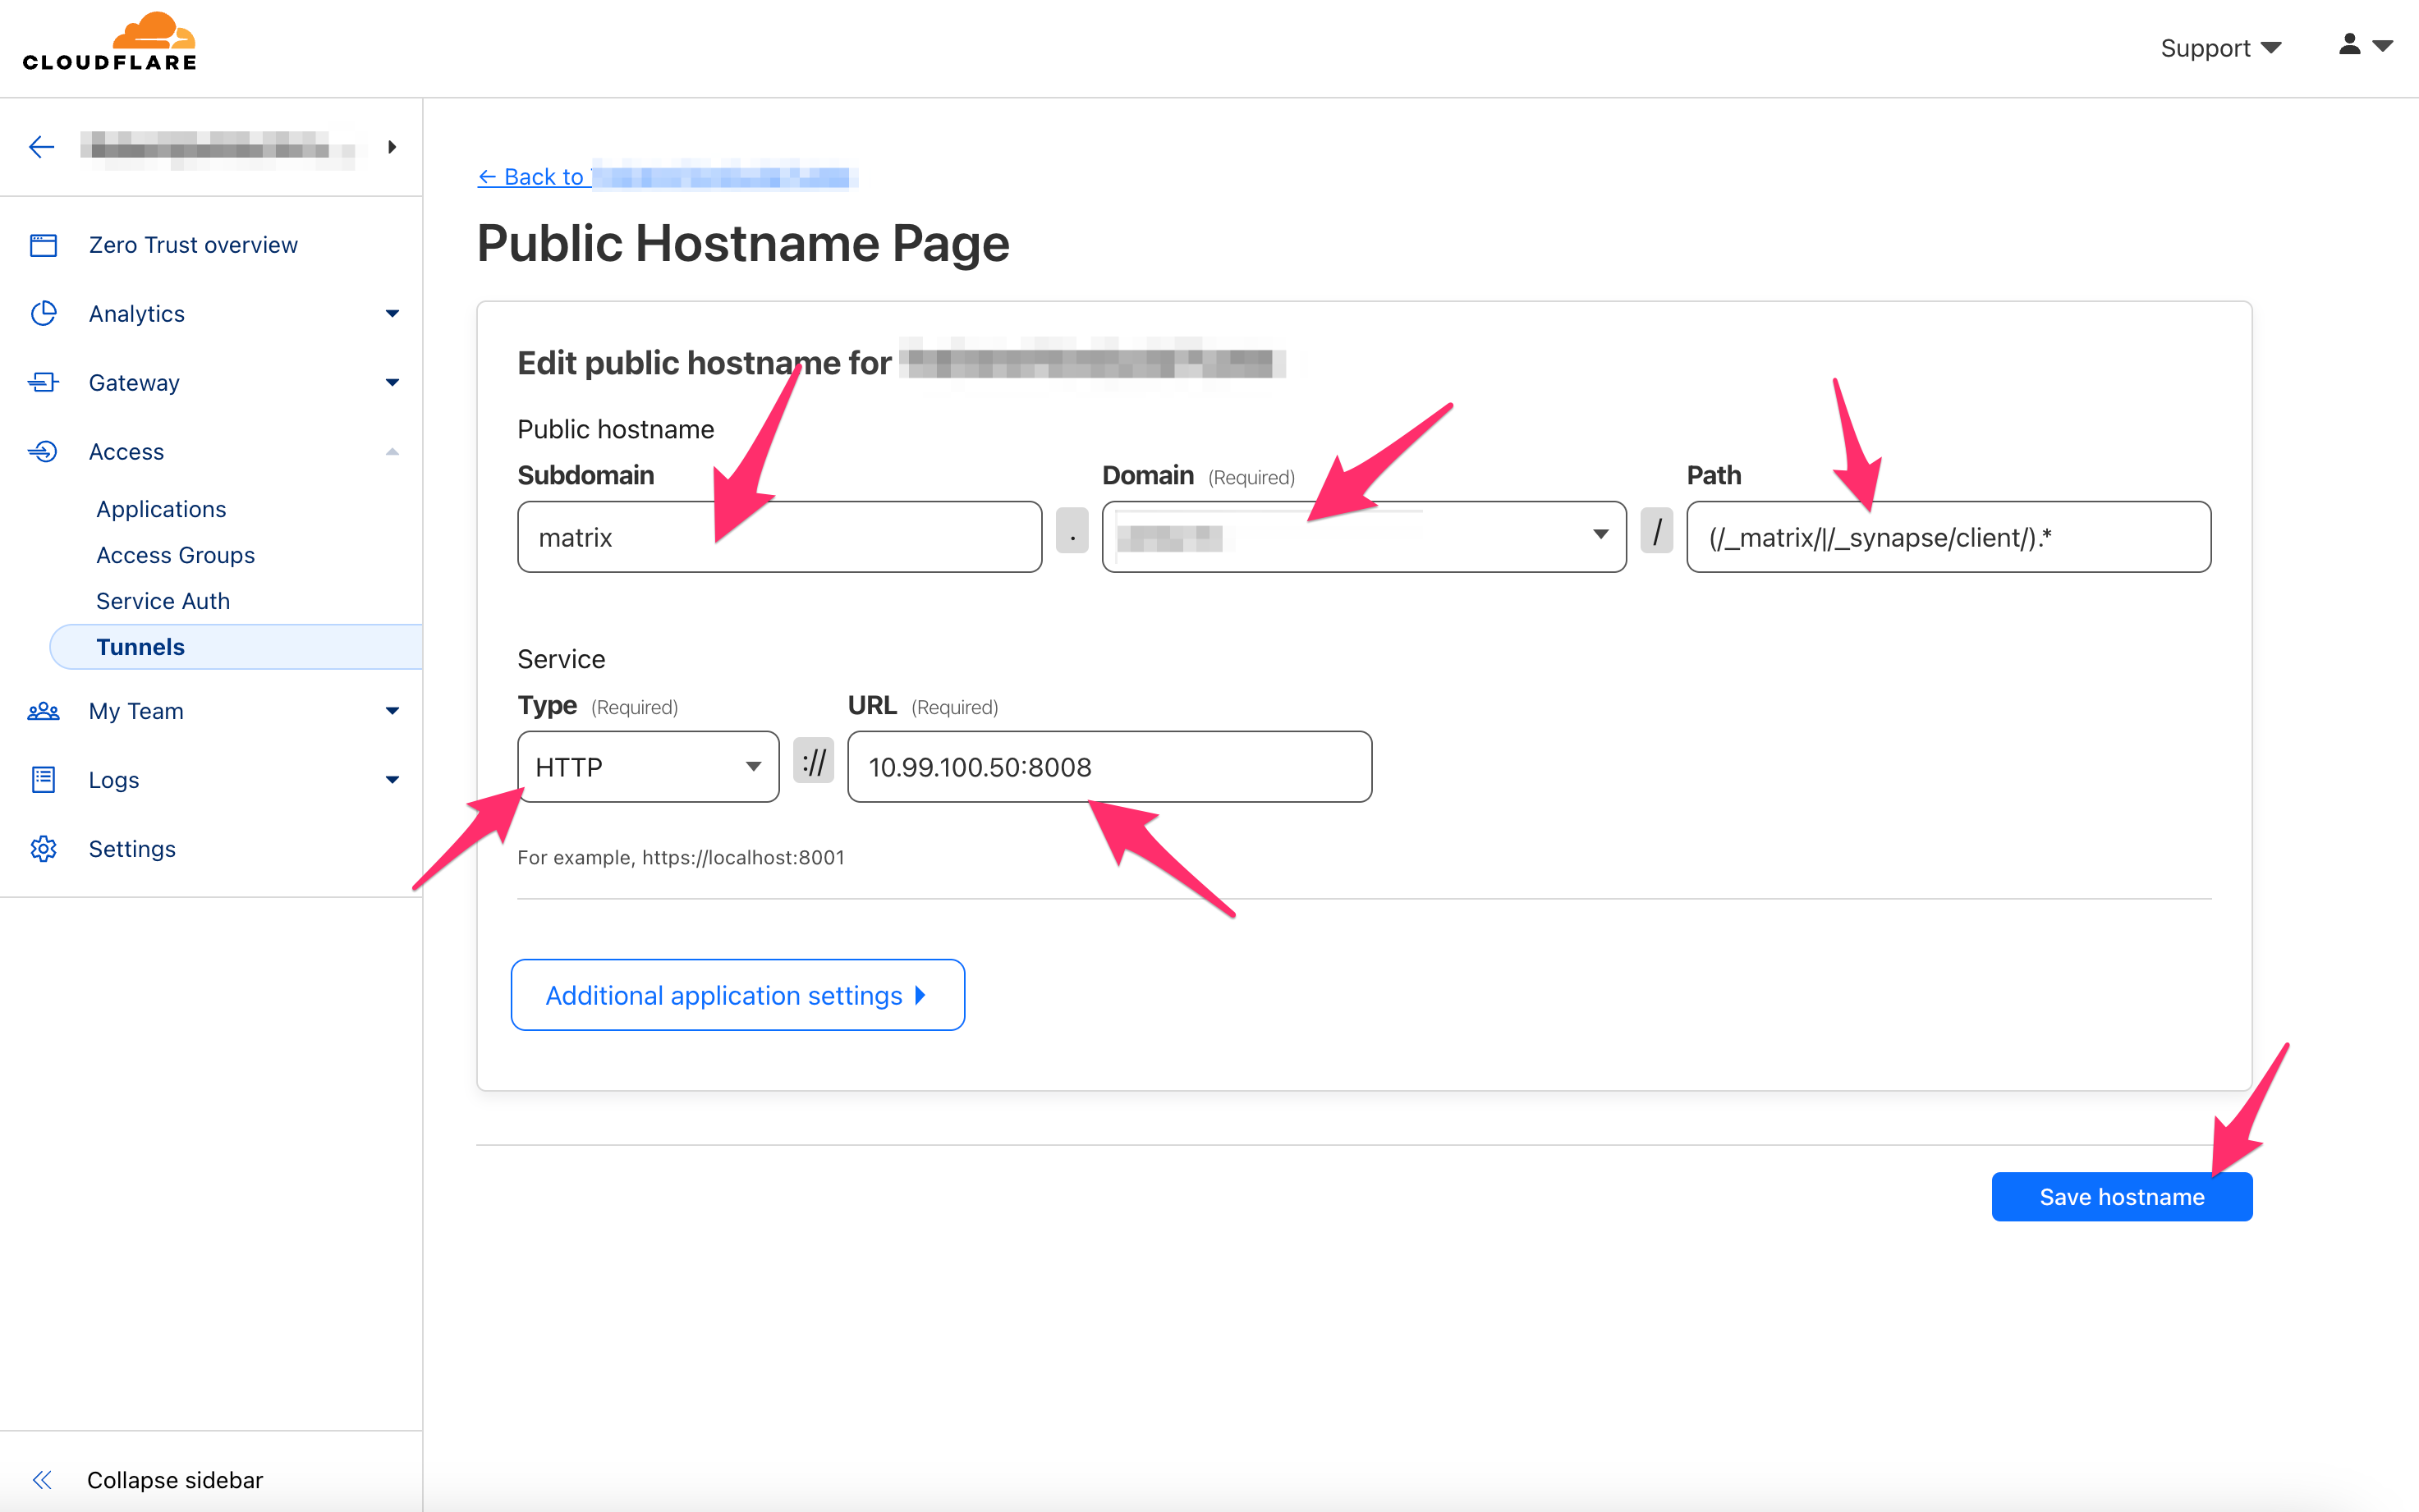
Now, we will add your matrix.yourdomain.tld to the tunnel. Click Add a public hostname. Under Subdomain, add “matrix”. For Domain, click the box and select your domain. For “Path”, enter the following:
(/_matrix/|/_synapse/client/).*
For the Service Type, select HTTP, and input the local IP address of your Matrix Server followed by port 8008 (e.g., 10.99.100.50:8008).
Click Save hostname in the bottom right.
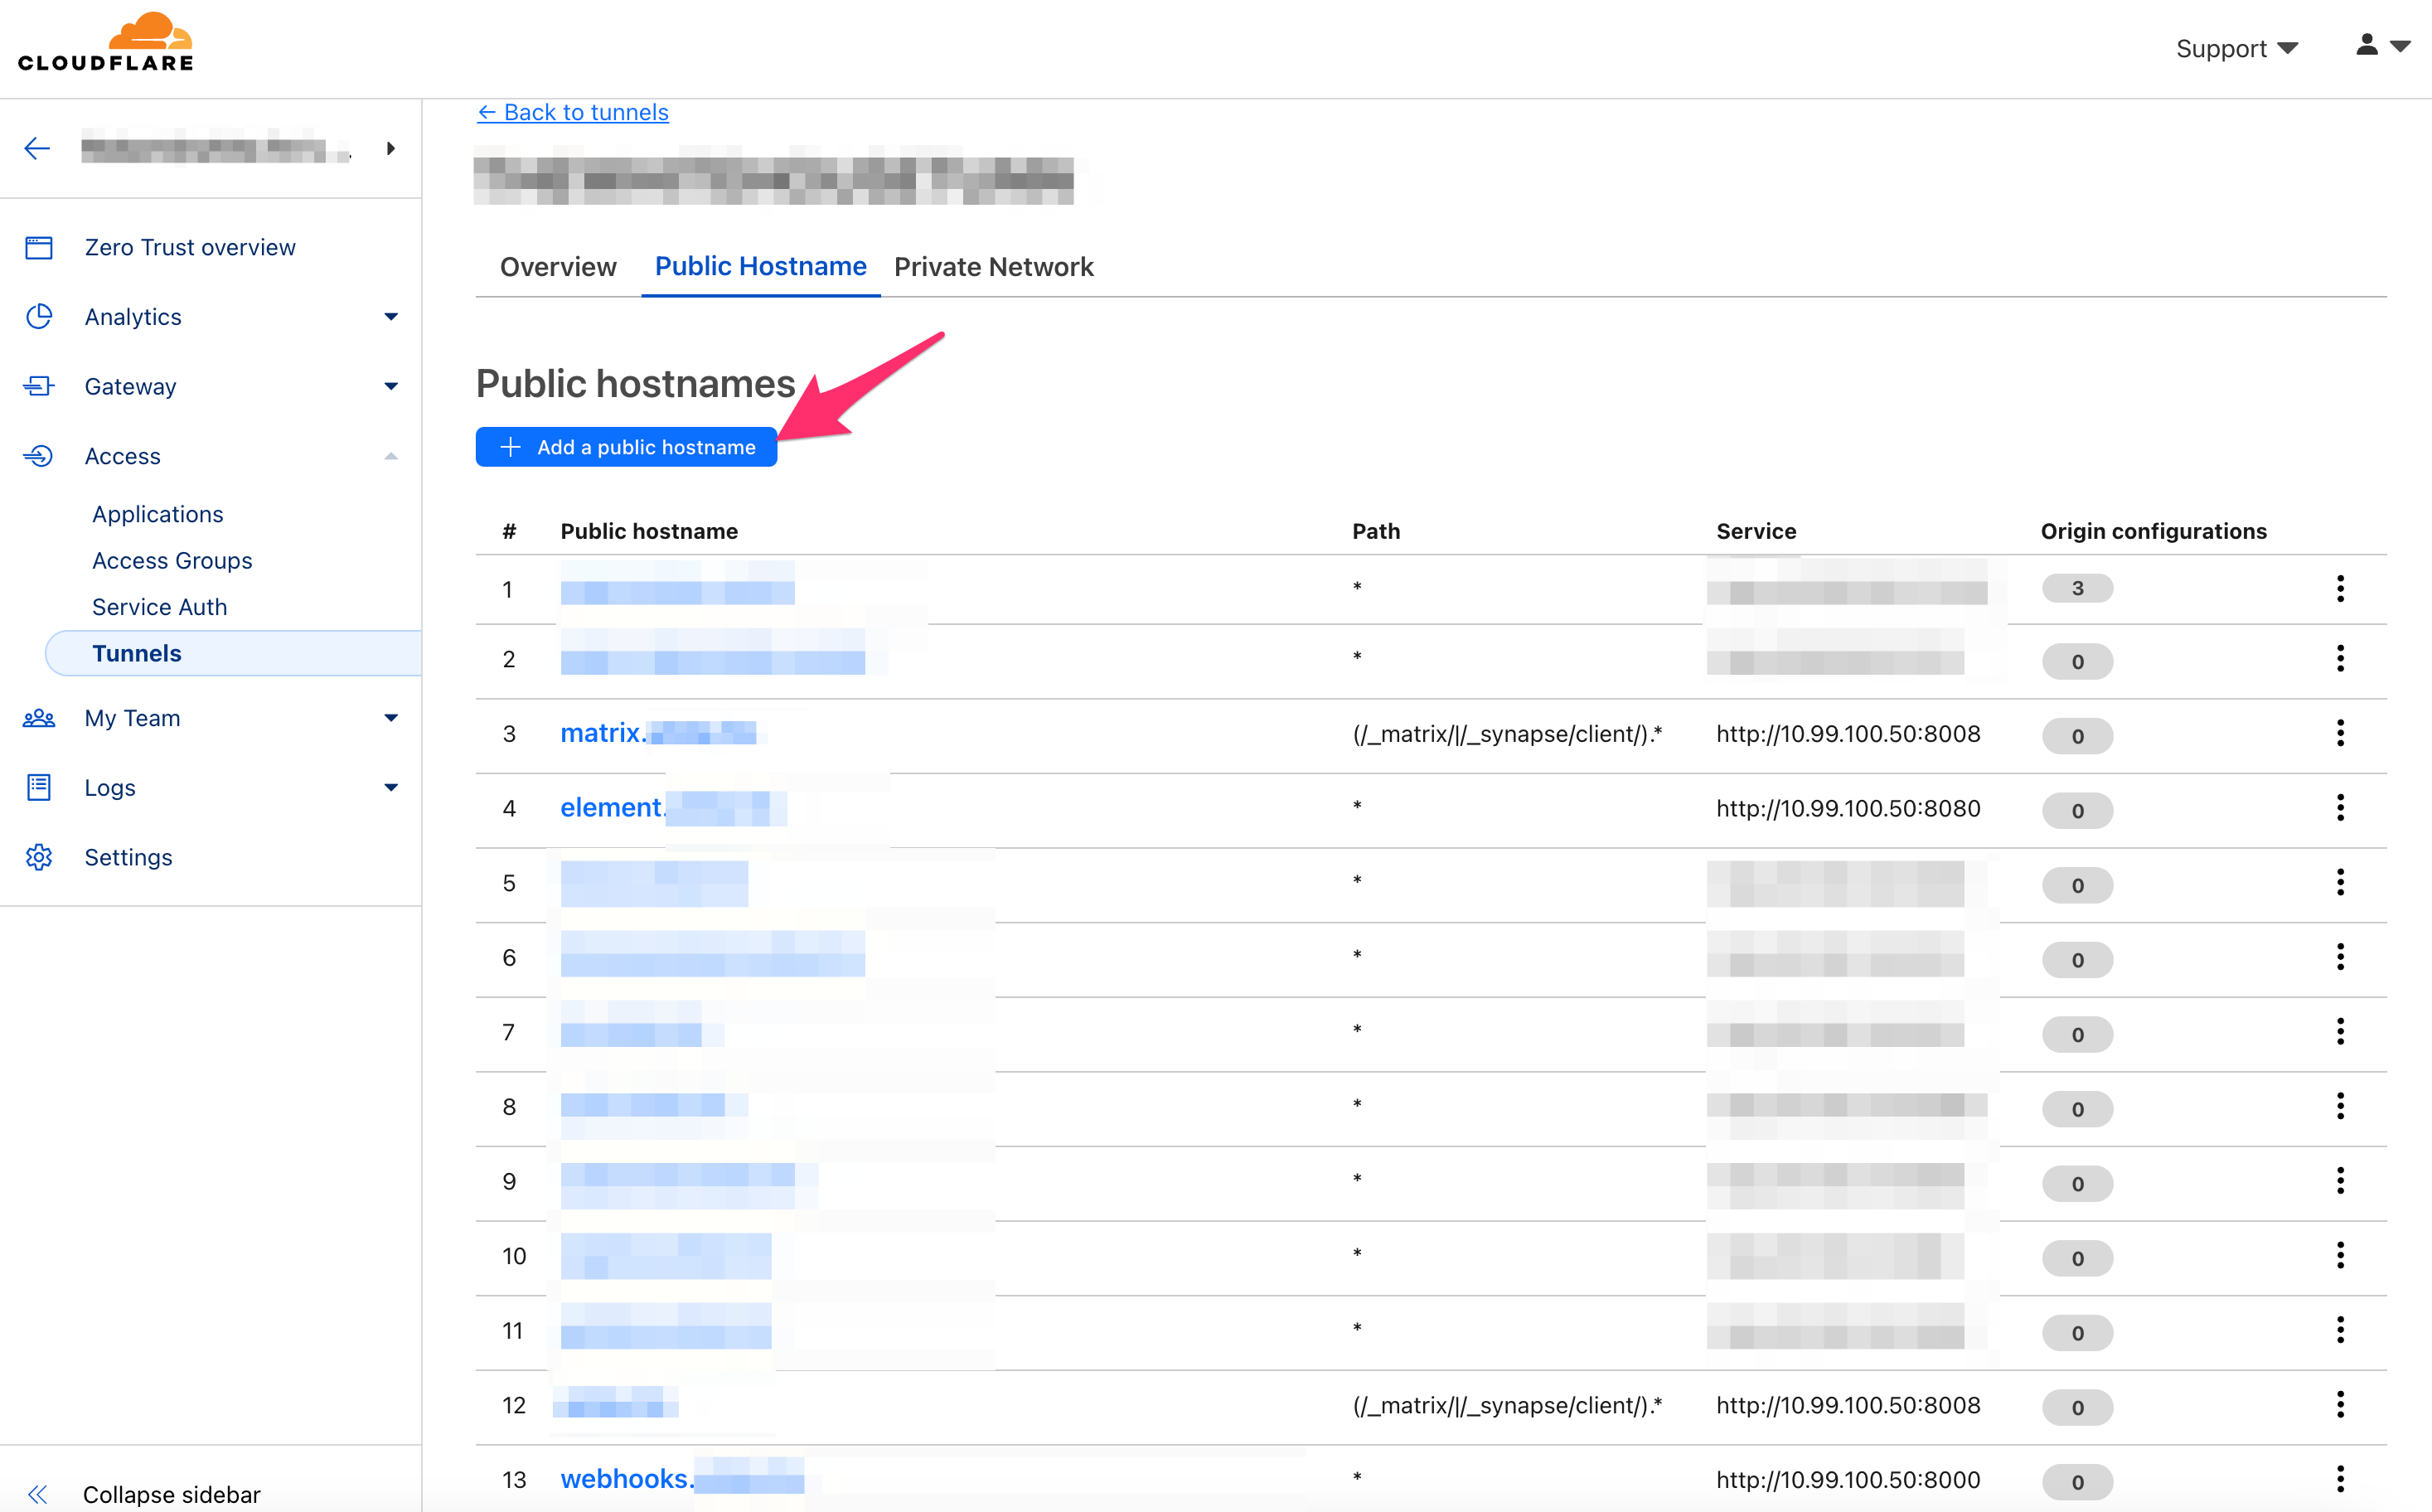
Follow the procedure above and duplicate your matrix.yourdomain.tld hostname. Make this one for the root level yourdomain.tld WITHOUT a subdomain. For example, if your Matrix Server were hosted at matrix.whitematter.tech, the new public hostname added to the tunnel would be whitematter.tech. You will end up with matrix.yourdomain.tld and yourdomain.tld both pointed to the local IP address of your Matrix Server followed by port 8008 (e.g., 10.99.100.50:8008).
Follow the procedure above for element.yourdomain.tld as well as both maubot.yourdomain.tld and webhooks.yourdomain.tld, if you are using them. Exclude the Path for these services.
Here are the IP:port combos for those services:
Element: http://IP:8080 (e.g., http://10.99.100.50:8080)

Maubot: http://IP:29316 (e.g., http://10.99.100.50:29316)

Webhooks: http://IP:80000 (e.g., http://10.99.100.50:8000)
Once you have these services added, your tunnel should look similar to the following image:
The Cloudflare Worker
In order to achieve federation while using a Cloudflared tunnel, we can take advantage of the Cloudflare Workers to serve the required .well-known file.
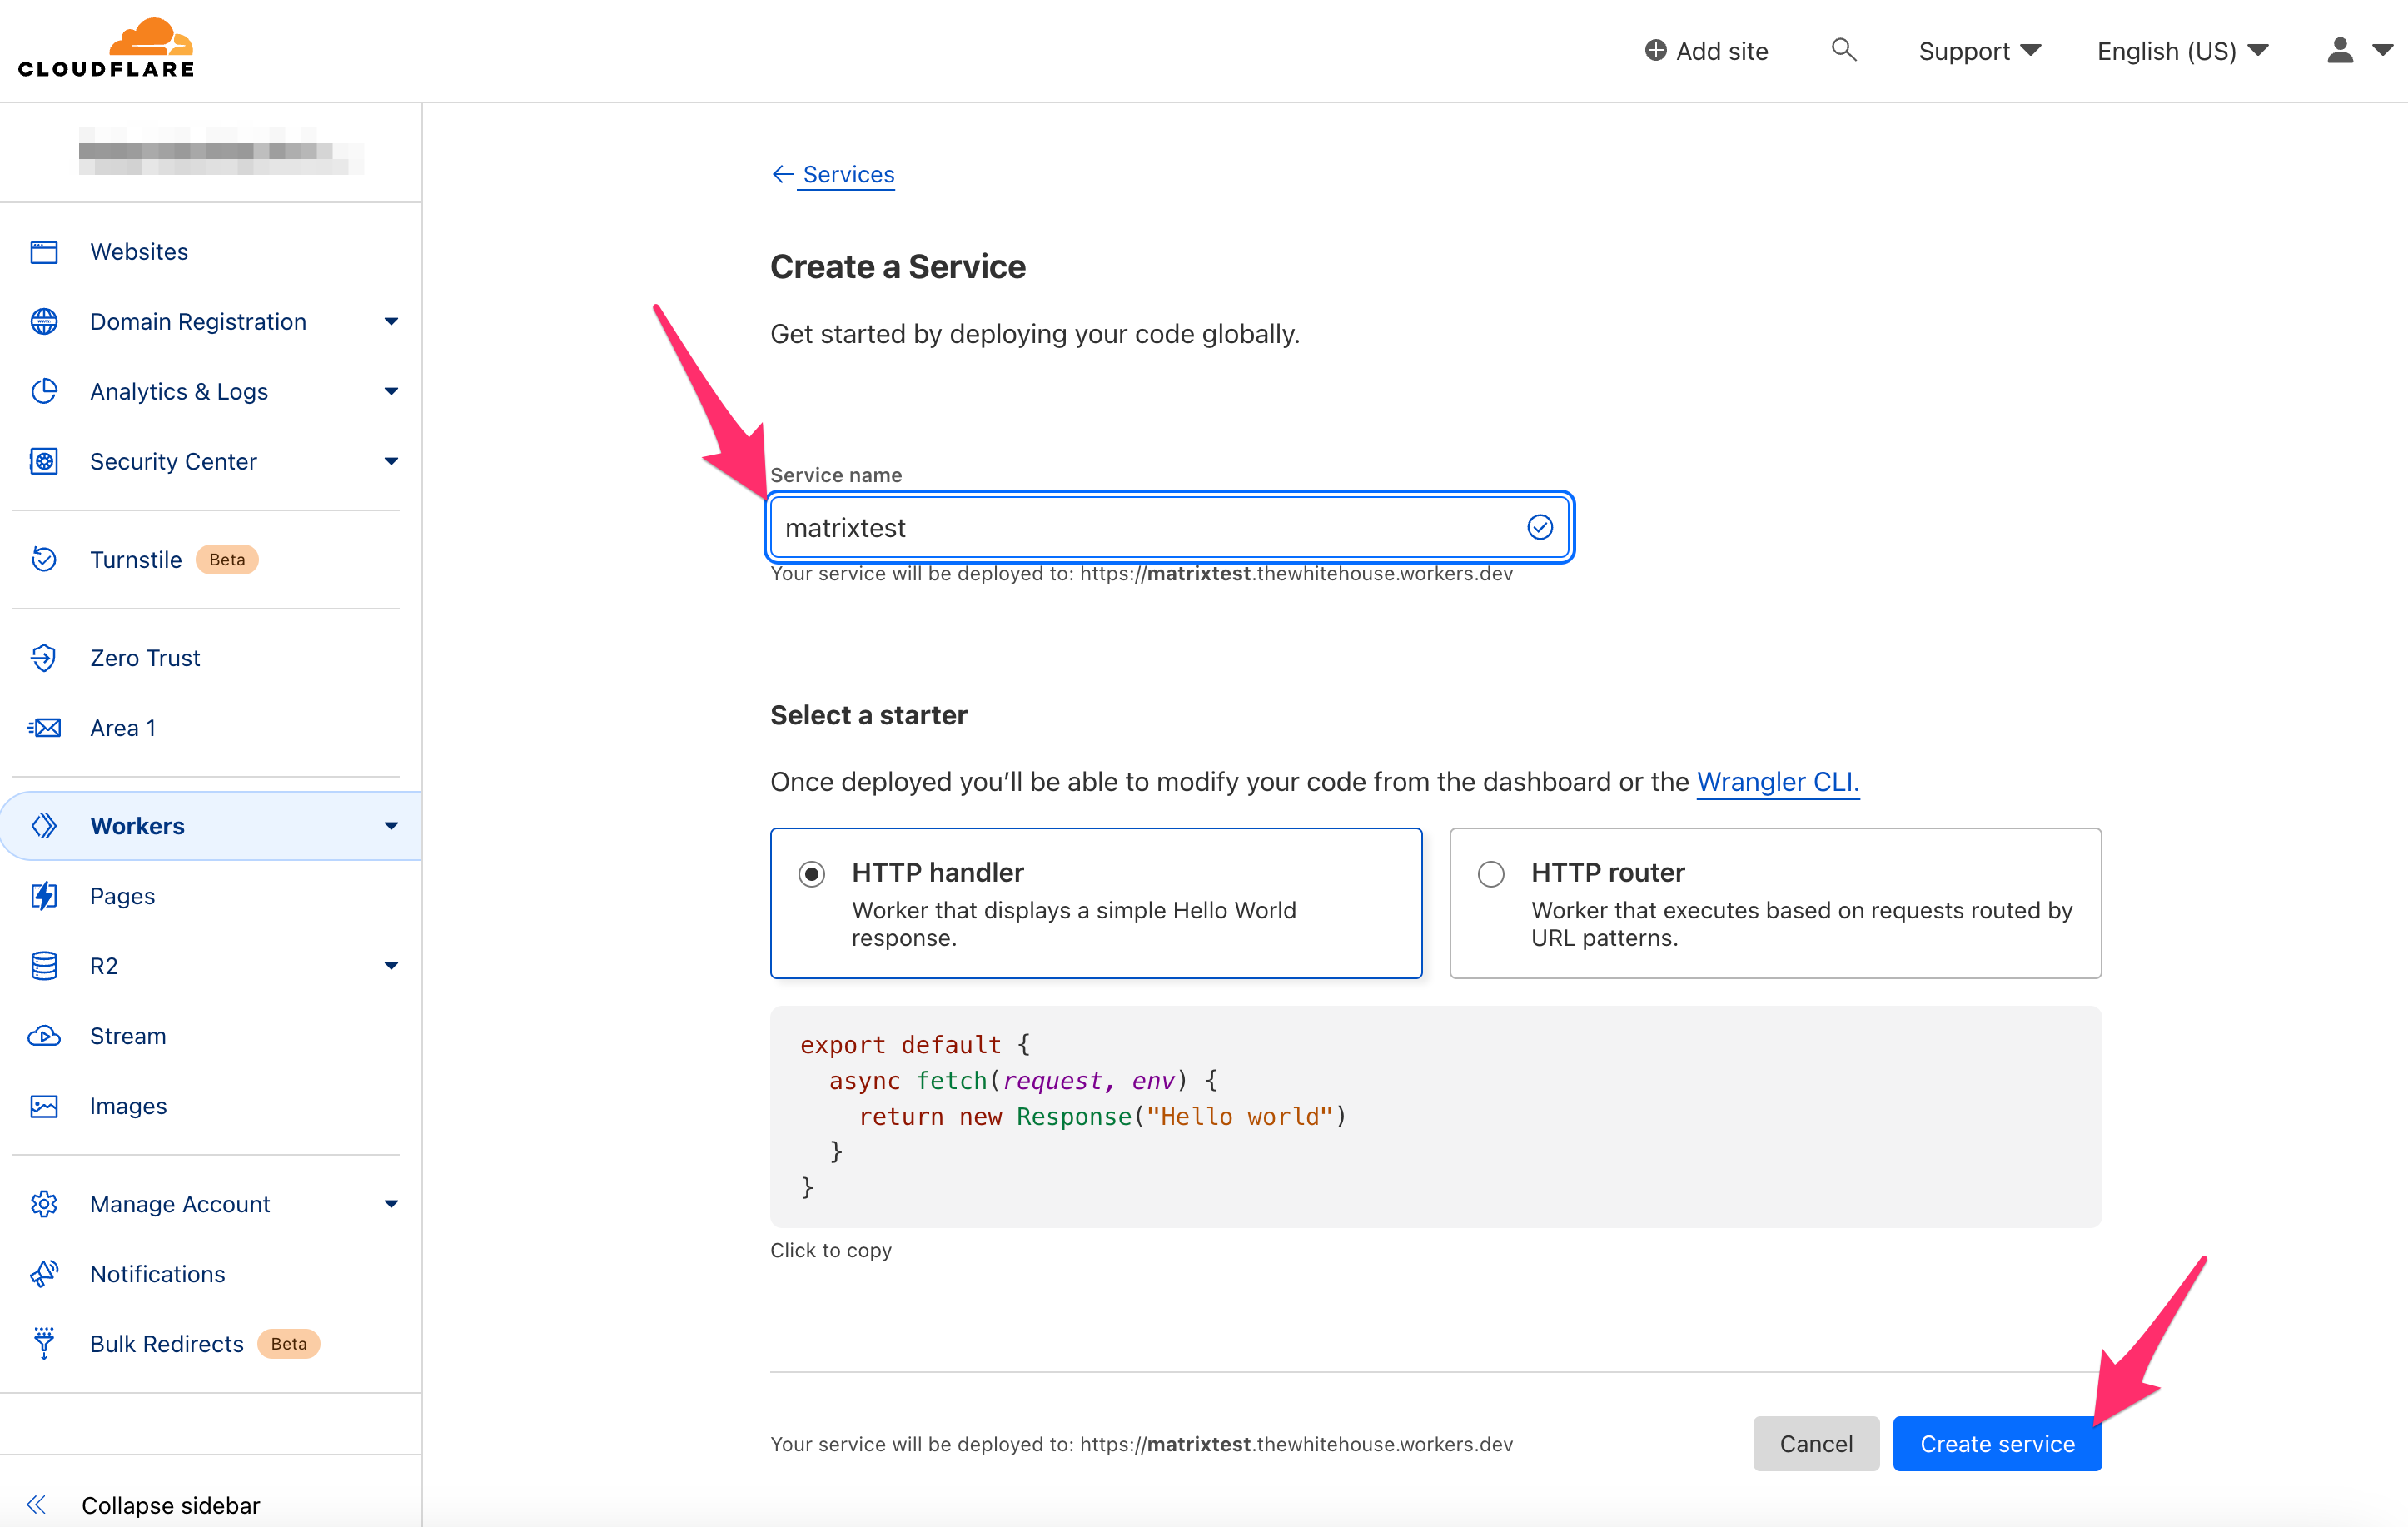
On your Cloudflare Dashboard, select Workers in the left navigation pane. Click Create a Service, and add a service name (e.g., matrix). Click Create service in the bottom right.
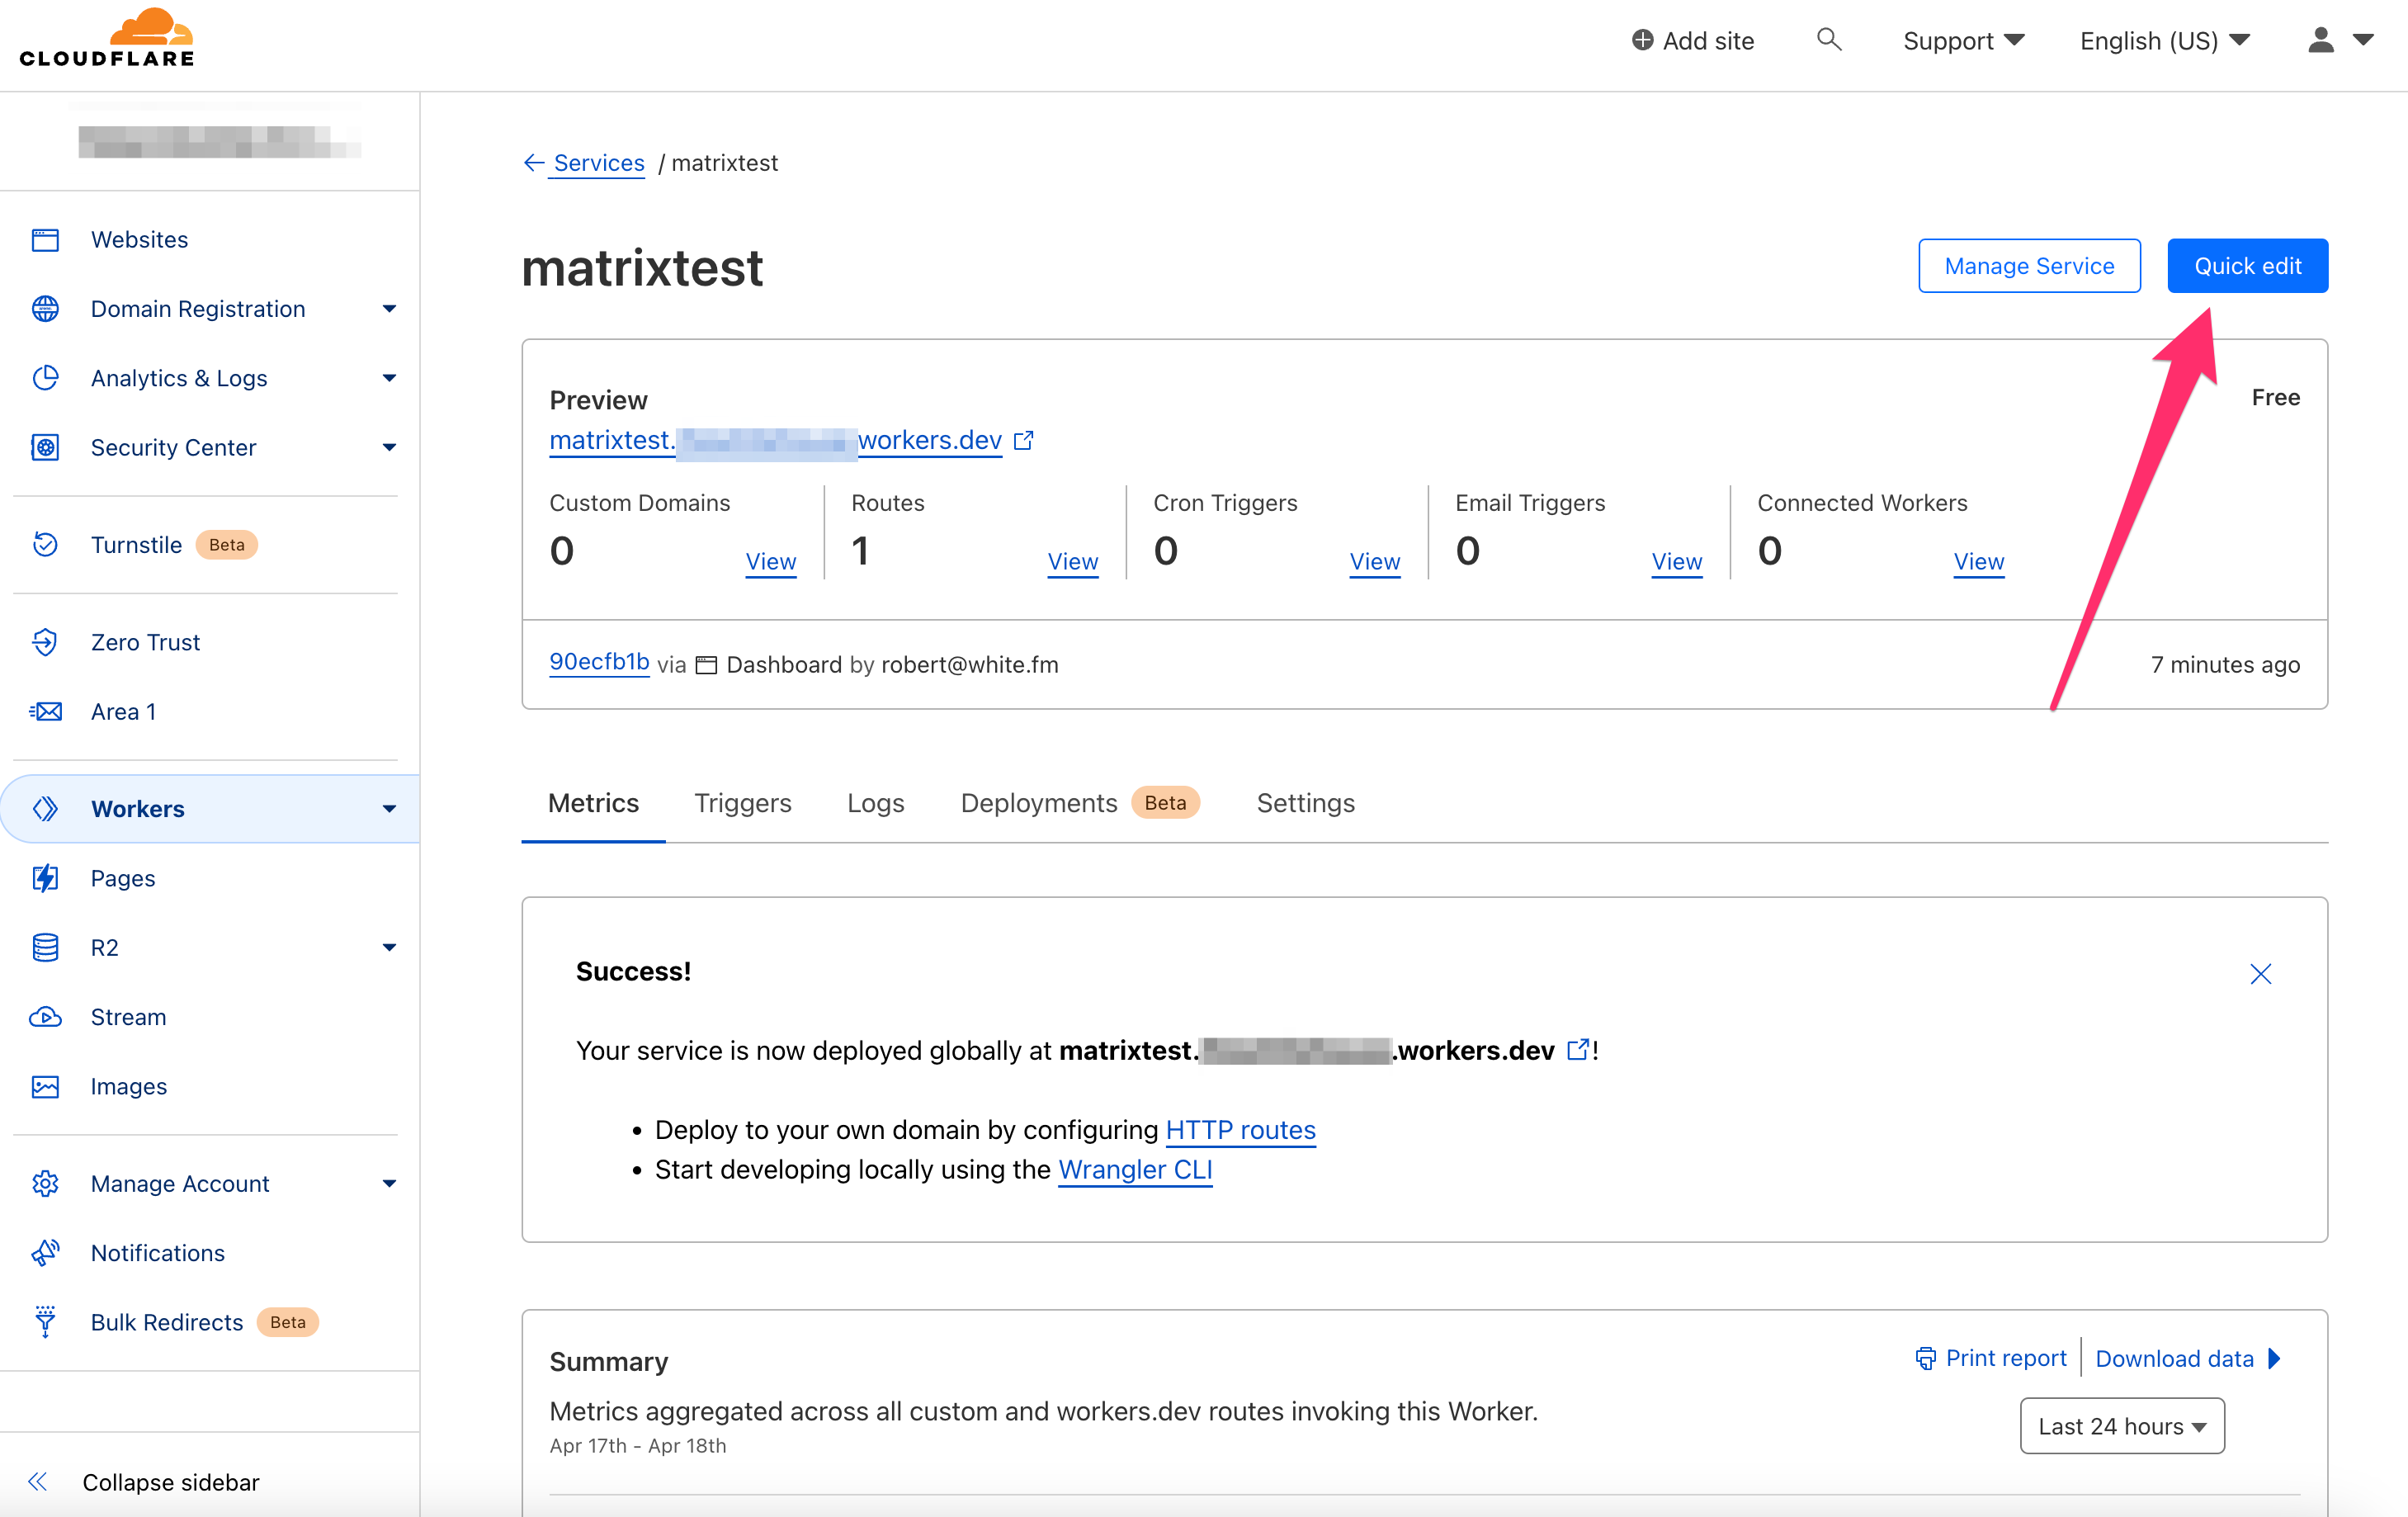
On the subsequent screen, click Quick edit in the top right.
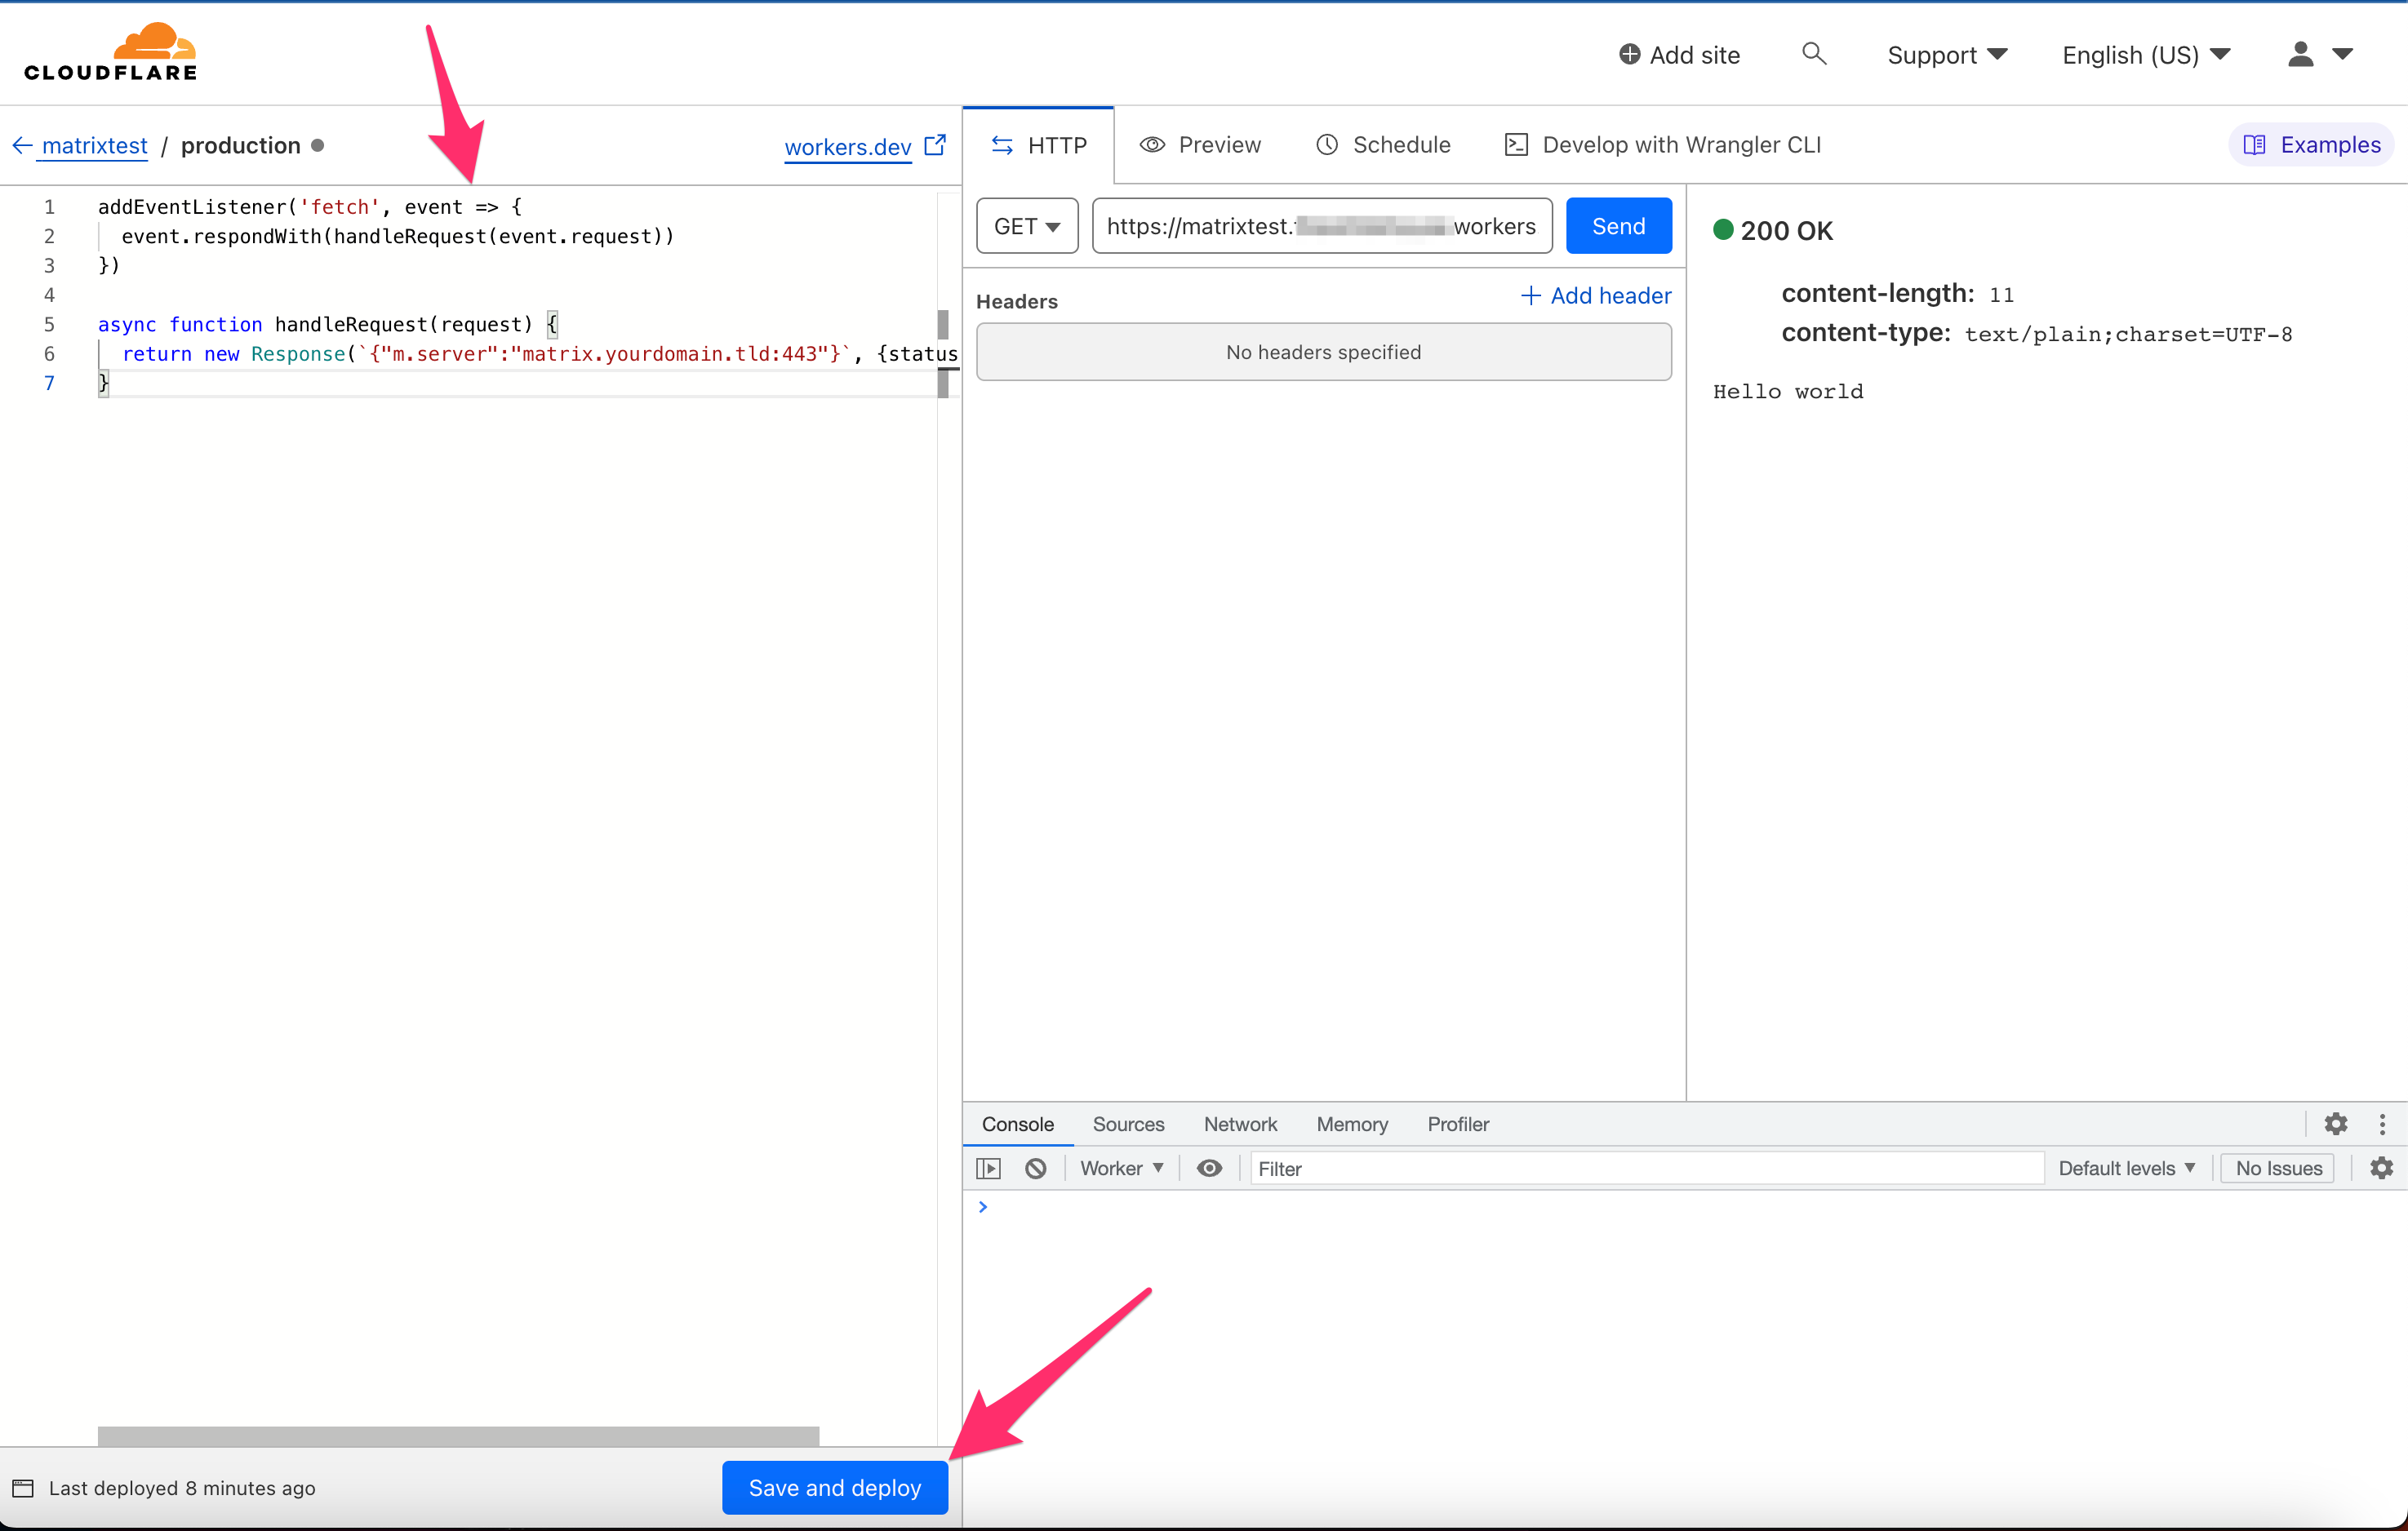
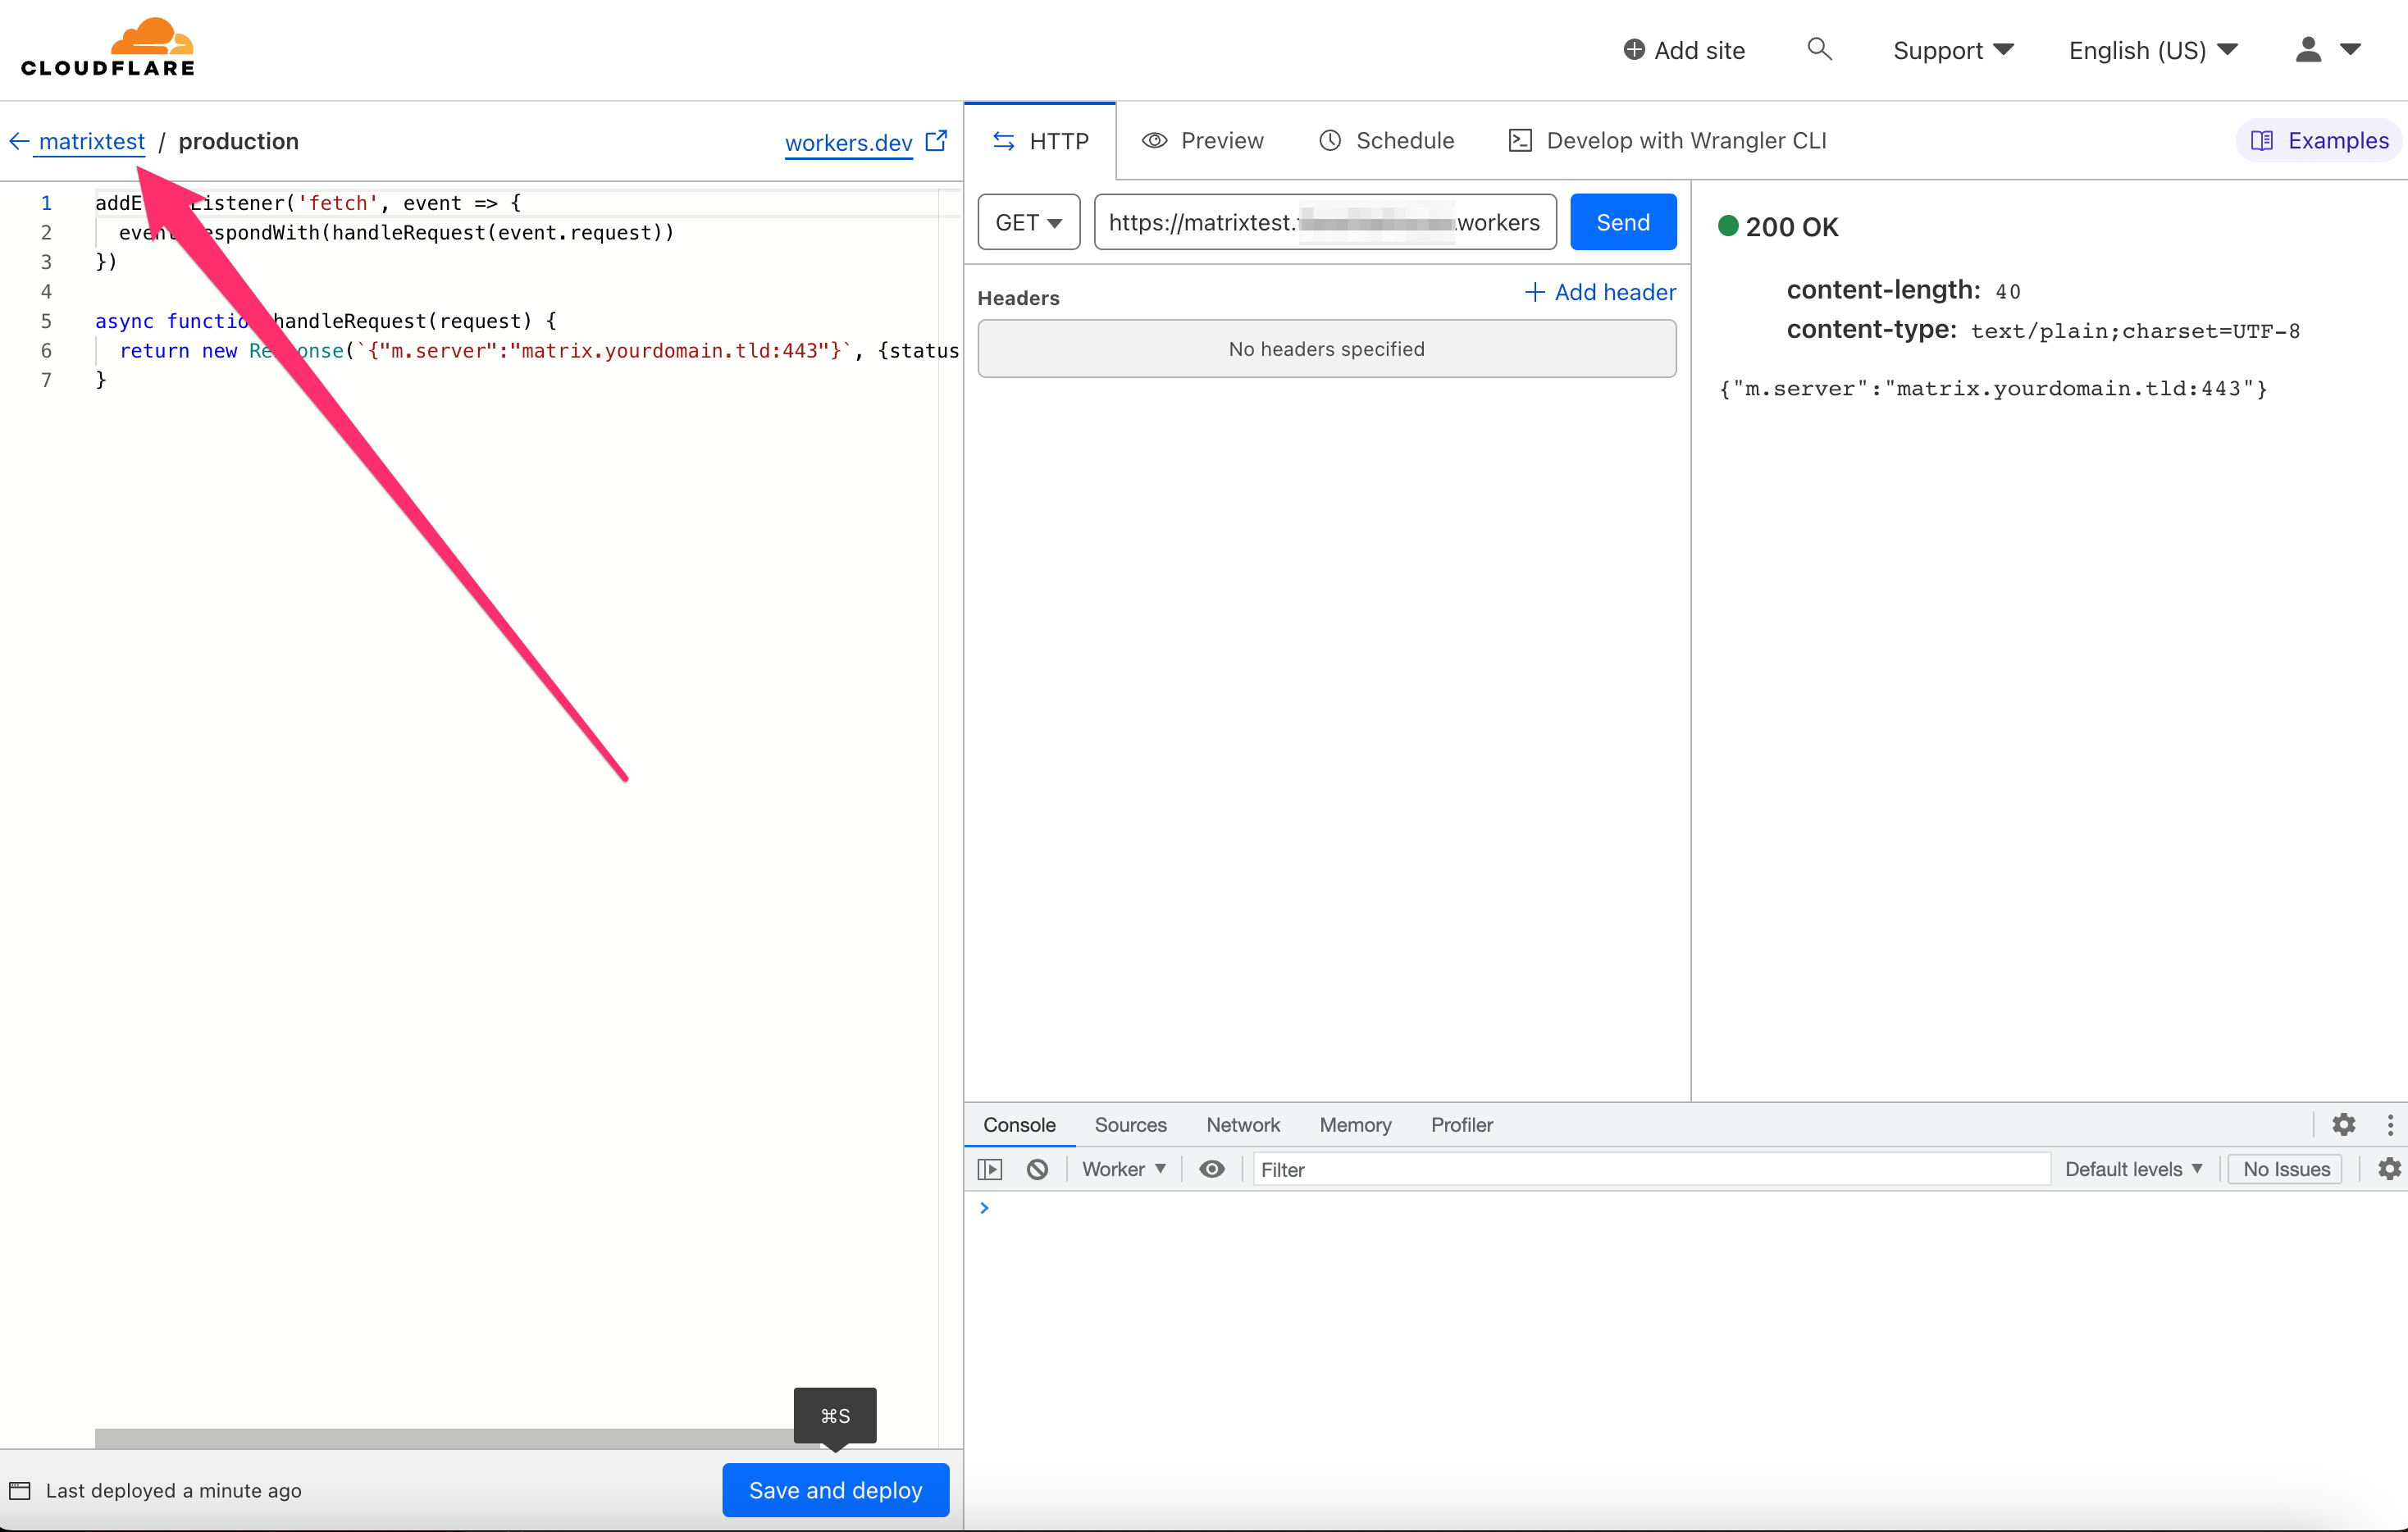
Paste the following code to replace the pre-filled code (and be sure to replace matrix.yourdomain.tld with your actual domain):
addEventListener('fetch', event => {
  event.respondWith(handleRequest(event.request))
})

async function handleRequest(request) {
  return new Response(`{"m.server":"matrix.yourdomain.tld:443"}`, {status: 200})
}
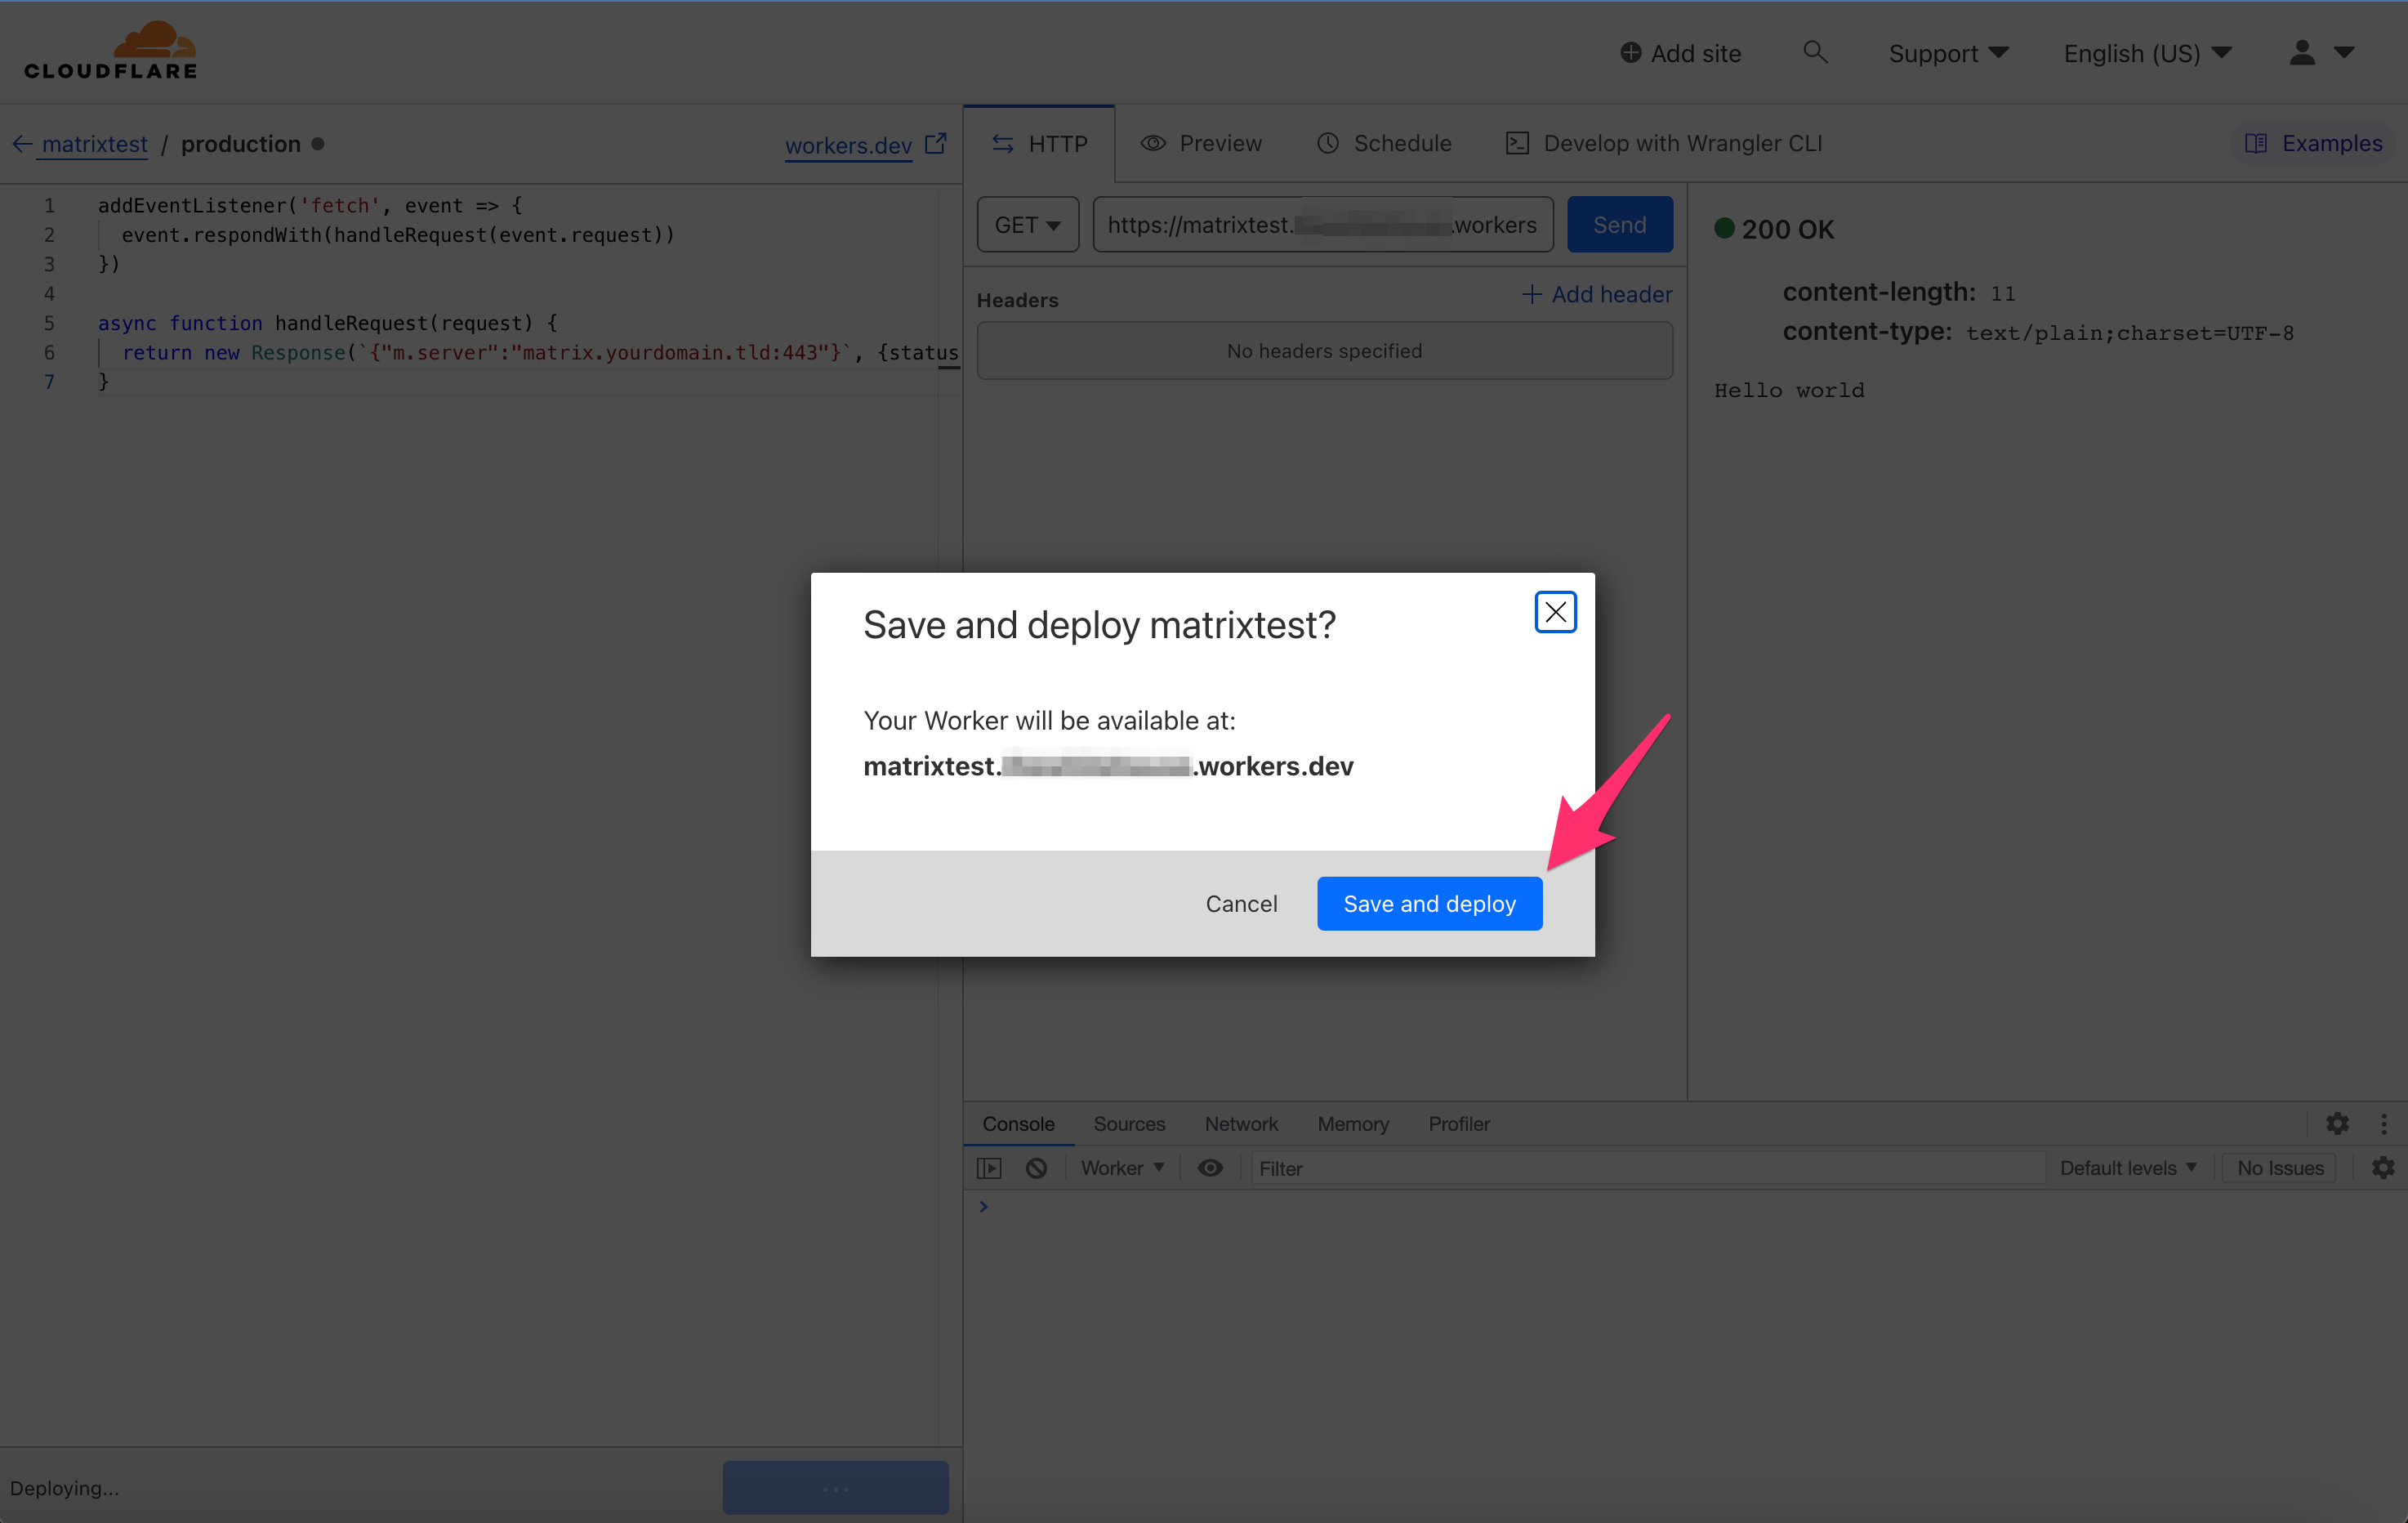
Click Save and Deploy.
 On the pop-up, again click Save and Deploy.
After saving, in the top left, select the name of your worker to return to the worker overview screen.
Now, under “Custom Domains”, click View.
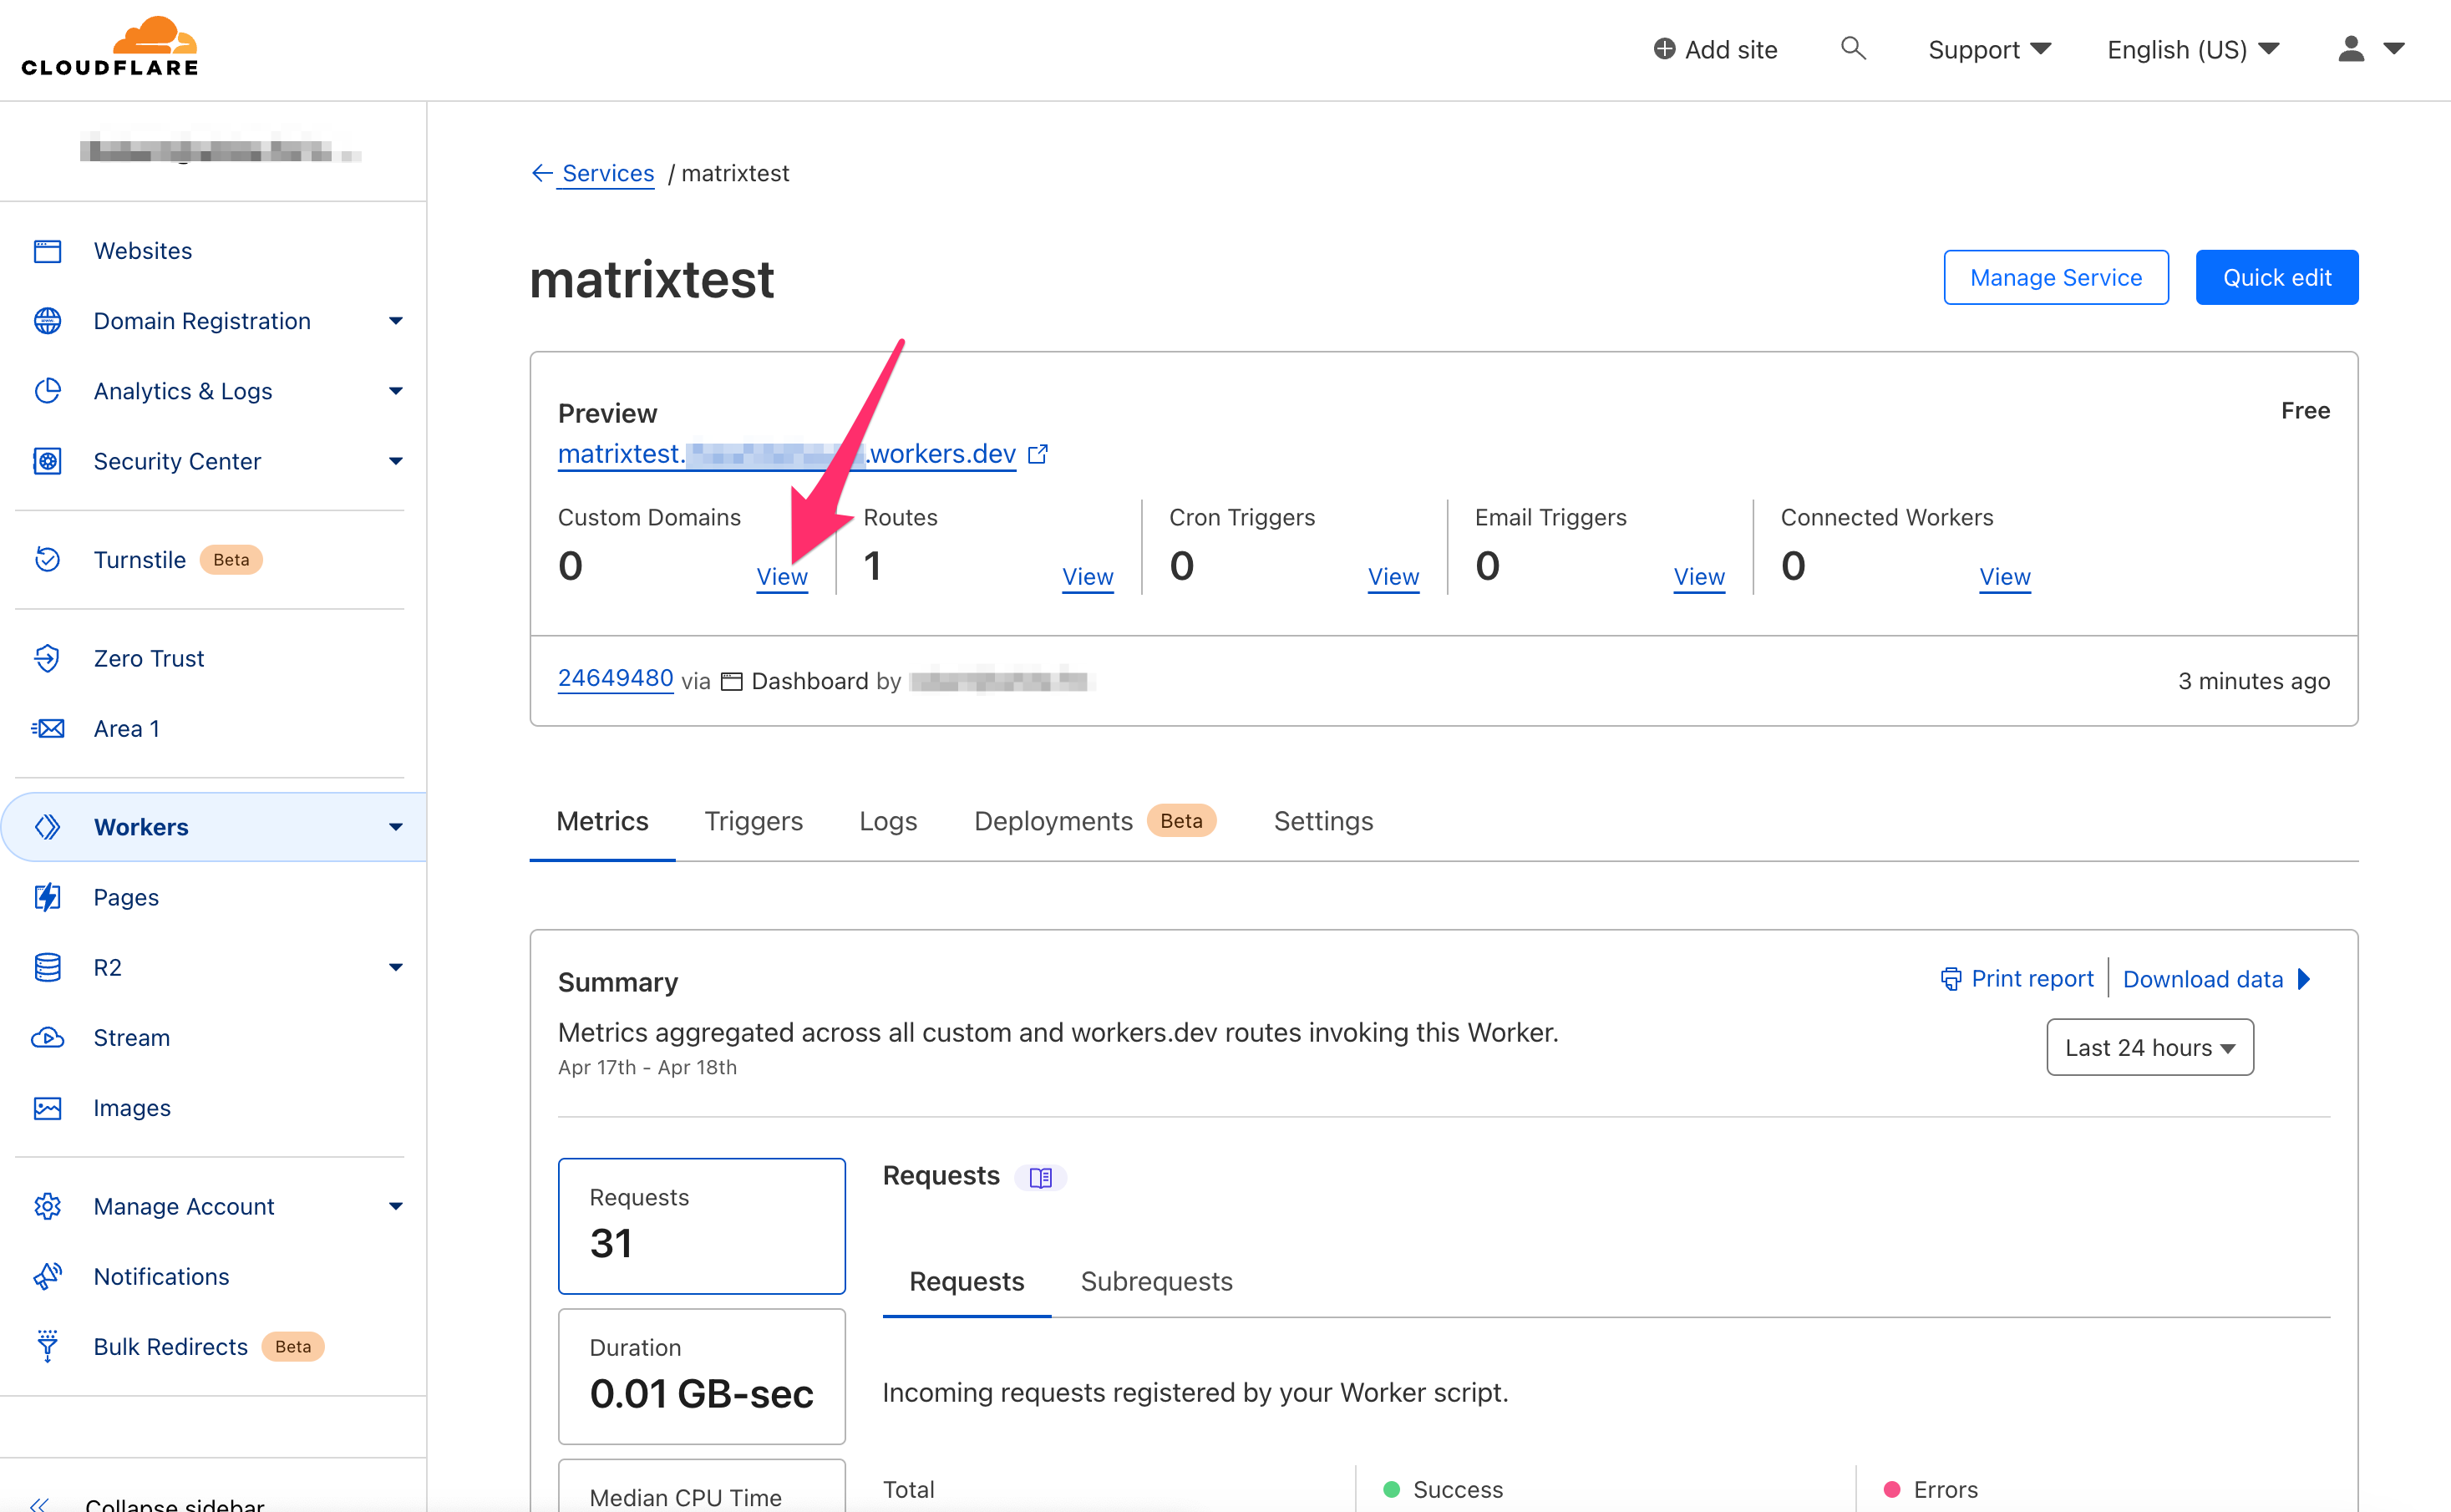
Select Add Custom Domain.
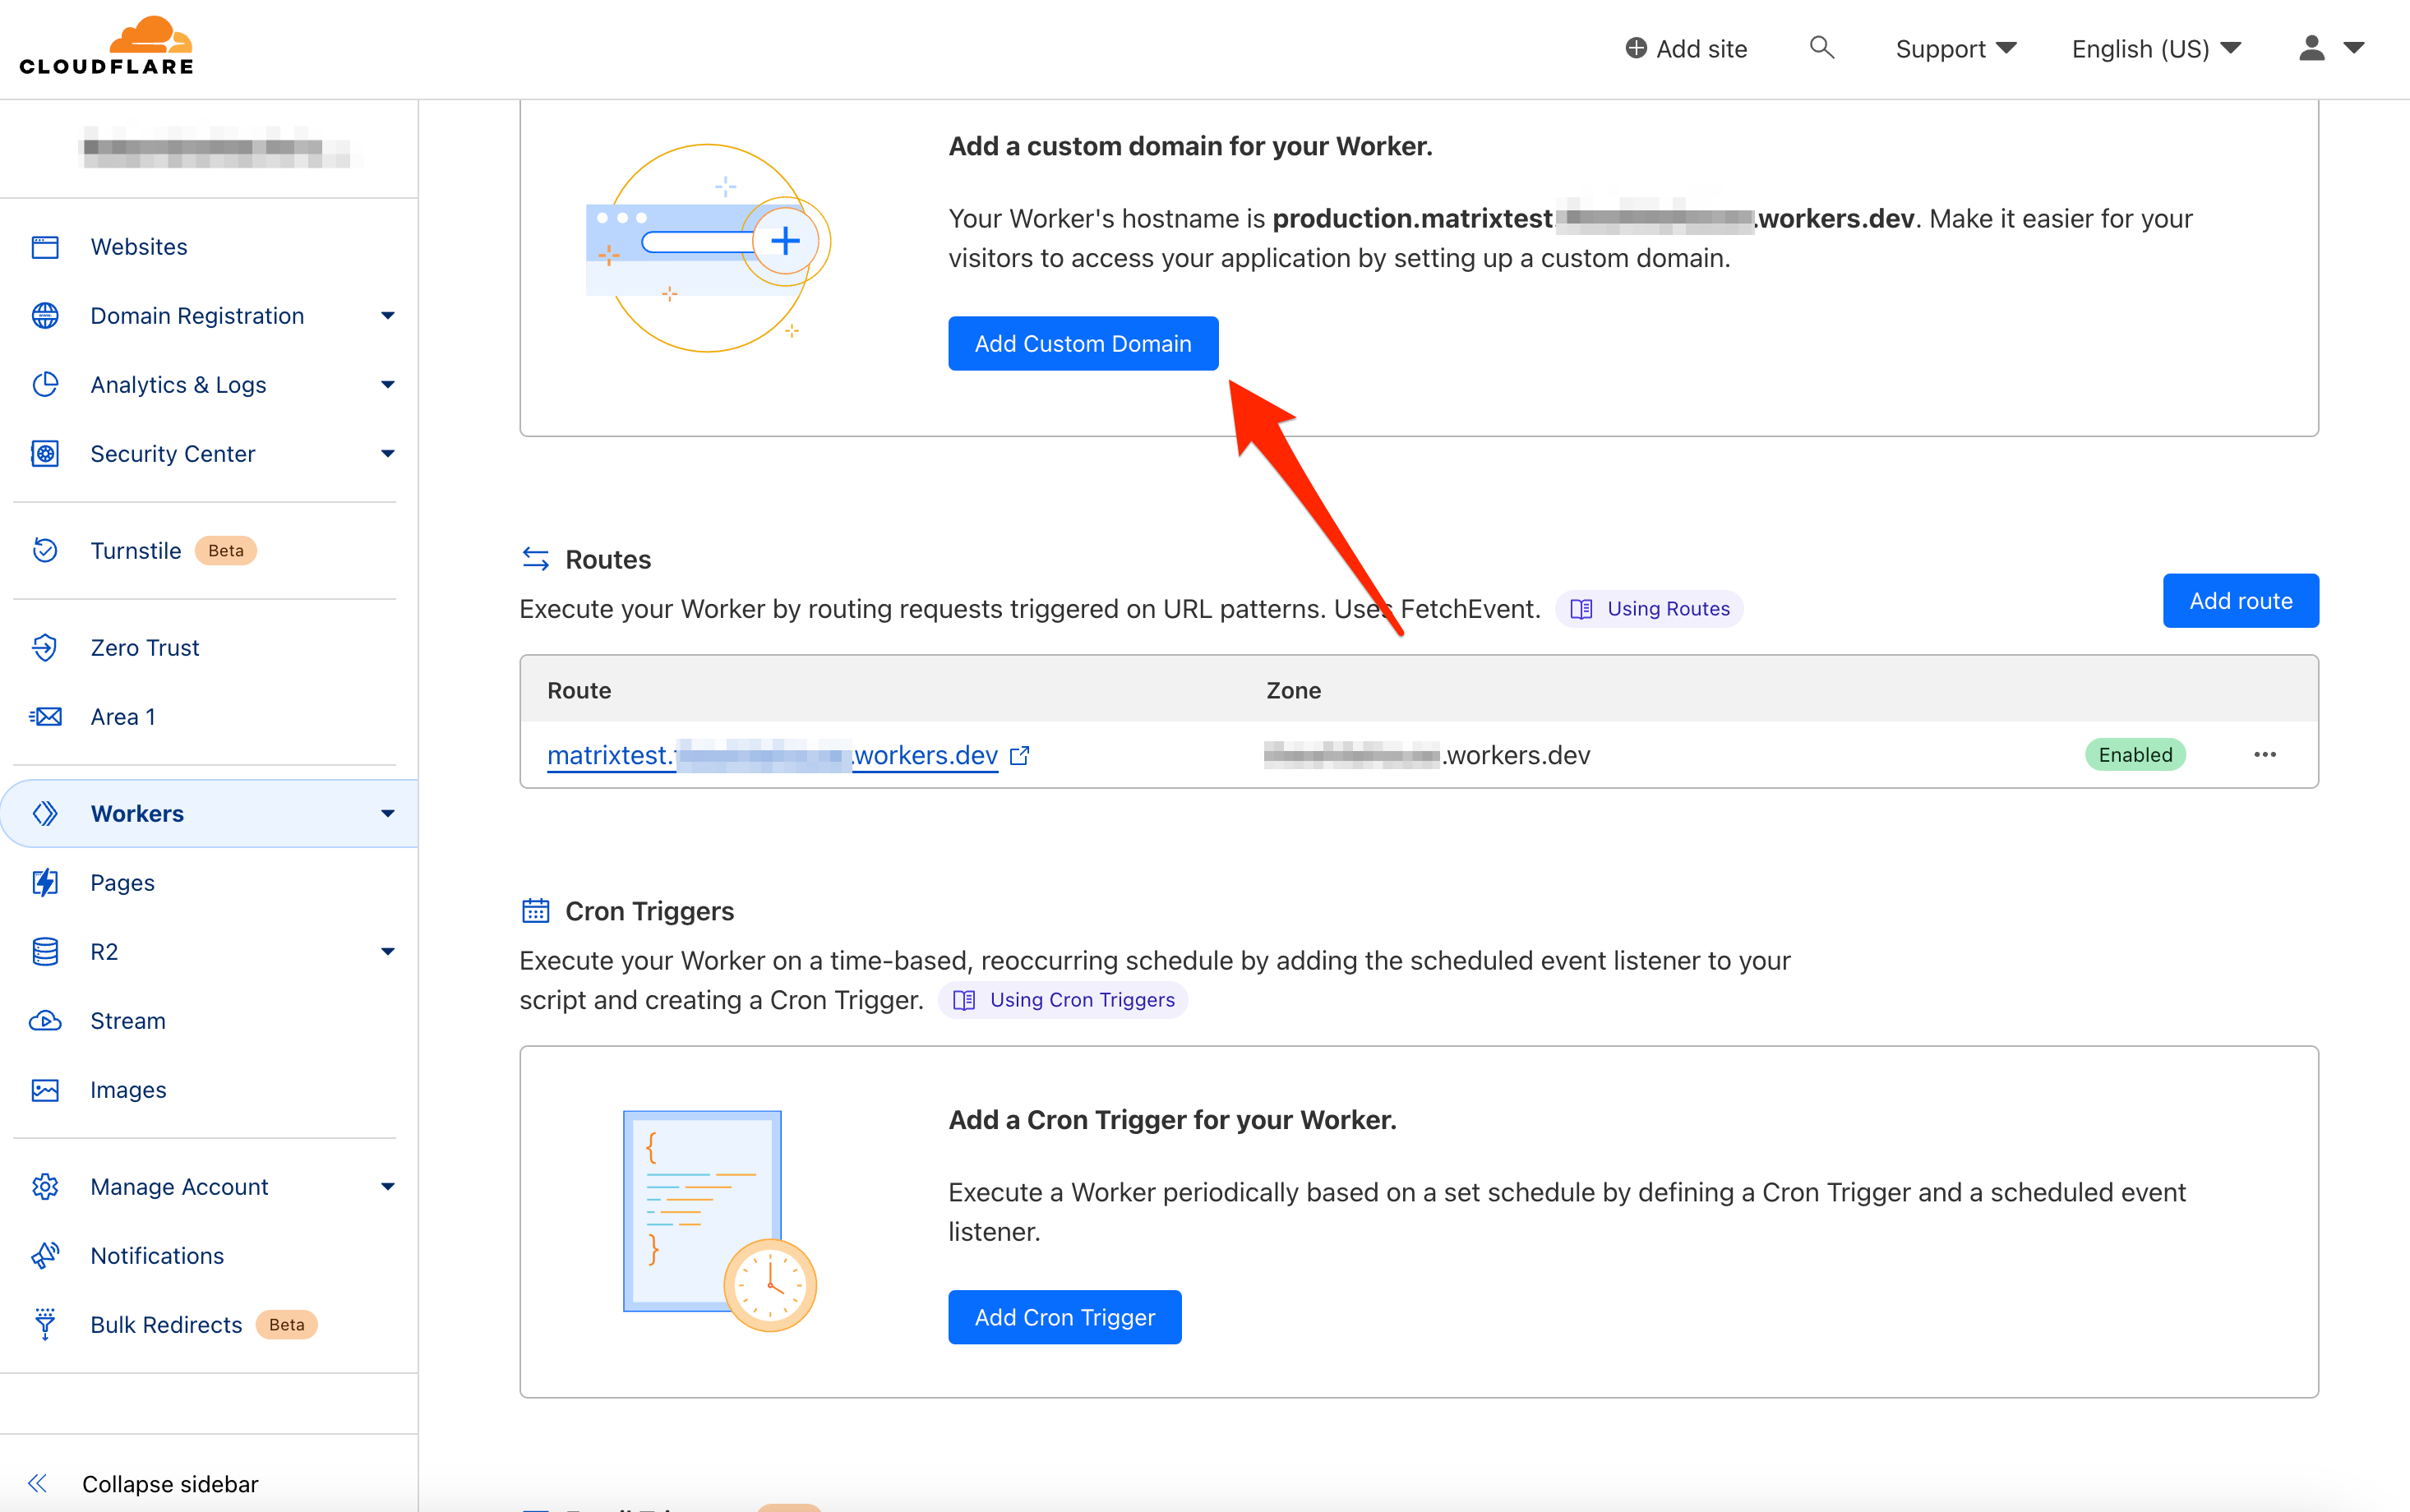
In the new box, enter a custom domain such as federation.yourdomain.tld, replacing yourdomain.tld with your domain. Then, click Add Custom Domain in the bottom right corner.
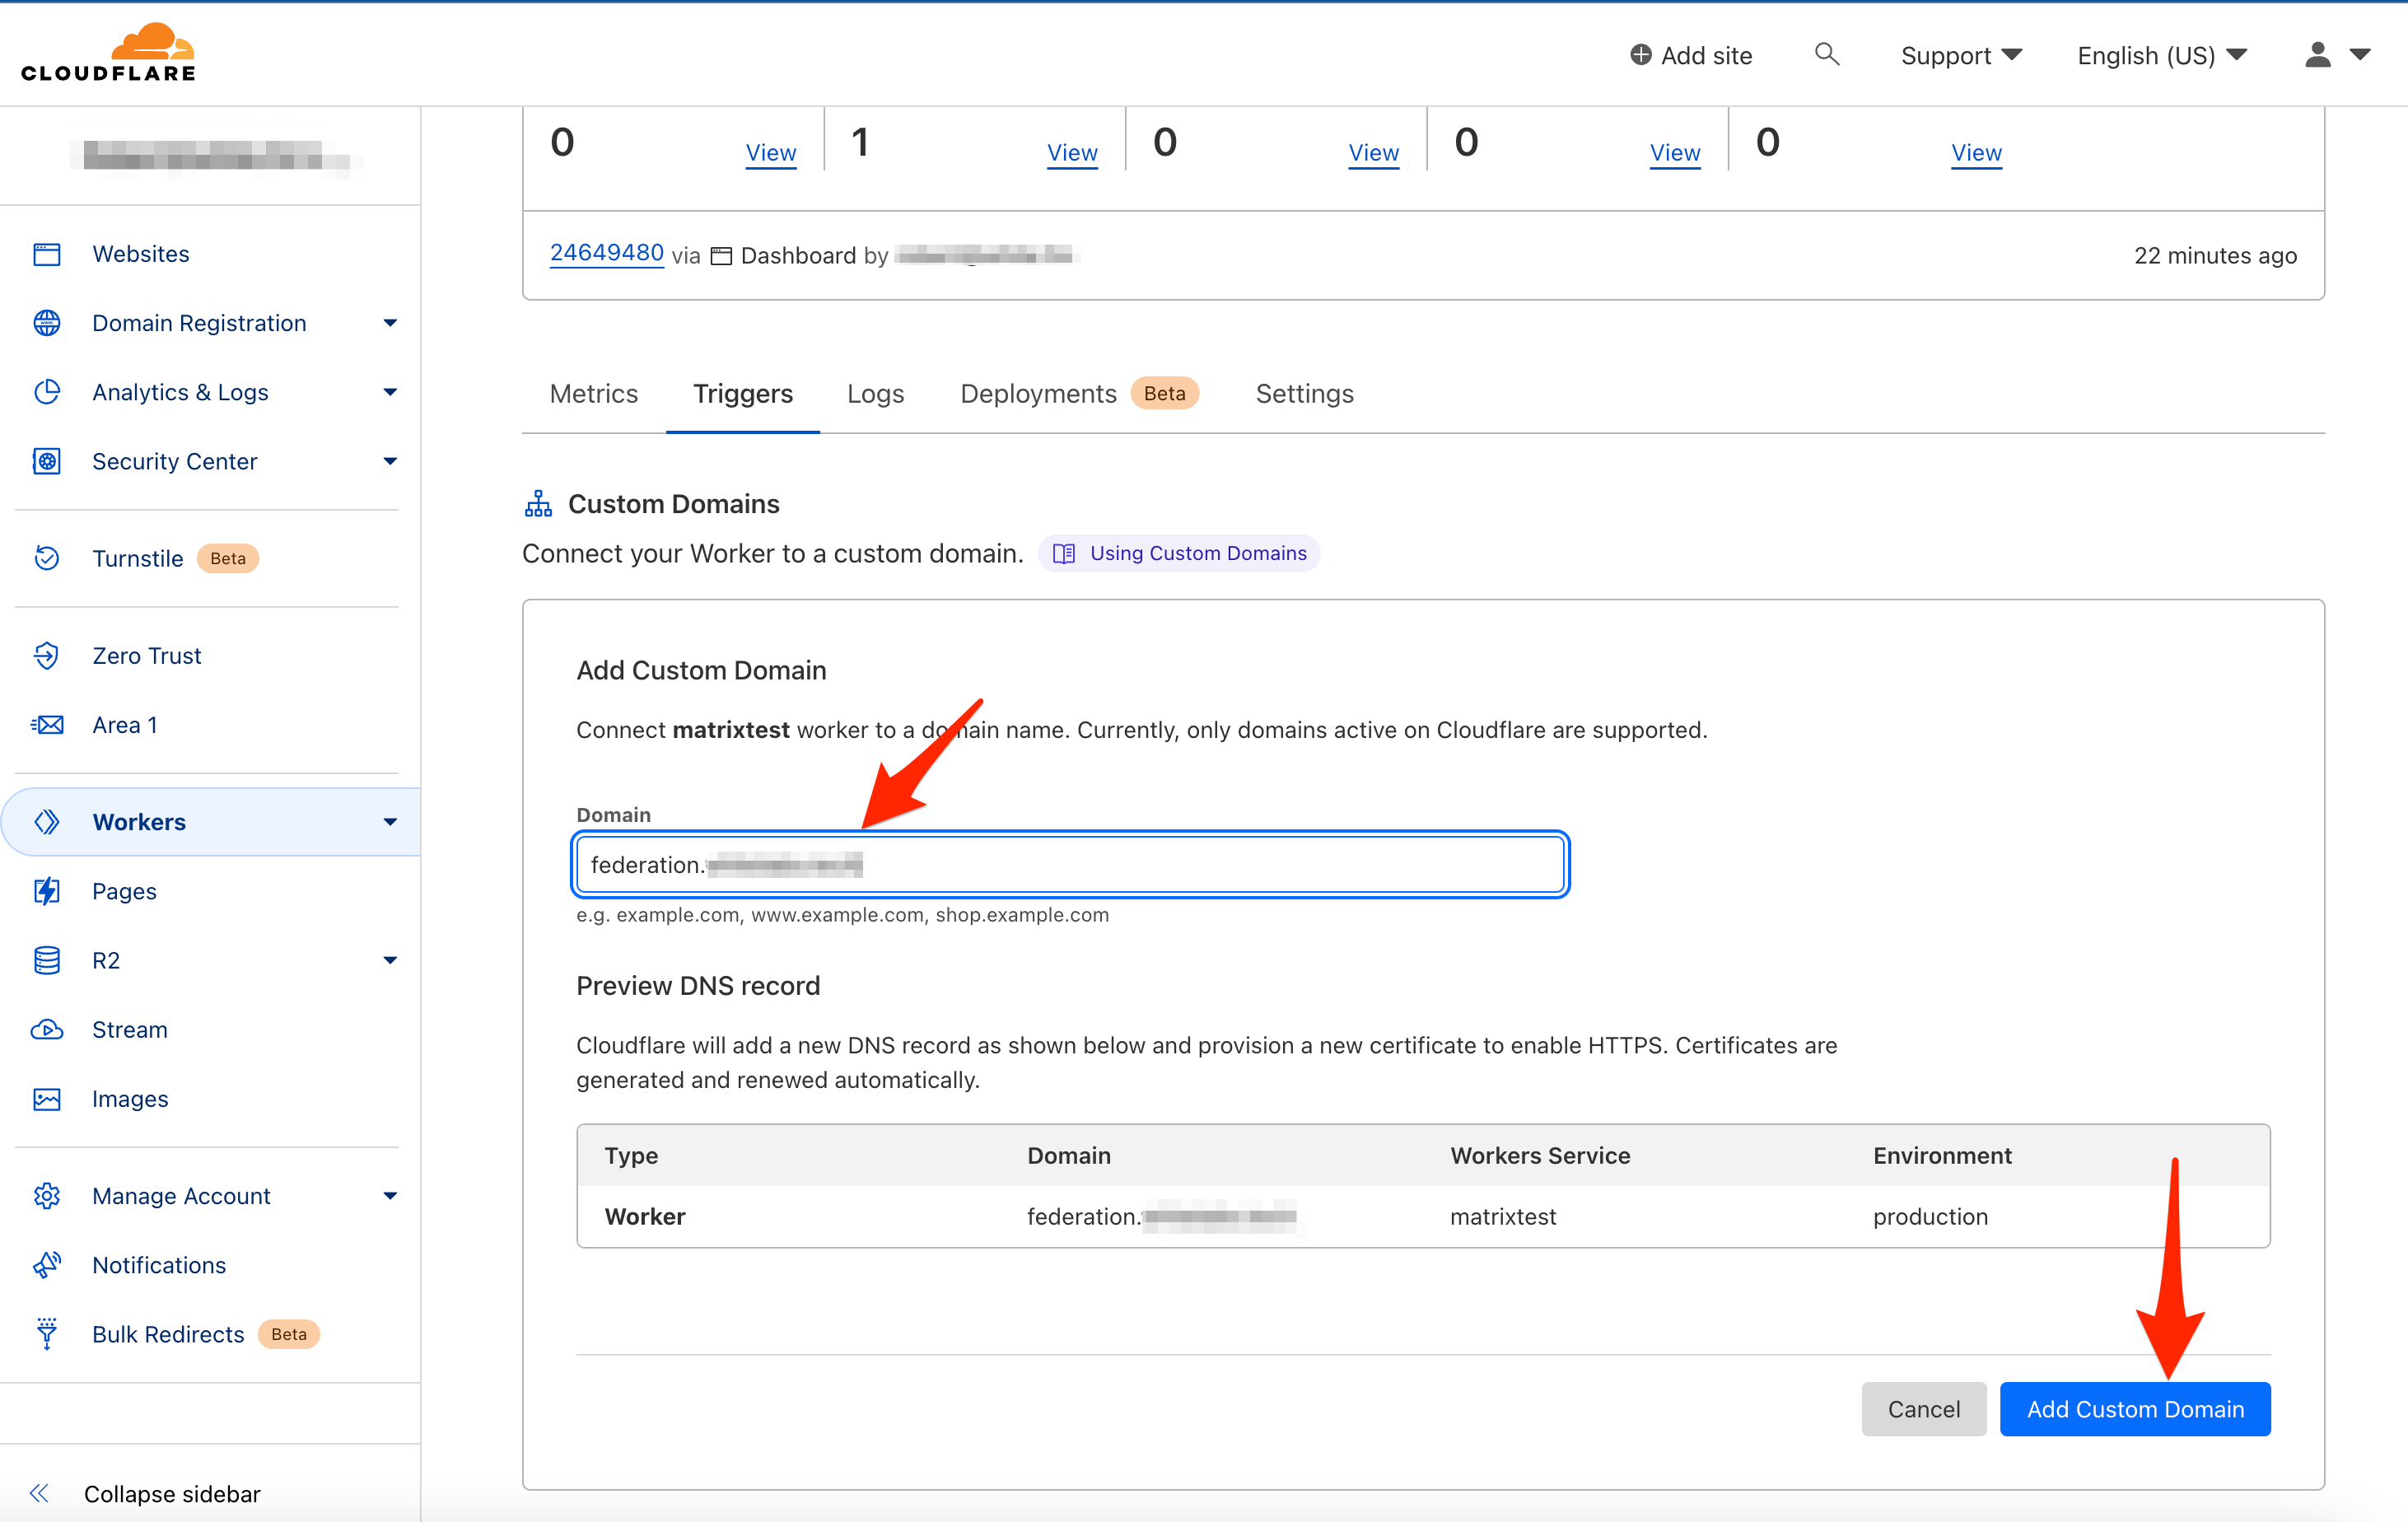
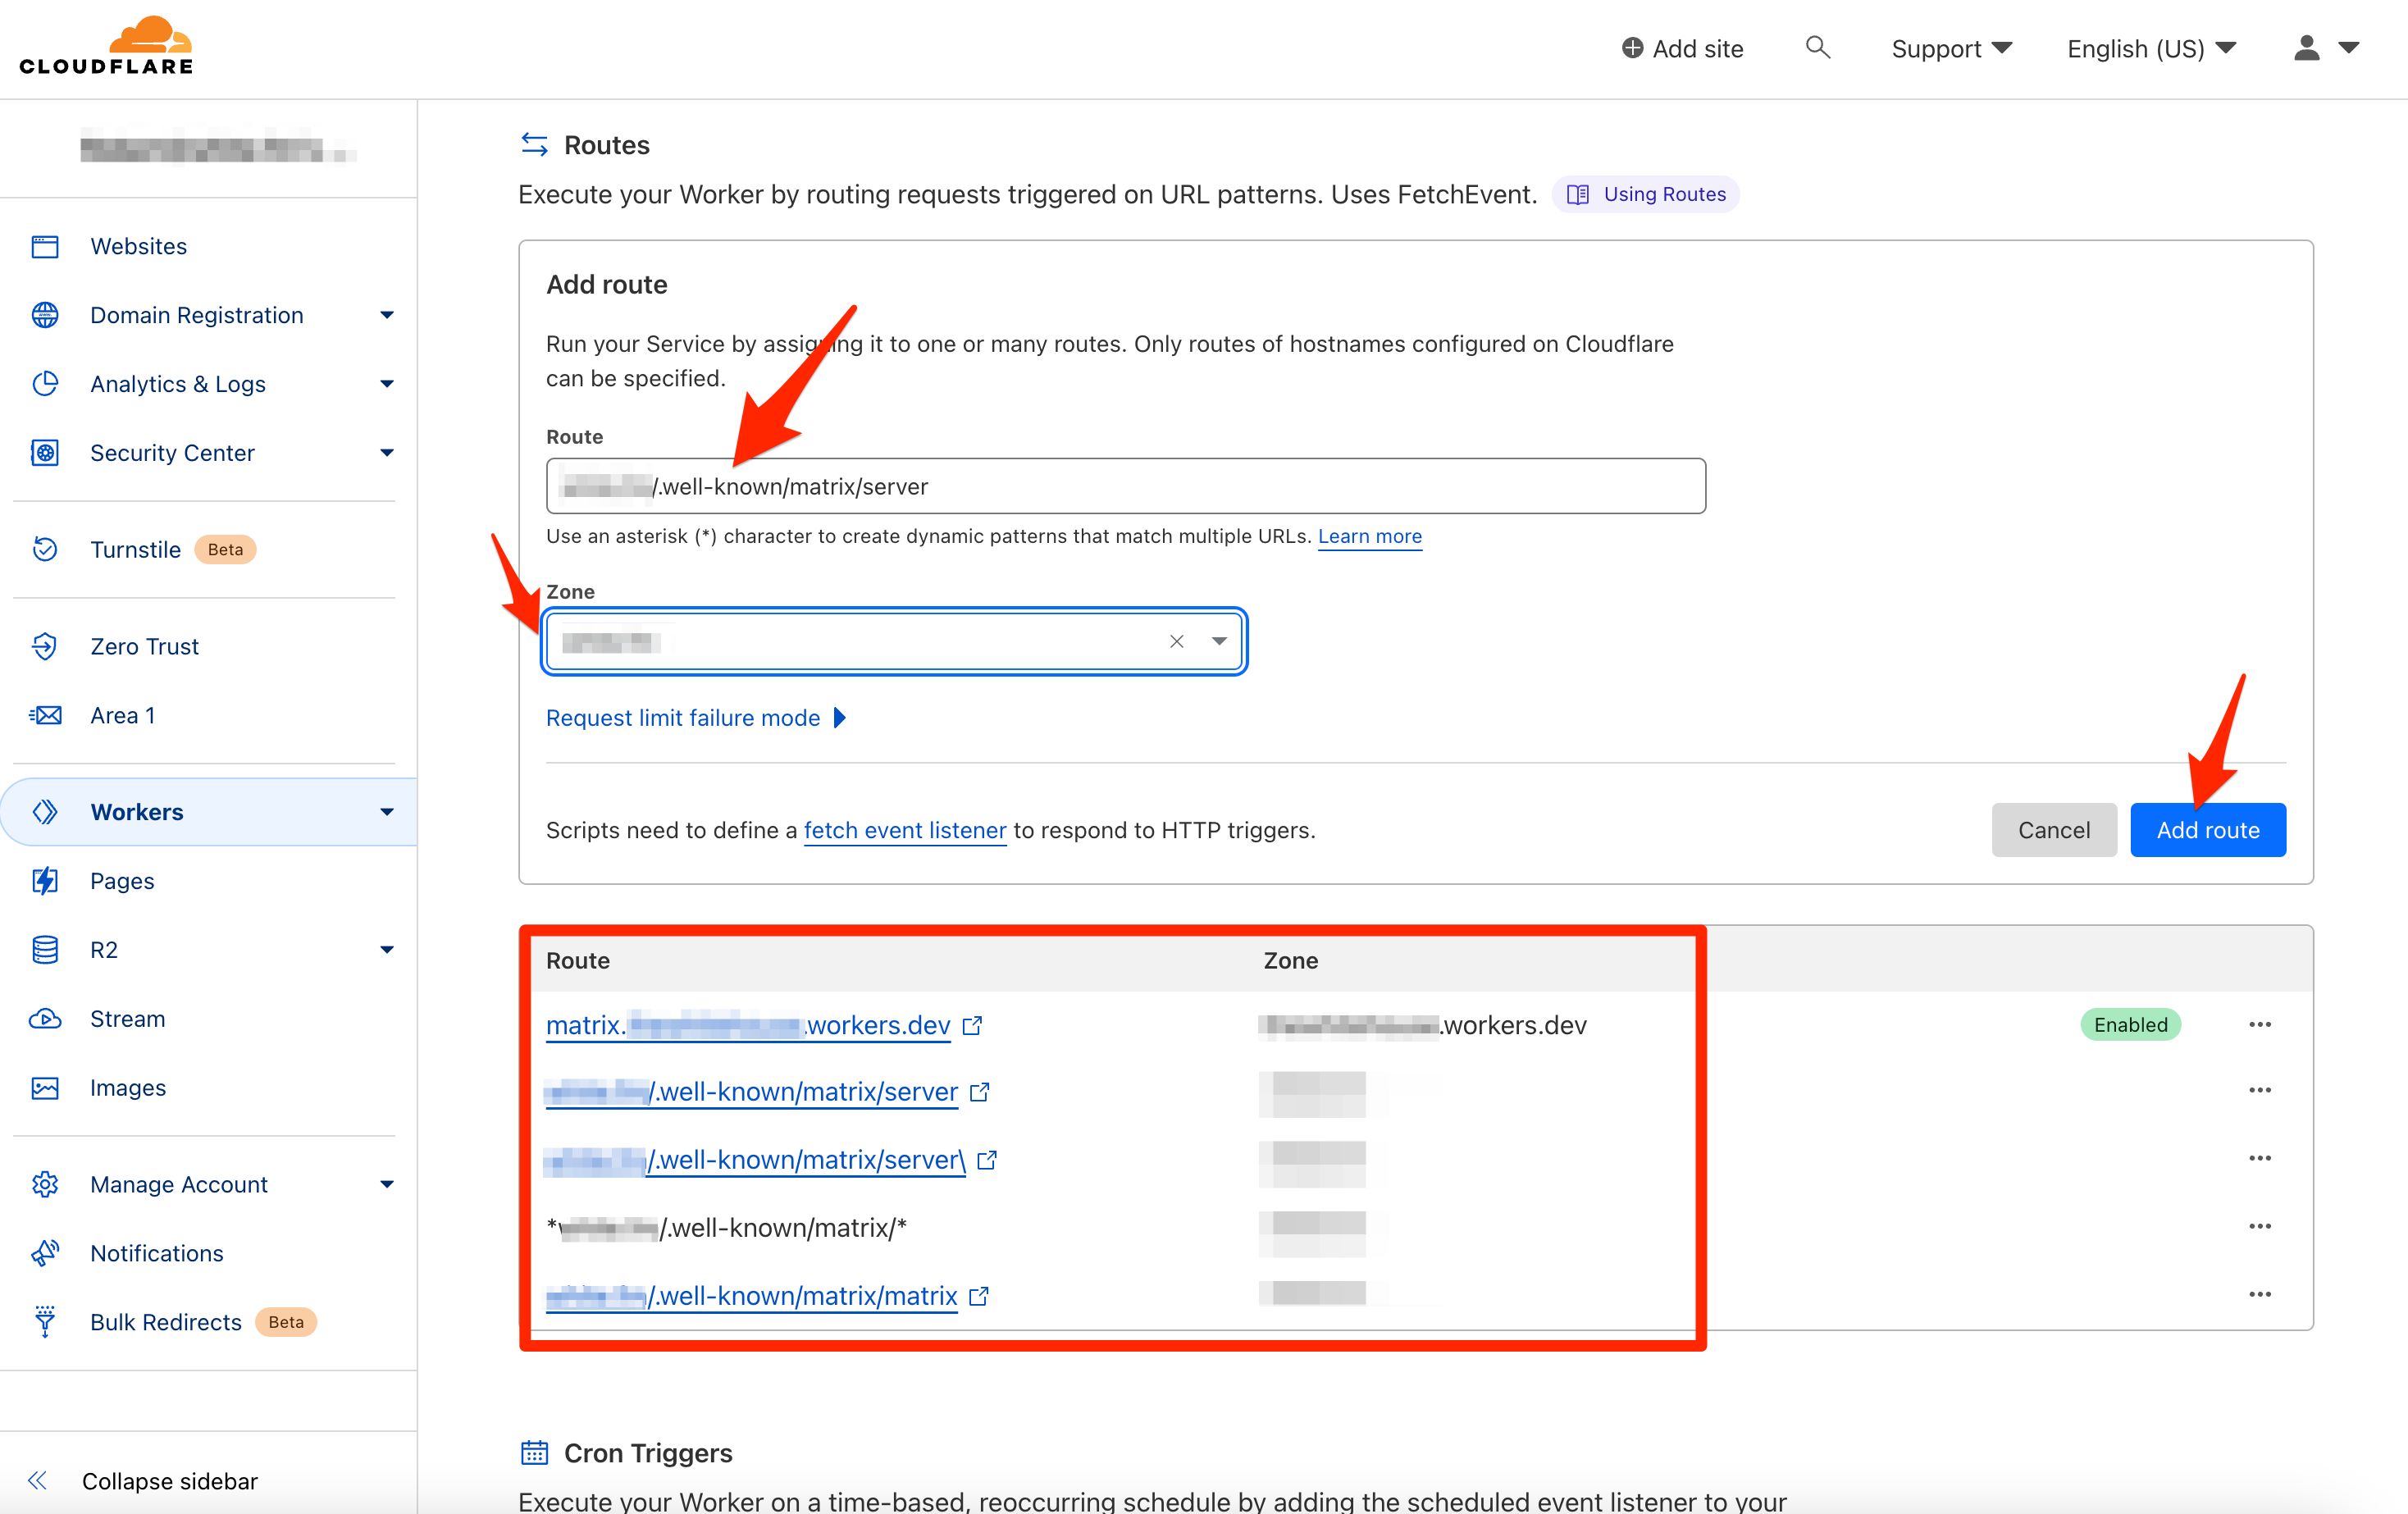
Scroll down slightly to Routes and add the following routes, replacing yourdomain.tld with your own domain. Be sure that each route points to the zone corresponding to your domain.
yourdomain.tld/.well-known/matrix/server
yourdomain.tld/.well-known/matrix/server\
*yourdomain.tld/.well-known/matrix/*
yourdomain.tld/.well-known/matrix/matrix
(Optional) Nginx Proxy Manager (NPM) Configuration
The NPM configuration is optional if you are running split-brain DNS and plan to access the Matrix Server locally. If you already have a NPM instance running, point matrix.yourdomain.tld and element.yourdomain.tld to your NPM instance via your DNS servers.
Running a New NPM Instance
If you need a NPM instance, uncomment Lines 53-69 and Lines 72-81 from the docker-compose.yml file you downloaded from GitHub. Once updated, rerun:
docker-compose up -d
You can follow the instructions at my previous post on NPM to get going.
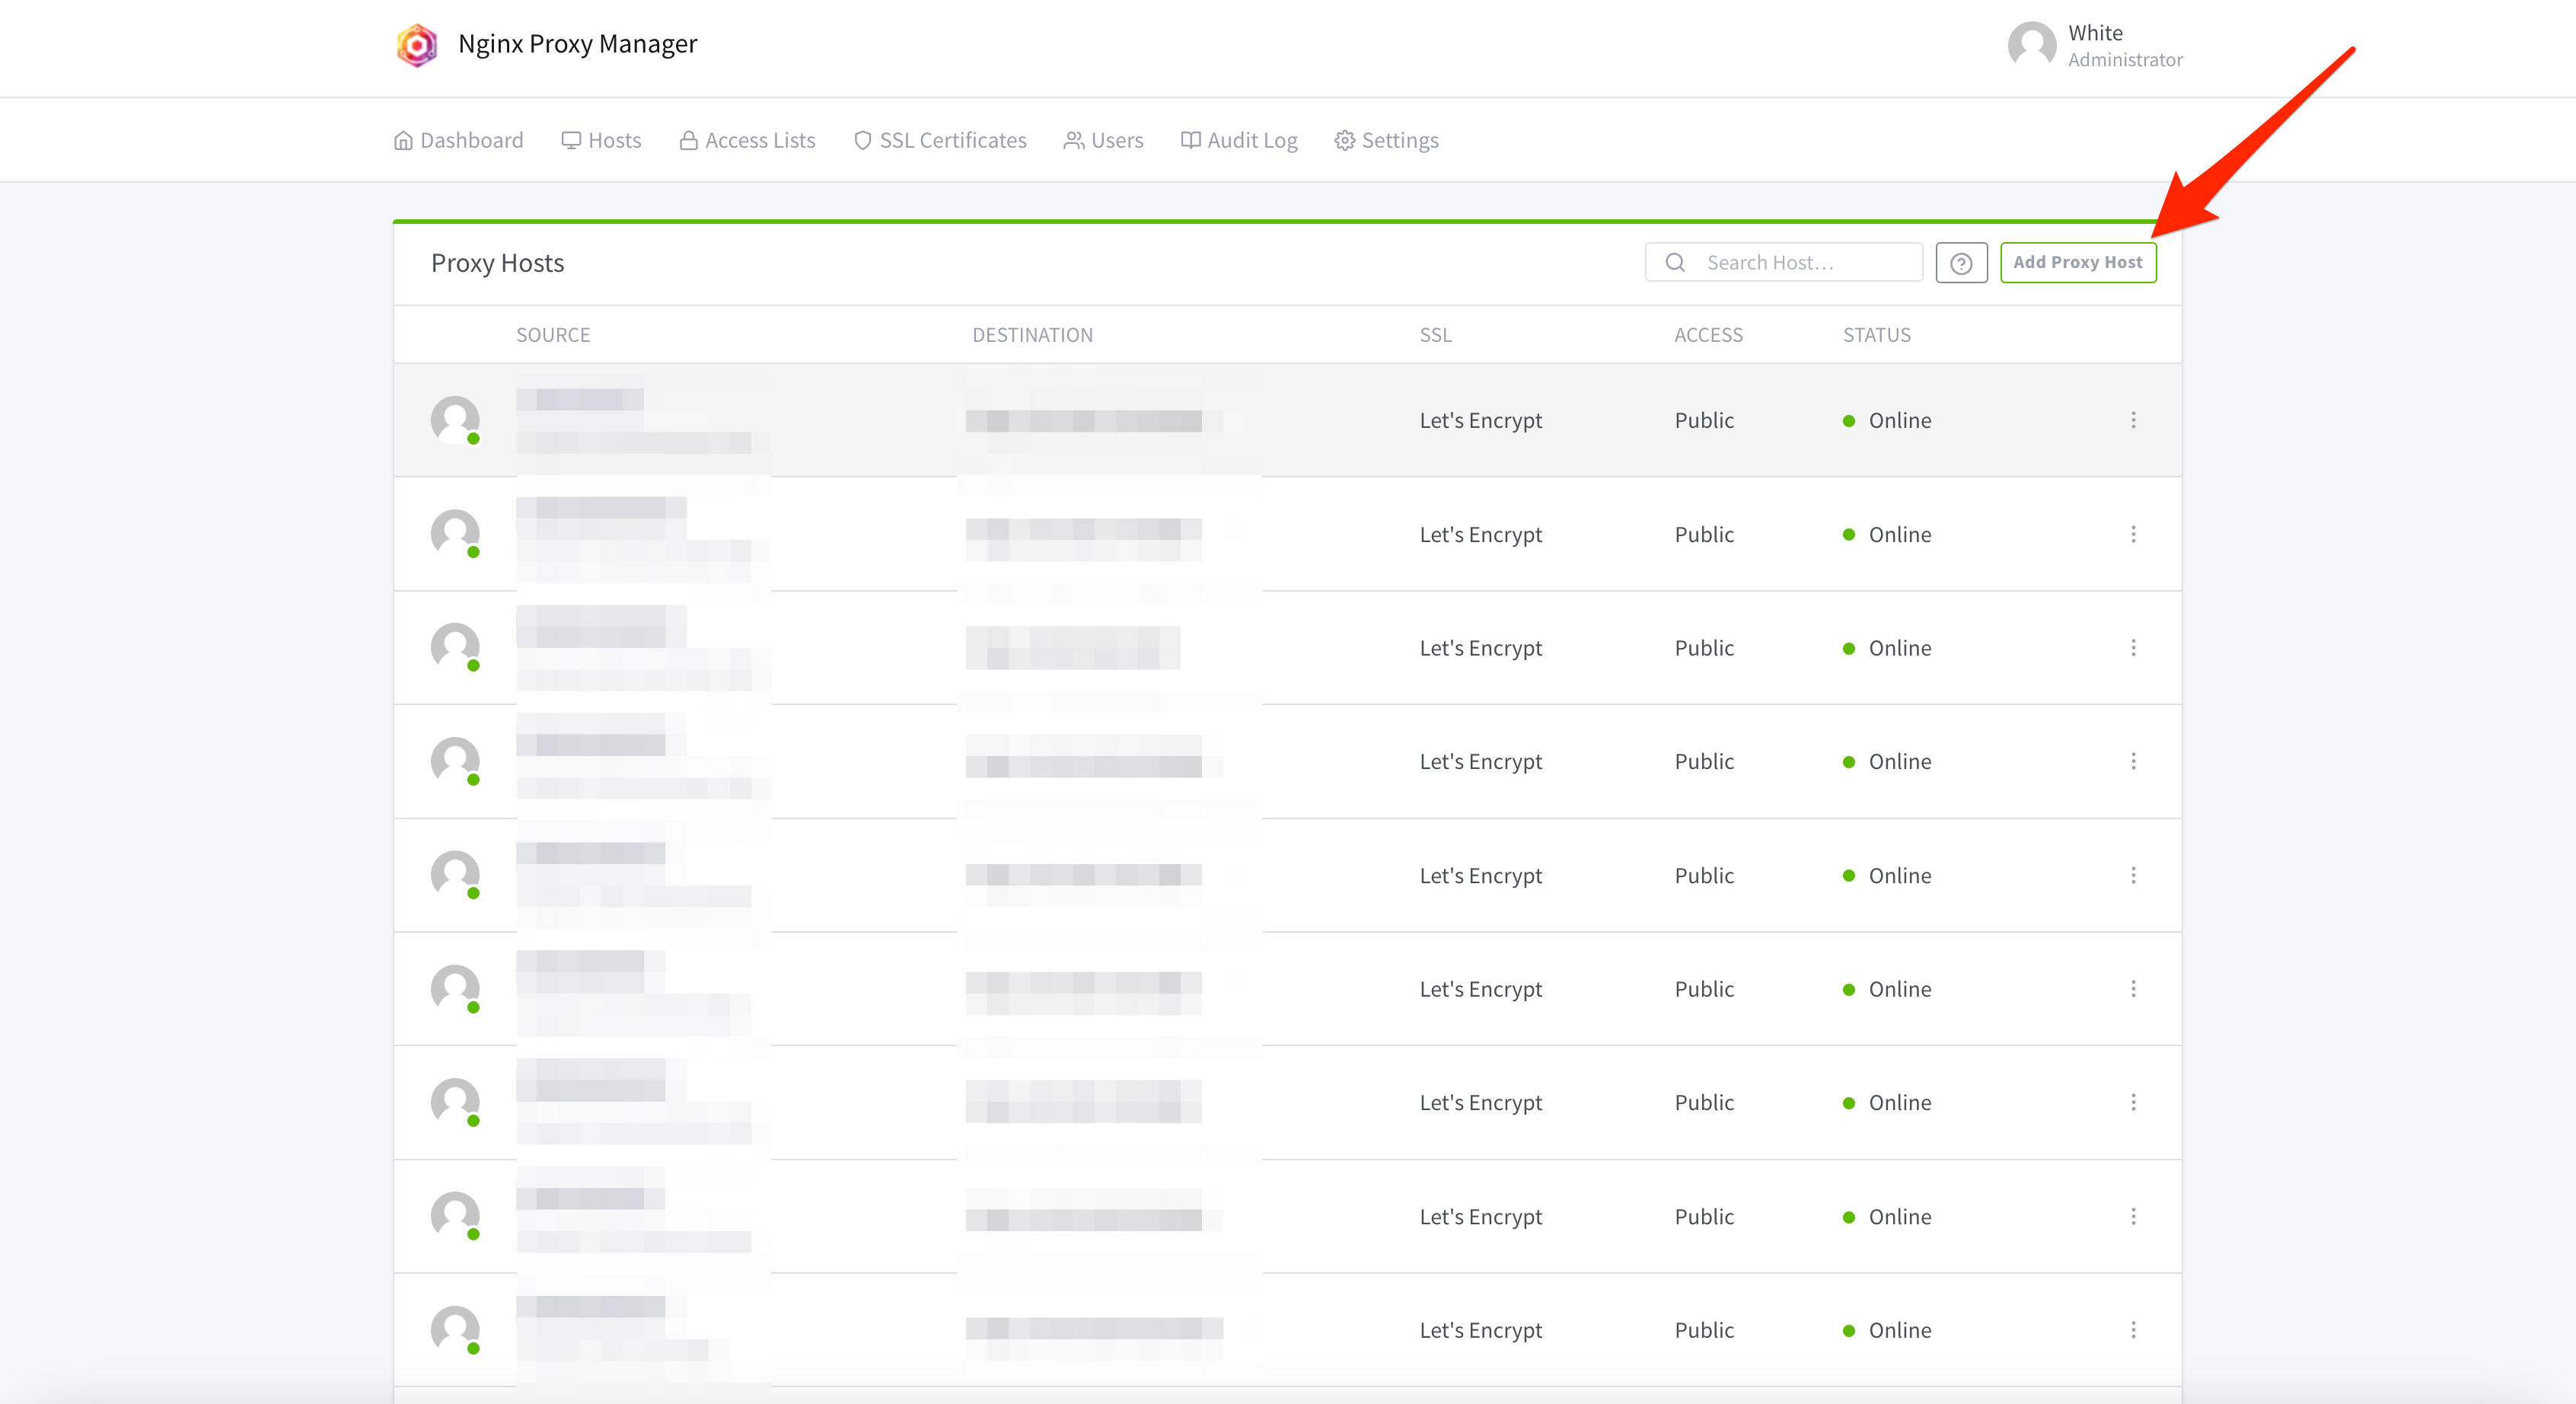
Configuring NPM
In NPM, you will need to create 3 separate proxy hosts. You will need matrix.yourdomain.tld, element.yourdomain.tld, and yourdomain.tld. If you are using webhooks and/or Maubot, you will need proxy hosts for them too (e.g., webhooks.youdomain.tld, maubot.youdomain.tld).
I will detail how to add matrix.yourdomain.tld. You can follow the exact process for the rest of the hosts as well.
First, click Add Proxy Host in the top right of NPM.
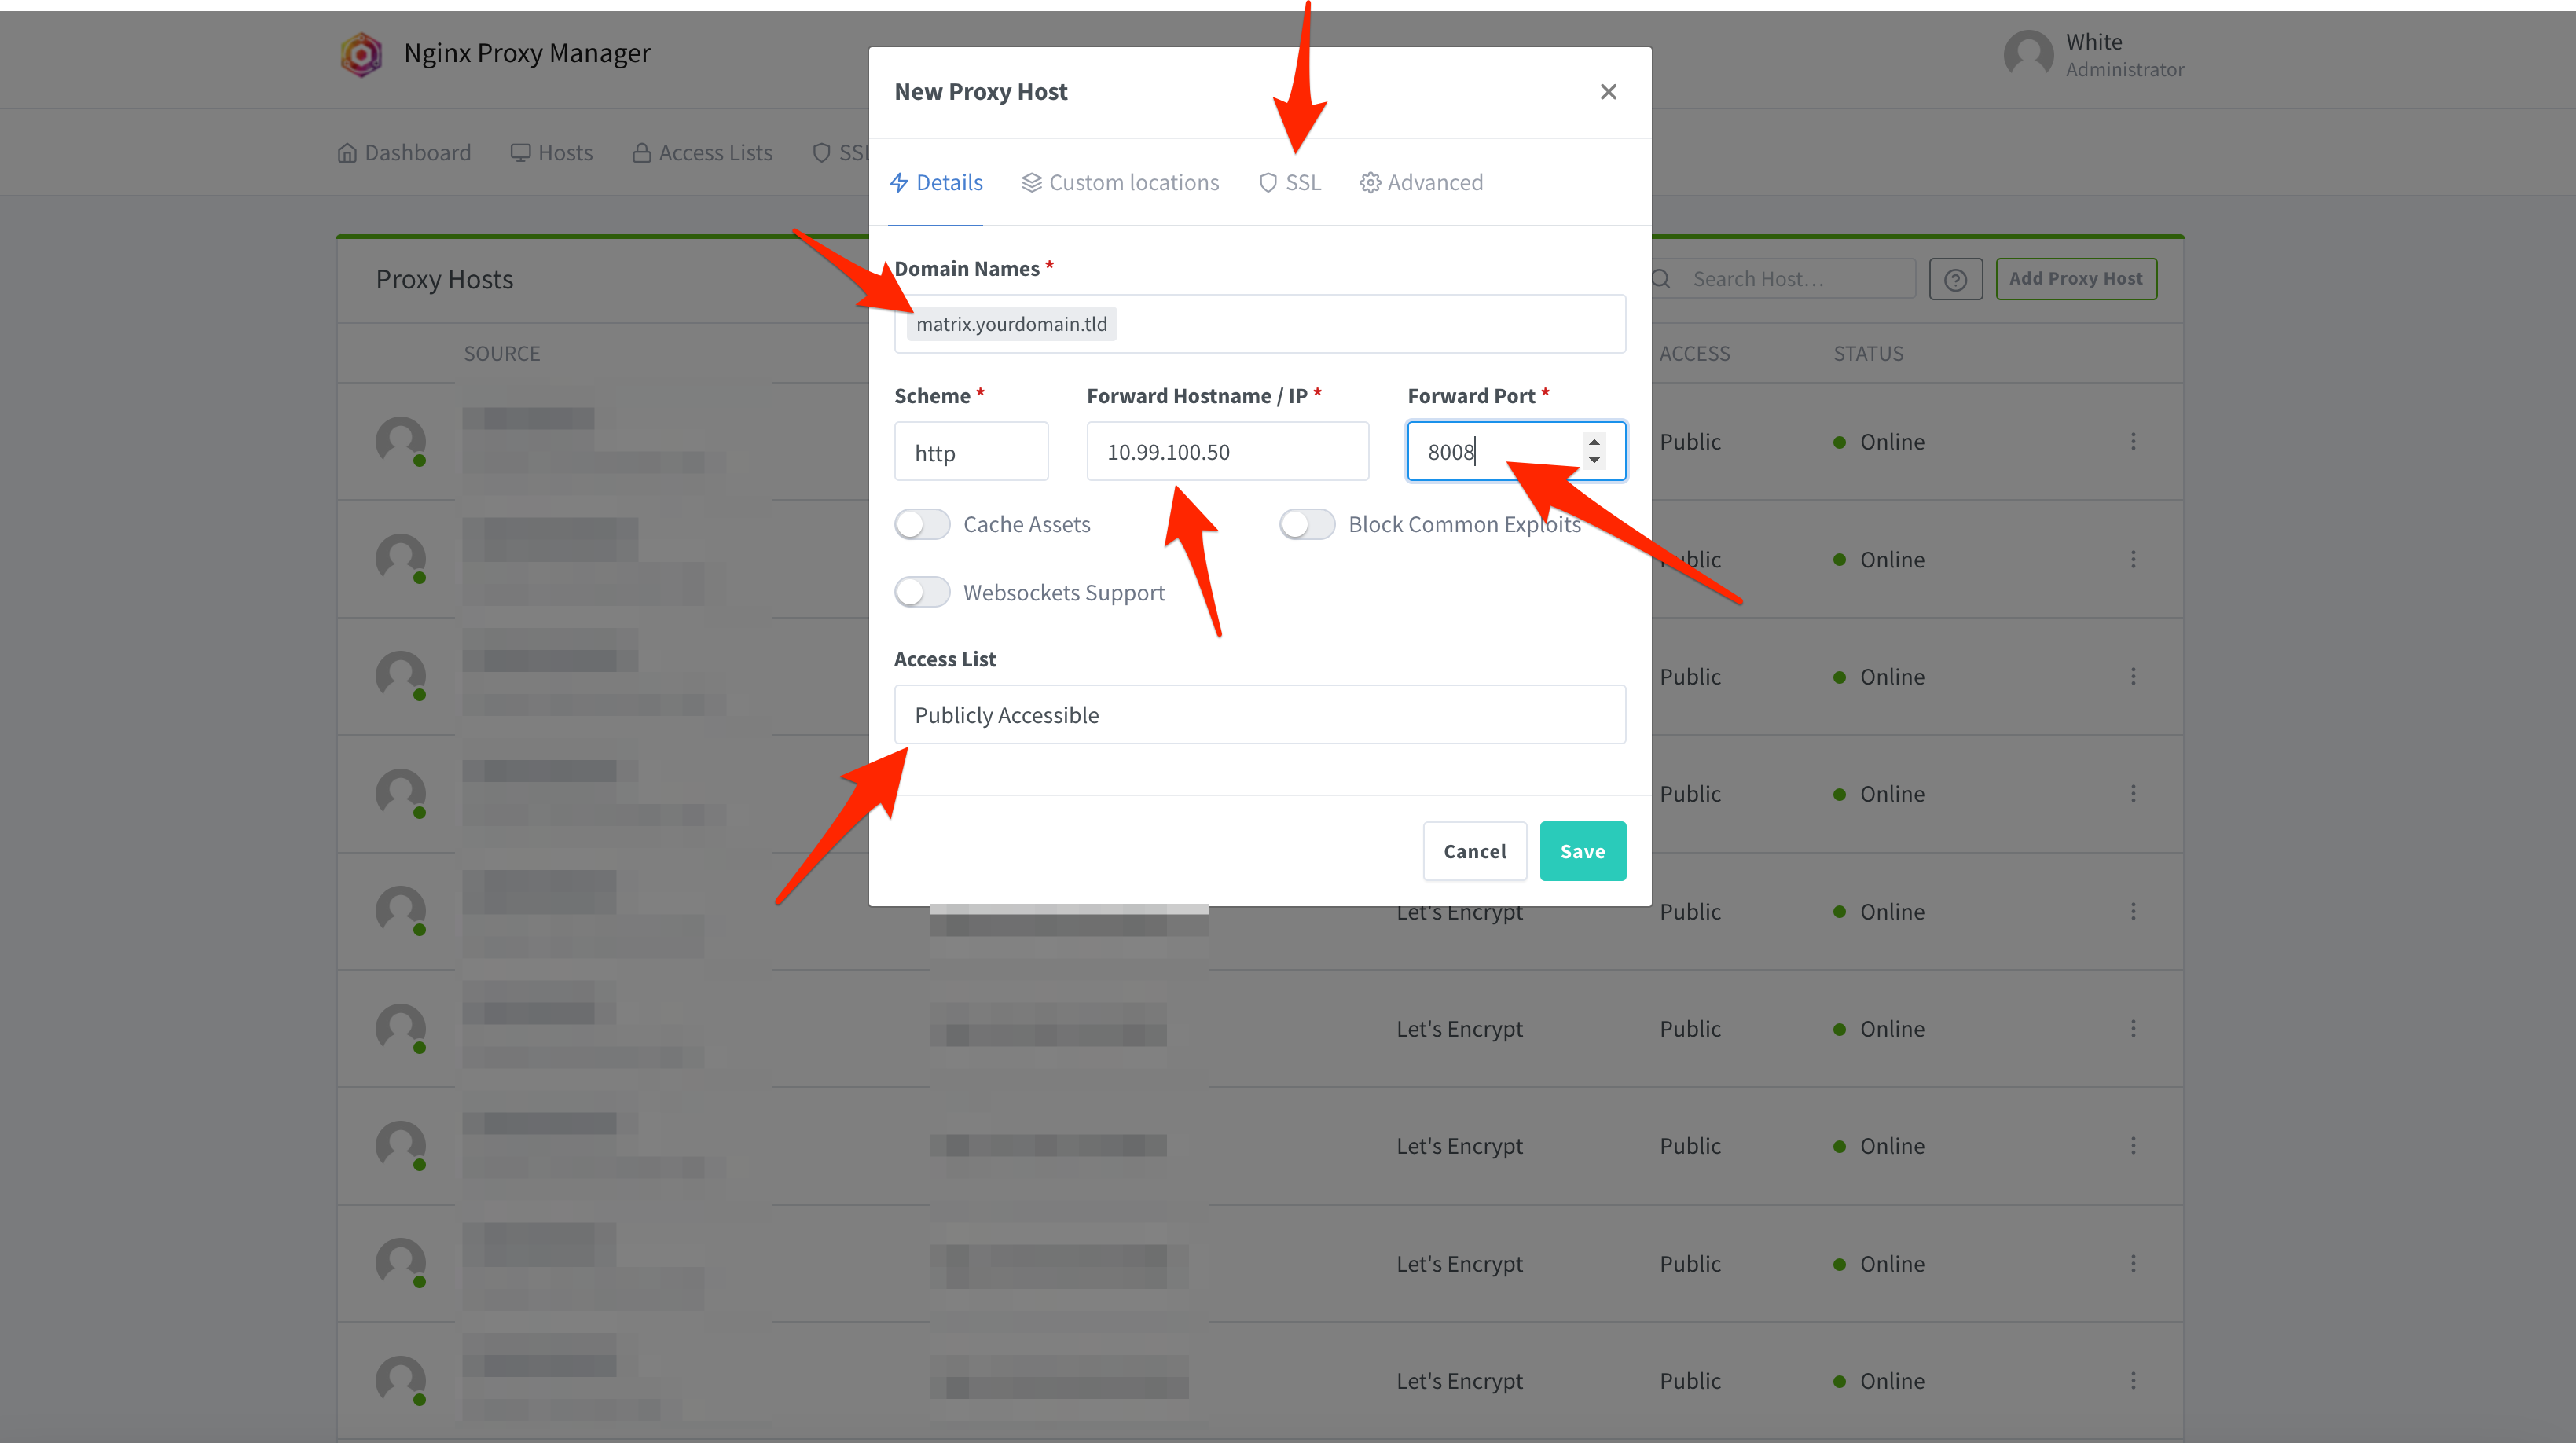
On the new screen, input matrix.yourdomain.tld under Domain Names, and input the local IP of your Matrix Server under Forward Hostname / IP. Next, input 8008 for the Forward Port. Then, click SSL.
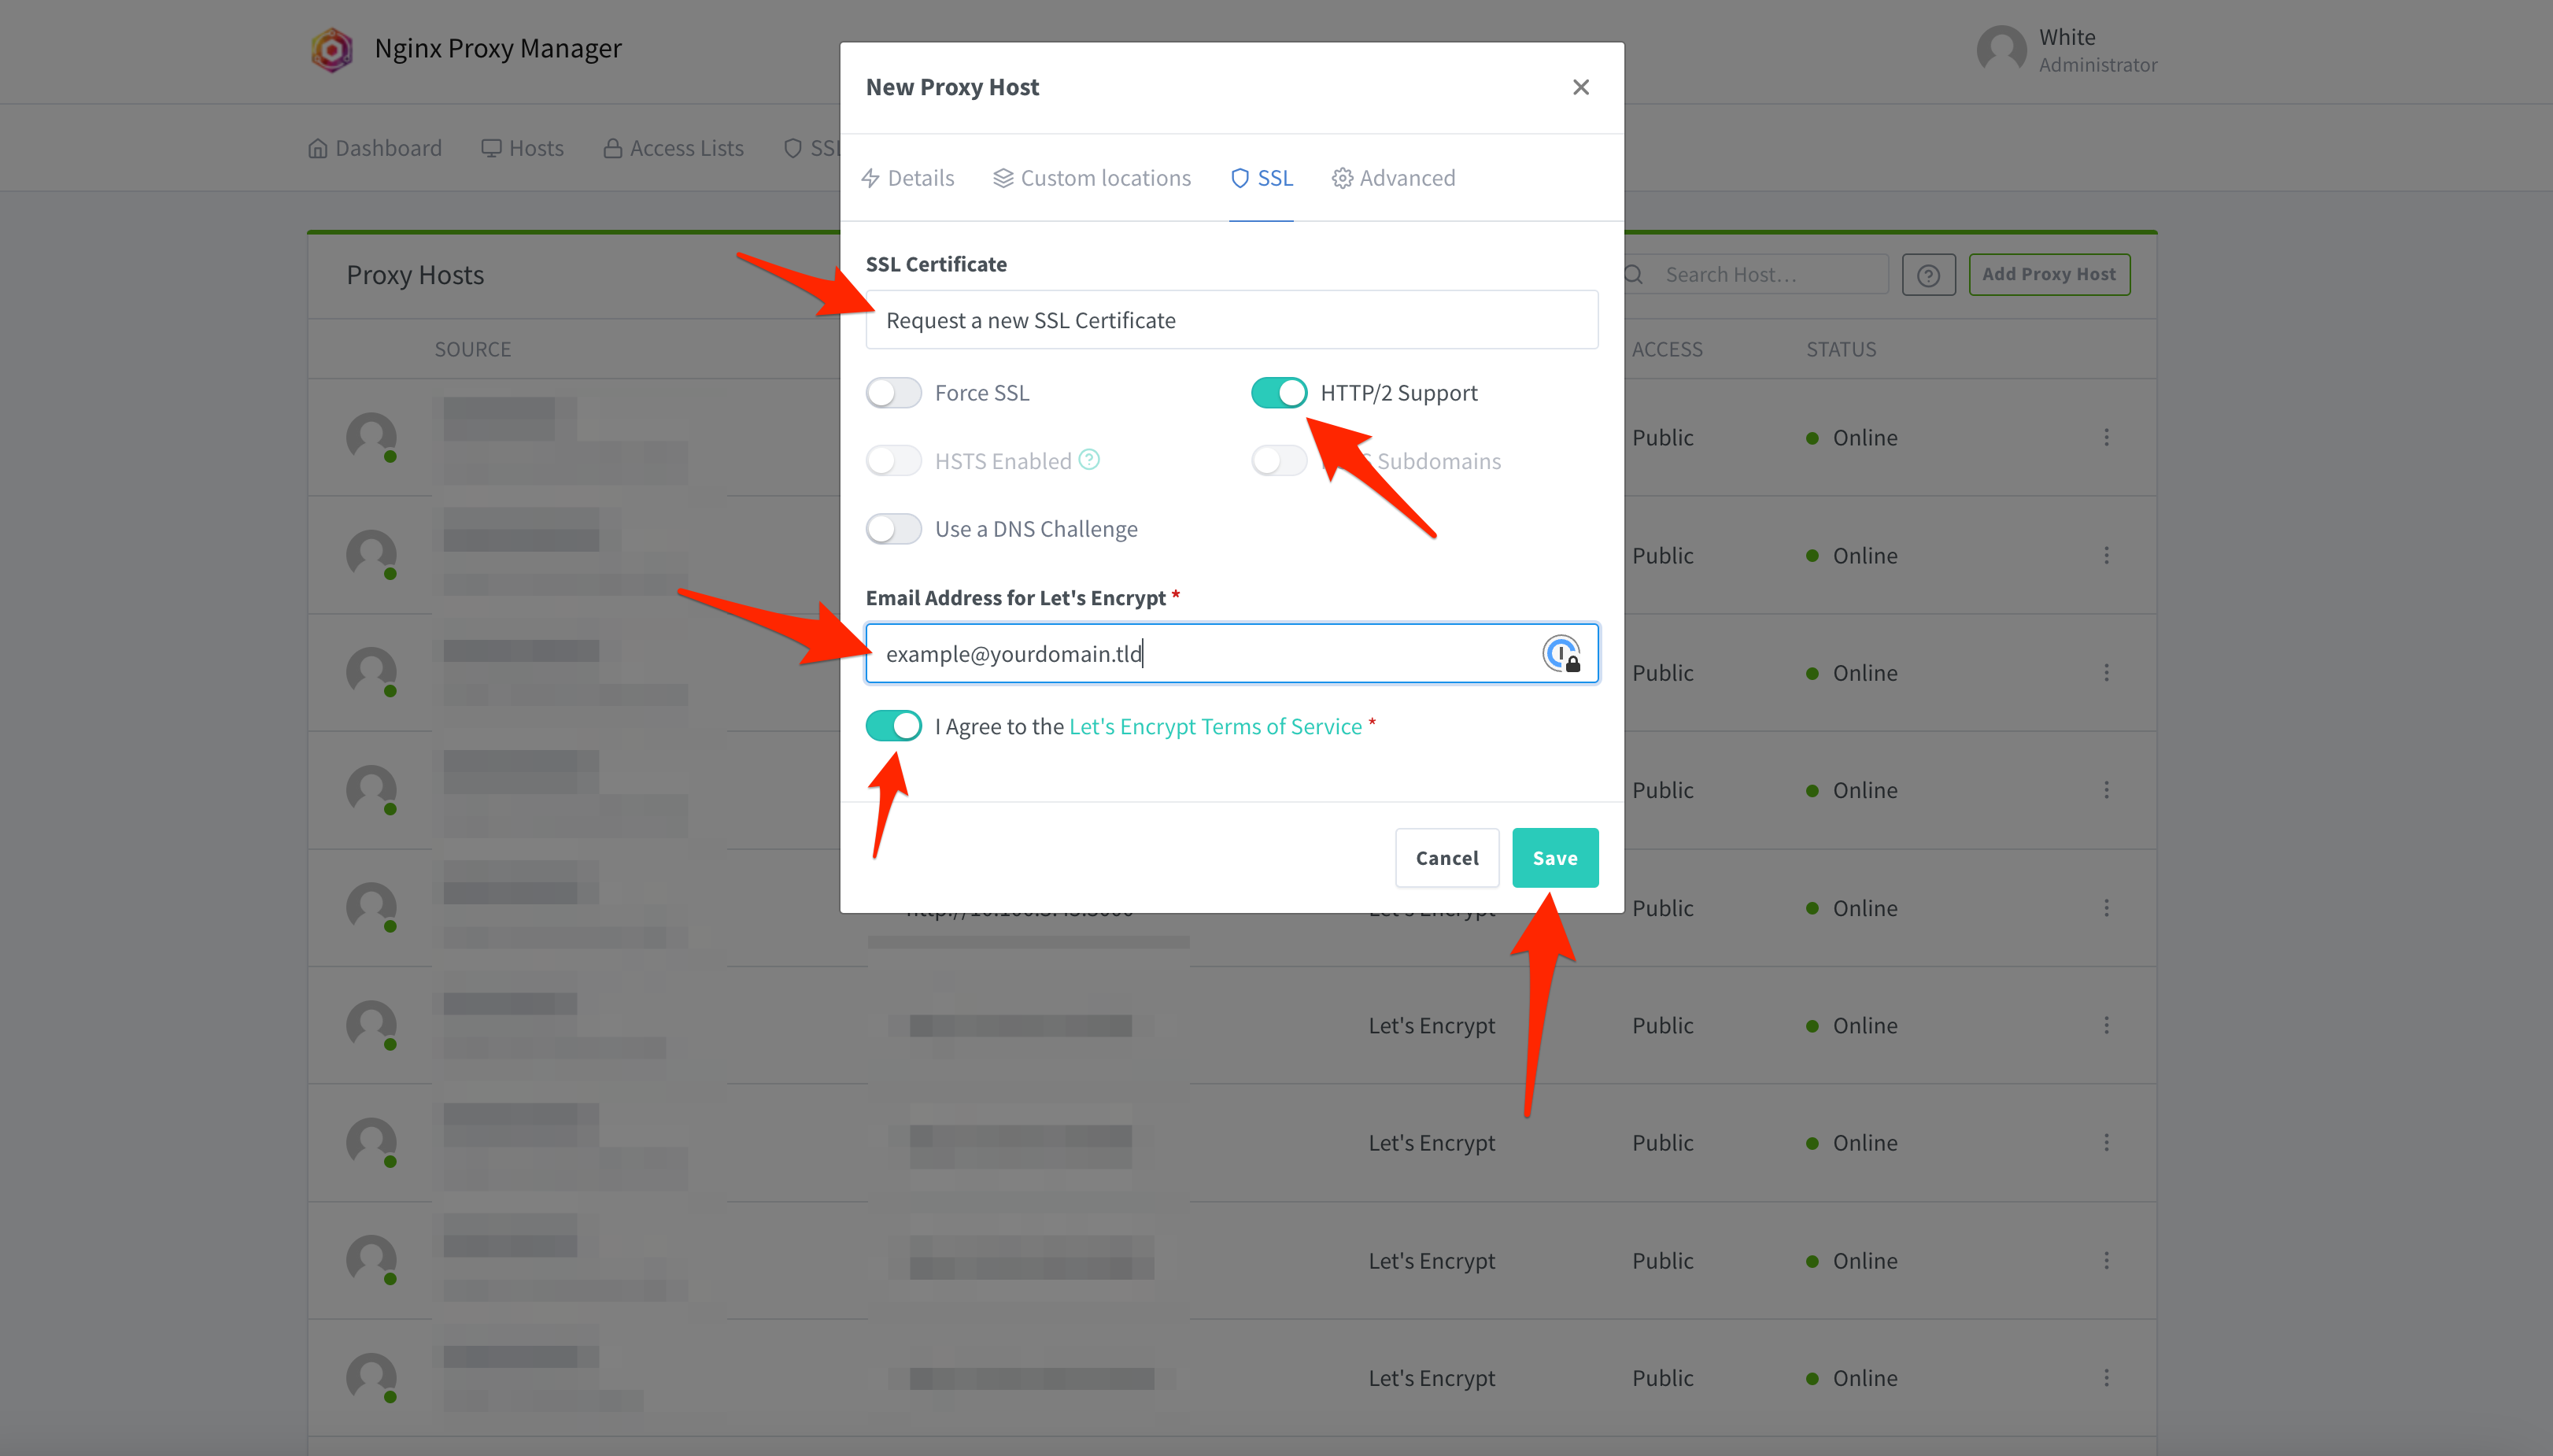
Here, under SSL Certificate, change the dropdown menu to Request a new SSL Certificate. Check HTTP/2 Support, and input your email address in the box Email Address for Let’s Encrypt. The email field is required, and the email address will be registered with Let’s Encrypt. Once filled in, click Save in the bottom right.
Here are the IP:port combos for all the services:
yourdomain.tld : http://IP:8008 (e.g., http://10.99.100.50:8008)

matrix.yourdomain.tld : http://IP:8008 (e.g., http://10.99.100.50:8008)

element.yourdomain.tld : http://IP:8080 (e.g., http://10.99.100.50:8080)

maubot.yourdomain.tld : http://IP:29316 (e.g., http://10.99.100.50:29316)

webhooks.yourdomain.tld : http://IP:80000 (e.g., http://10.99.100.50:8000)
Accessing Your Server
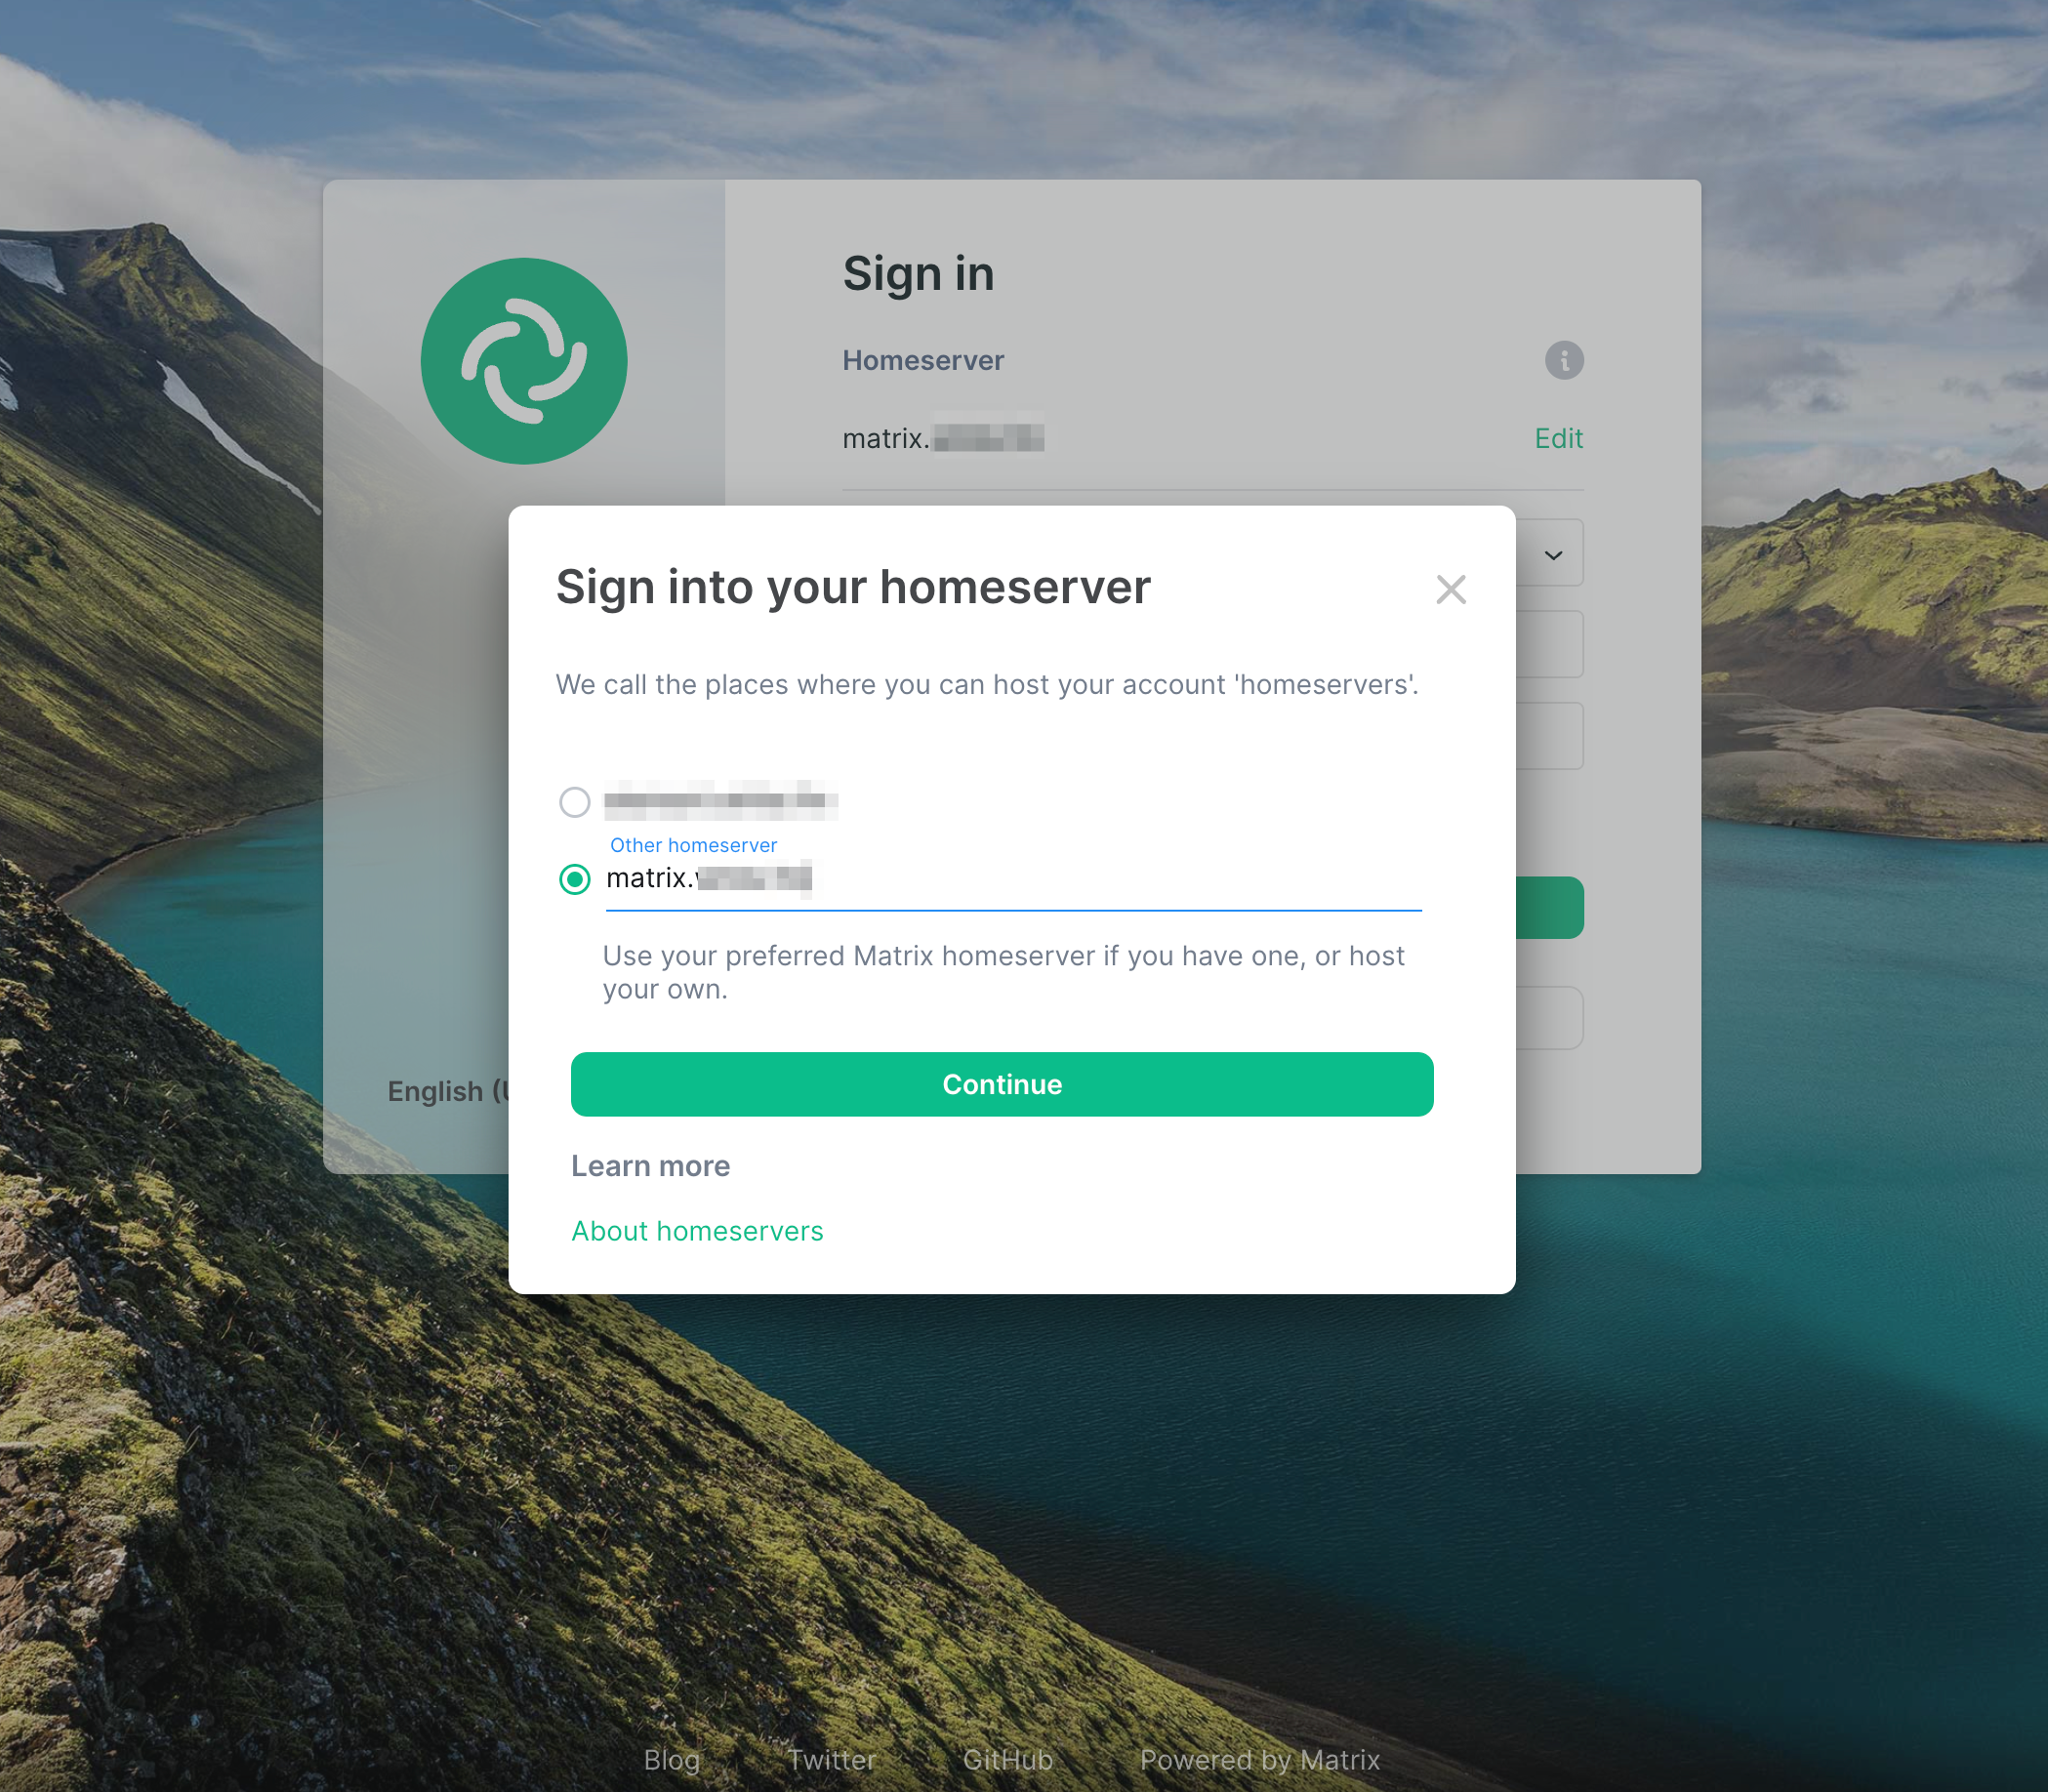
If all went according to plan, at this point, you should be able to access element.yourdomain.tld. Go there, and click Edit next to the auto-populated server name.
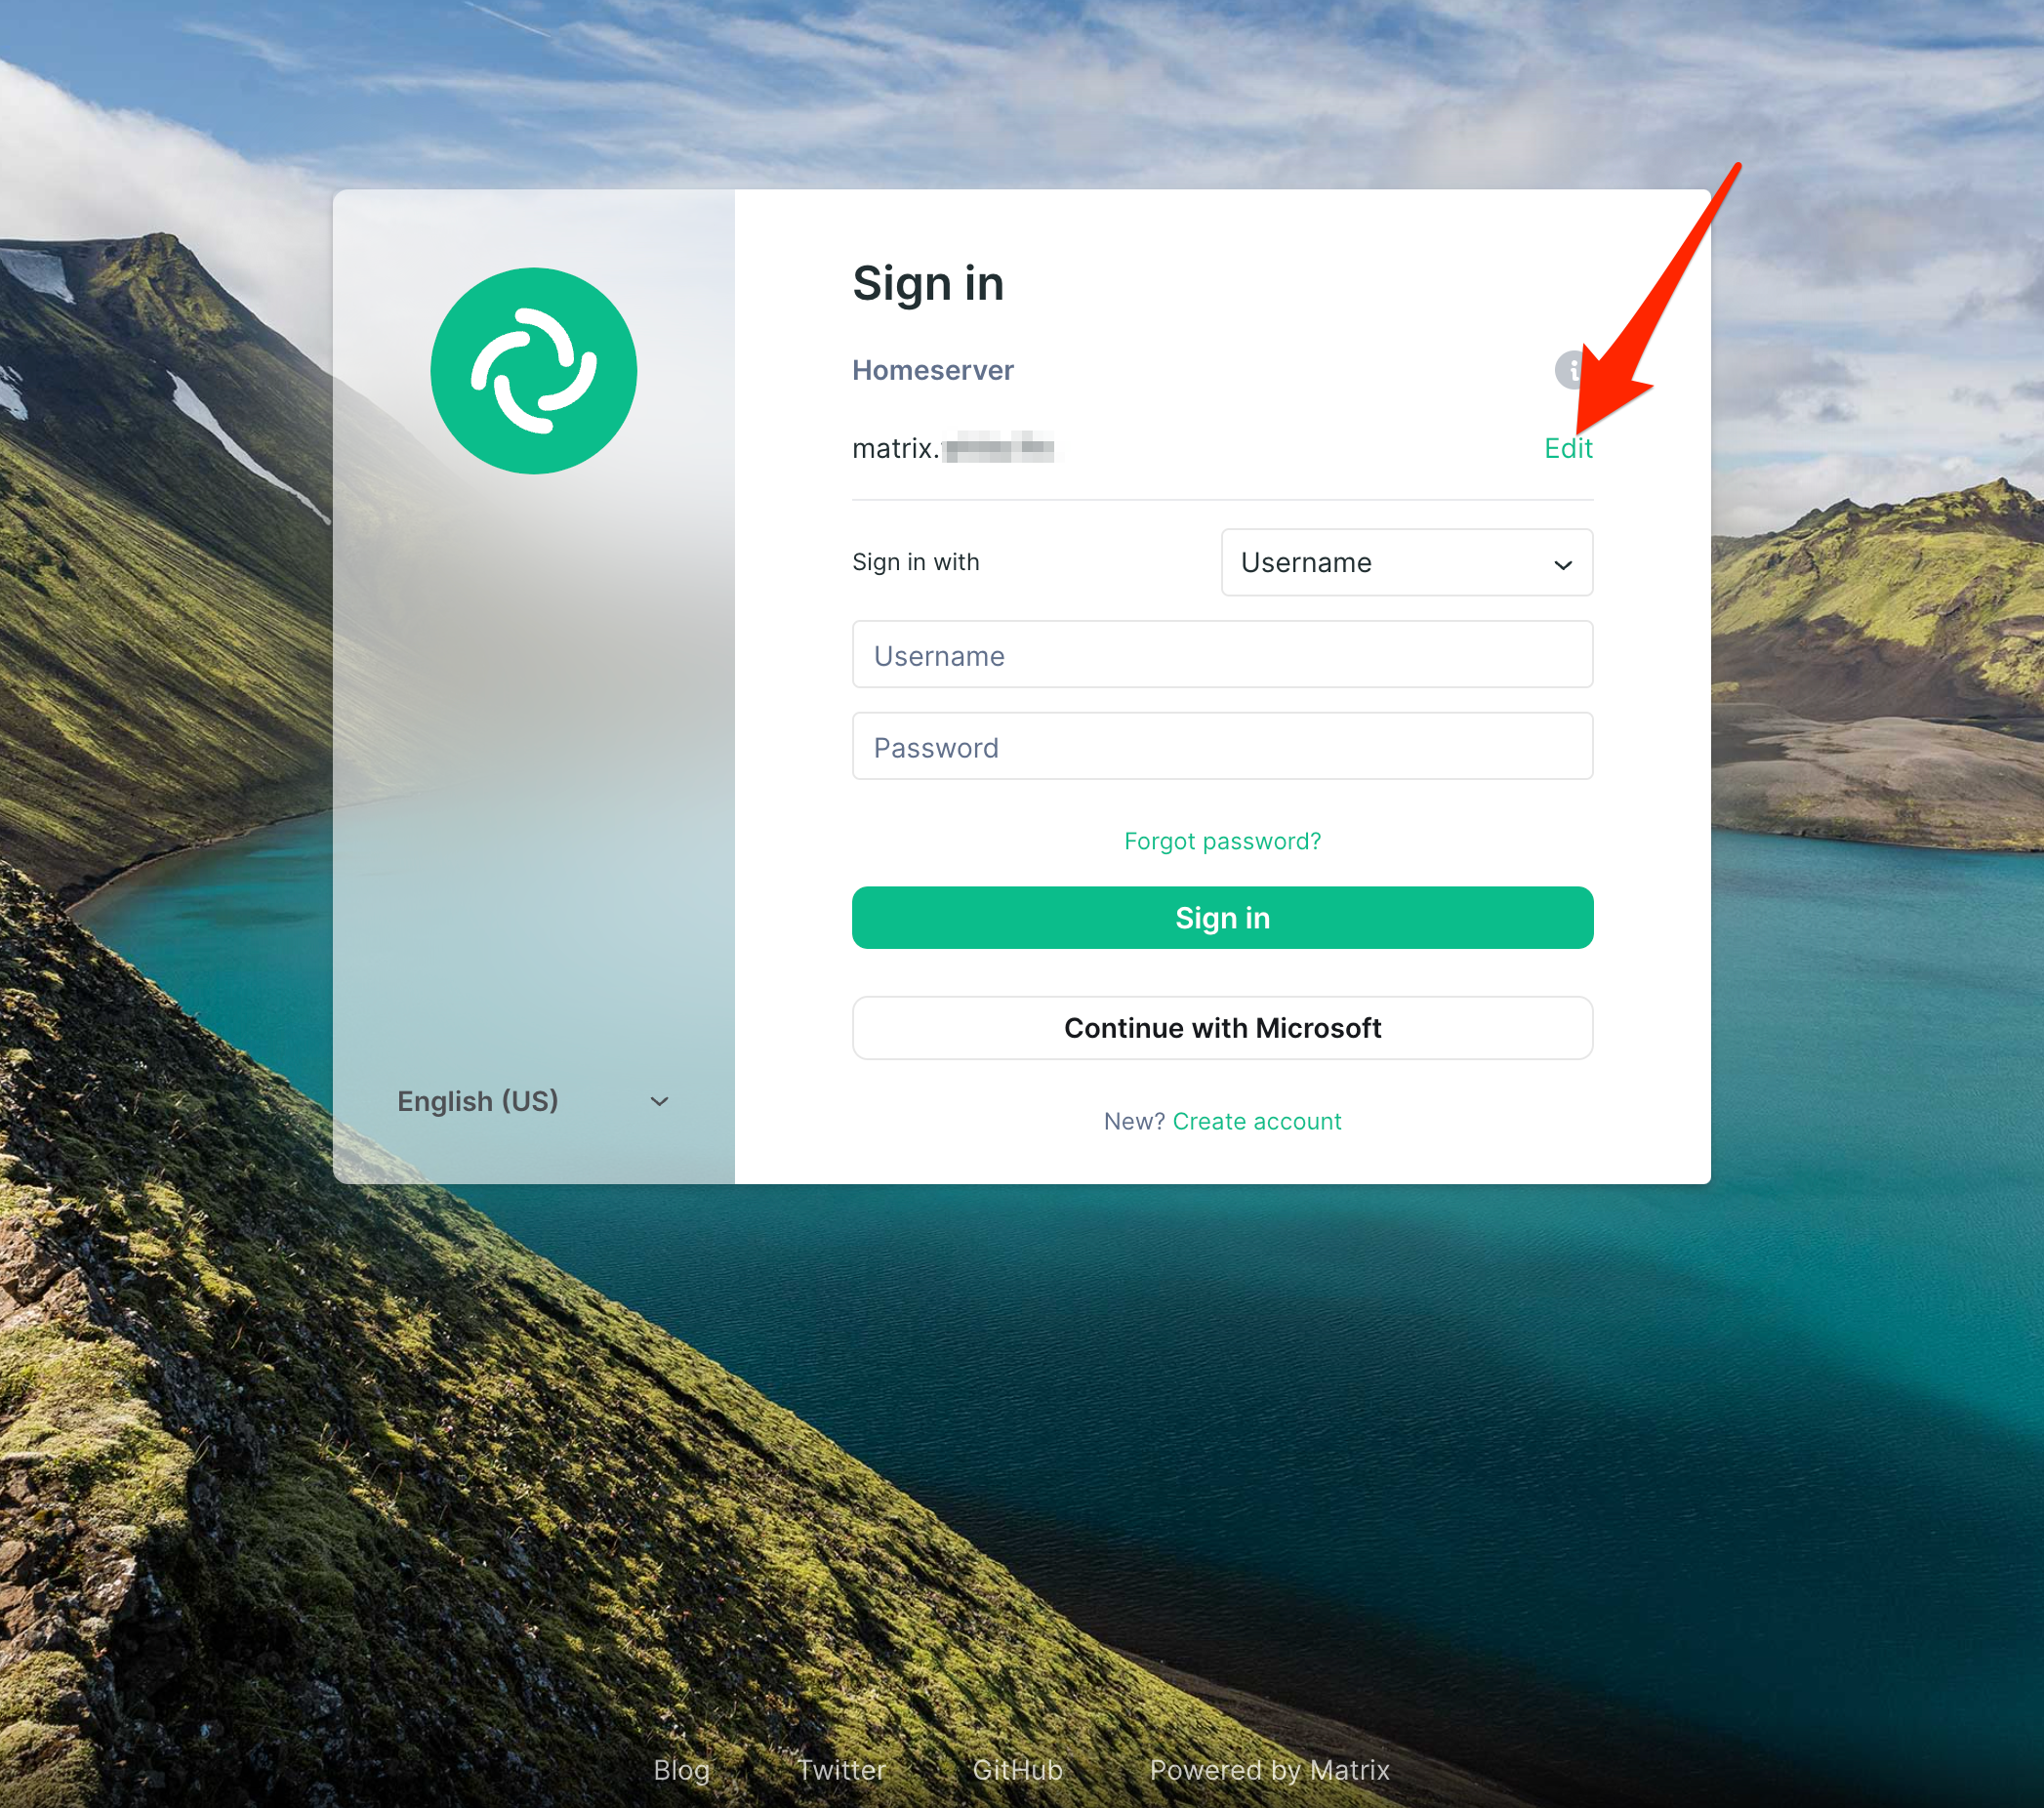
Next, input matrix.yourdomain.tld and click Continue.
At this point, you should be able to click Sign in and use the admin user and password you defined in the docker-compose.yml file and /synapse-secrets/matrix_admin_pass.txt. The user is defined on Line 23 and defaults to admin. Locate your password from /synapse-secrets/matrix_admin_pass.txt and login with those credentials.
If everything went according to plan, again, you should be successfully logged in to Element and interfacing with your Matrix Server!
Wrapping Up
Clearly, there are a lot of moving parts with this tutorial. Hosting your own Matrix Server is no small feat, and the possibilities are endless with what you can do.
If you followed my instructions to use CloudFlare and the tunnel/worker combo, you should be federated and able to access other external Matrix Servers (e.g., join channels).
I use the webhooks and Maubot containers to send encrypted notifications from other applications or hosts in my homelab or on my network. For example, I have Unifi sending emails to an SMTP server that converts the mail to an HTTP POST command in order to invoke the webhook and notify an encrypted channel on my Matrix Server. You can find many details about each of the respective containers. If you have any specific questions, please start a discussion on GitHub about it.
I also have a public channel specific to this blog. Feel free to join and start a conversation or ask more questions about this post or any other!
As always, if you have any questions or want to contribute to the above information, feel free to start a Discussion on GitHub, submit a GitHub PR to recommend changes/fixes in the article, or reach out to me directly at [email protected]. Finally, in light of this particular post, feel free to join my Matrix channel for WhiteMatterTech and chat with me there.
Thanks for reading!
Robert